

The KVM version of the Barracuda SecureEdge VTx is available as a pre-built image for your KVM hypervisor.
Before deploying the Barracuda SecureEdge VTx unit, verify that the host system meets the minimum storage requirements and review the resource recommendations for the production system.
Before You Begin
- For information on the sizing of your CPU, disk, and RAM, see Virtual Systems (VTx) Deployment.
- Download and install a VNC viewer.
- Configure the virtual network on the KVM host server. Port 4 of your virtual machine must be connected to the Internet using DHCP
- Download the KVM image for the Barracuda SecureEdge VTx from the Barracuda Download Portal.
- If the Internet connection of the virtual appliance is secured by a firewall, verify that SSL Inspection is disabled between the Barracuda SecureEdge appliance and the Internet.
Step 1. Import and Start the Barracuda SecureEdge VTx VM
Execute the install script to deploy the image and use virsh to define and start the virtual machine.
Log into the KVM host server with root permissions.
Copy the Barracuda SecureEdge VTx KVM install file KVM host server (e.g., install.GWAY-8.1.1-0097-VTxxx.kvm.sh).
Make the file executable.
chmod +x install.GWAY-8.1.1-0097-VTxxx.kvm.shStart the install script.
./install.GWAY-8.1.1-0097-VTxxx.kvm.sh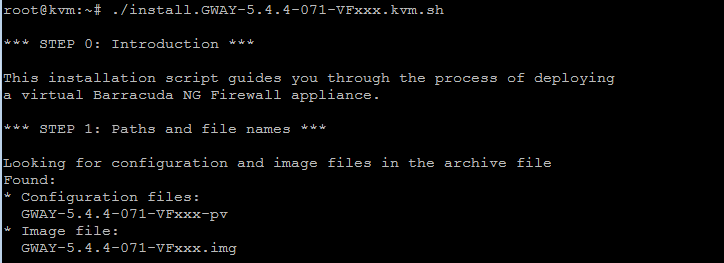
- (optional) Enter the name and path you want the image file deployed to. Press Enter to use the default value.

- (optional) Enter the path for the configuration file. Press Enter to use the default value.

- Choose non-sparse deployment for production deployments, sparse for testing purposes.

- Enter the domain name for the deployment. Press Enter to accept the default value suggested.

Enter the MAC for virtual network interface. Press Enter to accept the default value suggested.

- (optional) Depending on the network configuration of your KVM host, you must adapt the network settings in the XML configuration file. Per default, the configuration file is stored in /etc/libvirt/qemu.
- Port 4 of your virtual machine must be connected to the Internet using DHCP
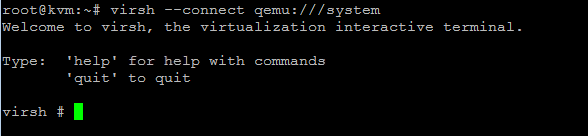
- Connect to the virtual console.
virsh --connect qemu:///system
Import the configuration file.
define /etc/libvirt/qemu/GWAY-8.1.1-0097-VTxxx-pv
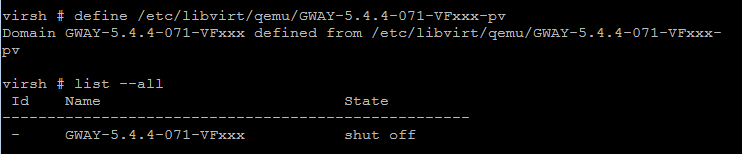
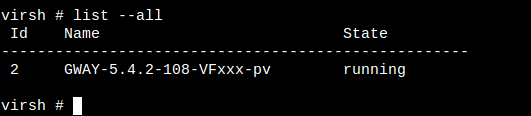
Start the virtual machine.
start GWAY-8.1.1-0097-VTxxx-pv

The virtual Barracuda SecureEdge VTx is now running on the KVM hypervisor.
Step 2. Enter the License Token
Connect to the console of the VM to enter the license token.
- Use a VNC client to connect to the IP address of the KVM host server. A console appears and displays the screen output of the Barracuda SecureEdge VTx that is running on the KVM server. For a basic configuration, the Active Recovery Technology (ART) menu launches.

- Select SecureEdge with the arrow keys and press Enter.
- Enter the license token:
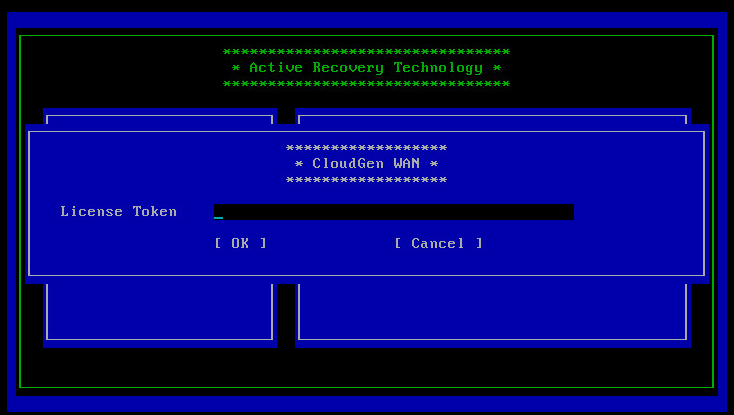
- Select OK with the arrow keys and press Enter.
- The appliance connects to the SecureEdge service and applies the configuration set in How to Create a T/VT Site Configuration in Barracuda SecureEdge.