The Intrusion Prevention System (IPS) actively monitors local and forwarding traffic for malicious activities and can also block suspicious traffic. The IPS engine analyzes network traffic and continuously compares the bitstream with its internal signatures database for malicious code patterns.

IPS Features
TCP Stream Reassembly
The SecureEdge engine provides support for TCP Stream Reassembly (SRA). In general, TCP streams are broken down into TCP segments that are encapsulated in IP packets. By manipulating how a TCP stream is segmented, it is possible to evade detection, for example, by overwriting a portion of a previous segment within a stream with new data in a subsequent segment. This method allows hackers to hide or obfuscate the network attack. The SecureEdge engine receives the segments in a TCP conversation, buffers them, and reassembles the segments into a correct stream, for example, by checking for segment overlaps, interleaved duplicate segments, invalid TCP checksums, and so forth. Afterwards, the SecureEdge engine passes the reassembled stream to the IPS engine for inspection.
URL Obfuscation
The IPS engine provides various countermeasures to avert possible network attacks based on the following URL encoding techniques:
Escape encoding (% encoding)
Microsoft %u encoding
Path character transformations and expansions ( /./ , //, \ )
Premature URL ending
Long URL
Fake parameter
TAB separation
FTP Evasion
The IPS engine can avert FTP exploits where the attacker tries to evade the IPS by inserting additional spaces and Telnet control sequences in FTP commands.
TCP Split Handshake
The IPS engine provides an evasion countermeasure technique that can block the usage of TCP split-handshake attacks. Although the TCP split handshake is a legitimate way to start a TCP connection (RFC793), it can also be used by hackers to execute various network attacks by gaining access to the internal network by way of establishing a trusted IP connection, thus evading firewall and IPS policies.
Before You Begin
If you want to use the users or groups from user directories (such as Microsoft Entra ID, LDAP, Google Workspace, Okta, and Barracuda Cloud Control) in the policies, you must first connect your SecureEdge Identity Management in order to synchronize users and groups. For more information, see Identity Management.
If you want to select users or groups from user directories such as BCC-linked Microsoft Entra ID or the BCC-linked LDAP directory in the policies, you must first connect your directory with Barracuda Cloud Control in order to synchronize users and groups. For more information, see LDAP Active Directory and Microsoft Entra ID and How to Connect Microsoft Entra ID with Barracuda Cloud Control.
Settings
Select the Default Action
Go to https://se.barracudanetworks.com and log in with your existing Barracuda Cloud Control account.
Go to Security Policy.
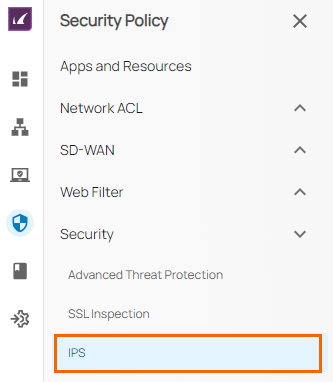
Expand the Security menu on the left and select IPS.

The IPS window opens. Select the Default Action.
Do Not Scan – IPS does not scan traffic matching the criteria.
Scan & Log – IPS only scans and logs the events.
Scan & Enforce – IPS is enforced.

Add a Rule
Go to https://se.barracudanetworks.com and log in with your existing Barracuda Cloud Control account.
Go to Security Policy.
Expand the Security menu on the left and select IPS.
The IPS window opens. To create a new rule, click Add Rule.

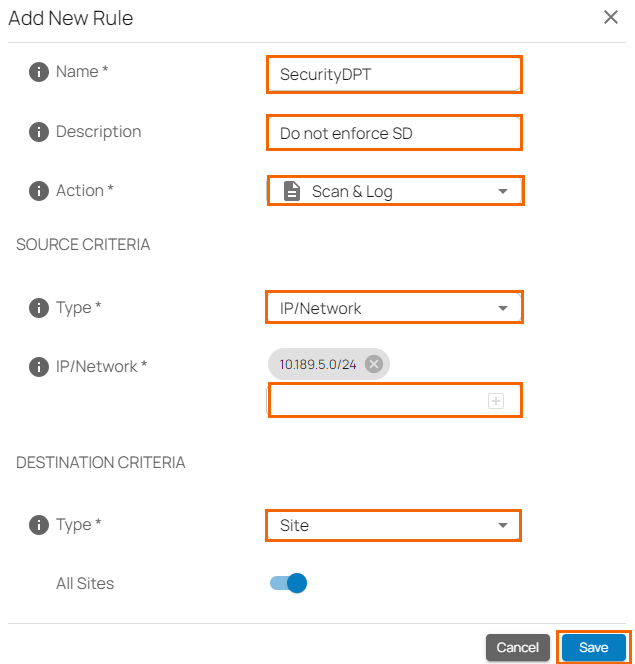
The Add New Rule window opens. Specify values for the following:
Name – Enter a unique name for a rule.
Description – Enter a brief description.
Action – Select an action:
Do Not Scan – IPS does not scan traffic matching the criteria.
Scan & Log – IPS only scans and logs the events.
Scan & Enforce – IPS is enforced.
In the SOURCE CRITERIA section, specify values for the following:
Type – Select a source type. You can choose between IP/Network, Site, and User/Group.
IP/Network – Enter an IP or network address, and click +.
In the DESTINATION CRITERIA section, specify values for the following:
Type – Select a destination type. You can choose between Application, Domain, IP/Network, and Site.
Application – Select an application. For more information, see How to Create Custom Applications.

Click Save.
Edit an Existing Rule
In the left menu, click Security Policy. Expand the Security menu on the left and select IPS.
The IPS window opens. Click on the pencil icon next to the rule you want to edit.

The Edit Rule window opens. Edit the value you are interested in.
Click Save.
Remove an Existing Rule
In the left menu, click Security Policy. Expand the Security menu on the left and select IPS.
The IPS window opens. Click on the trash can icon next to the rule you want to remove.

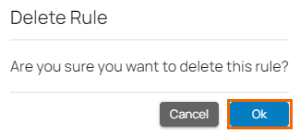
The Delete Rule window opens.

Click OK to confirm.
False Positives
In this section, you can configure the actions for false positives.
Add a Rule
Go to https://se.barracudanetworks.com and log in with your existing Barracuda Cloud Control account.
Go to Security Policy.
Expand the Security menu on the left and select IPS.
The IPS window opens. Click the False Positives tab.
To create a new rule, click Add Rule.

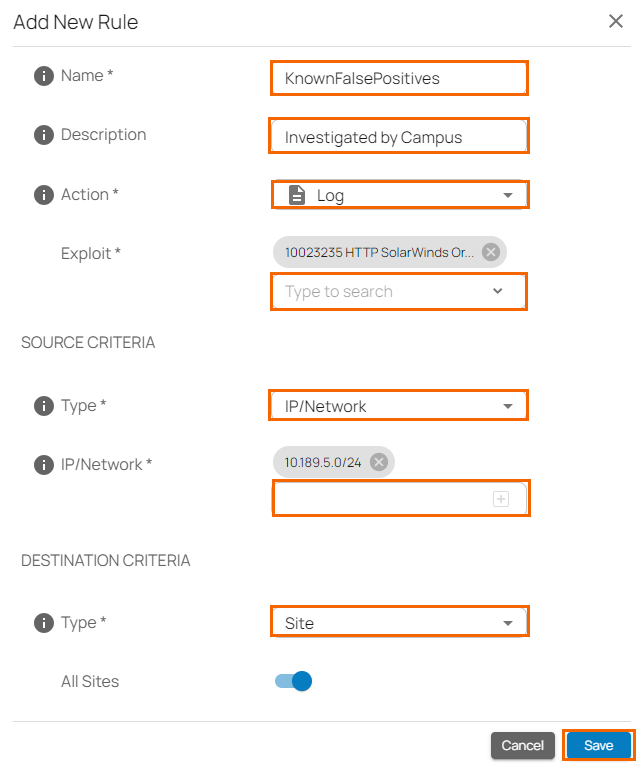
The Add New Rule window opens. Specify values for the following:
Name – Enter a unique name for a rule.
Description – Enter a brief description.
Action – Select an action:
Ignore – IPS ignores this exploit.
Log – IPS only scans and logs the events.
Enforce – IPS is enforced.
Exploit – Select an exploit from the drop-down list, or type to search.
In the SOURCE CRITERIA section, specify values for the following:
Type – Select a source type. You can choose between IP/Network and Site.
IP/Network – Enter an IP or network address, and click +.
In the DESTINATION CRITERIA section, specify values for the following:
Type – Select a type. You can choose between IP/Network and Site.
IP/Network – Enter an IP or network address, and click +.

Click Save.
Edit an Existing Rule
In the left menu, click Security Policy. Expand the Security menu on the left and select IPS.
The IPS window opens. Click the False Positives tab. Click on the pencil icon next to the rule you want to edit.

The Edit Rule window opens. Edit the value you are interested in.
Click Save.
Remove an Existing Rule
In the left menu, click Security Policy. Expand the Security menu on the left and select IPS.
The IPS window opens. Click the False Positives tab.
Click on the trash can icon next to the rule you want to remove.

The Delete Rule window opens.

Click OK to confirm.
