Barracuda SecureEdge allows administrators to define a number of policies that specify the access requirements associated with the various resources that the Barracuda SecureEdge Agent can connect to. As with SD-WAN and security policies, there is a zero trust access policy per workspace or tenant. The Barracuda SecureEdge Agent allows users or groups of users to connect to different resource types like custom apps or public endpoints such as SaaS services. The policies also define the security attributes, such as the security inspection and device posture of the device itself, that must be in place to grant access. A zero trust access policy defines the resources made available to end users of the Barracuda SecureEdge Agent and the associated access restrictions.

Before You Begin
If you want to use the users or groups from user directories (such as Microsoft Entra ID, LDAP, Google Workspace, Okta, and Barracuda Cloud Control) for SecureEdge Access, you must first connect your SecureEdge Identity Management in order to synchronize users and groups. For more information, see Identity Management.
If you want to select users or groups from user directories such as BCC-linked Microsoft Entra ID or the BCC-linked LDAP directory in the zero trust access policies, you must first connect your directory with Barracuda Cloud Control in order to synchronize users and groups. For more information, see LDAP Active Directory and Microsoft Entra ID and How to Connect Microsoft Entra ID with Barracuda Cloud Control.
Create a Zero Trust Access Policy
Go to https://se.barracudanetworks.com and log in with your existing Barracuda Cloud Control account.
In the left menu, click the Tenants/Workspaces icon and select the workspace you want to configure a zero trust access policy for.
In the left menu, go to Security Policy > Access and click Zero Trust Access.
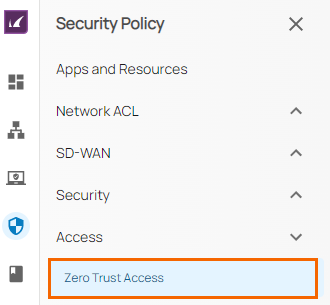
The Zero Trust Access page opens. To create a new zero trust access policy, click Add policy.

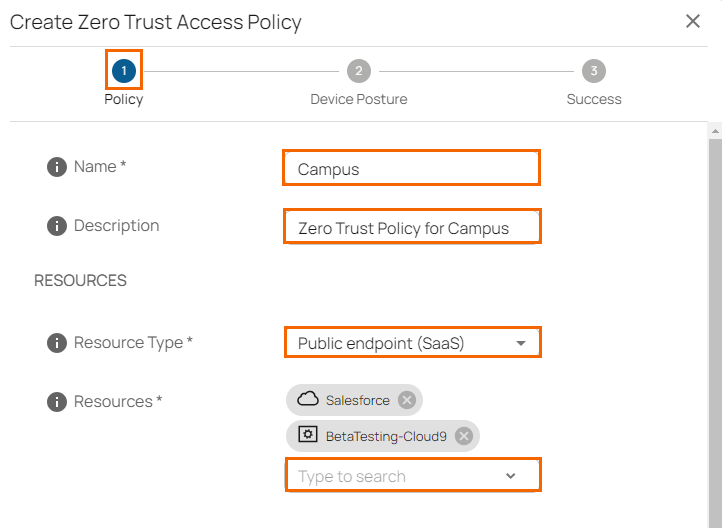
The Create Zero Trust Access Policy window opens. In the Policy tab, specify values for the following:
Name – Enter a unique name for the policy.
Description – Enter a brief description.
In the RESOURCES section, specify values for the following:
Resources Type – Select a resource type. You can choose between Internal resources (custom apps) and Public endpoint (SaaS). Note: Select either Internal resources for resources that are accessible internally via a point of entry or Public endpoints for publicly accessible resources.
If you select the Internal resources (custom apps), the Security Inspection field is disabled by default.
If you select the Public Endpoint (SaaS), the Security Inspection field is optional.
Resources – Select a resource from the drop-down list, or type to search.
In the ACCESS CRITERIA section, specify values for the following:
Users – Select a user from the drop-down list, or type to search. Note: if no users are selected, the selected apps are accessible to all.
Groups – Select a group from the drop-down list, or type to search. Note: if no groups are selected, the the selected apps are accessible to all.
Device Posture – Select a device posture from the drop-down list. You can choose between the following:
Enforce Compliance – Device attributes are evaluated and matched to the security compliance requirements defined in the Device Posture tab (Step 2) of the Zero Trust Access Policy. If the defined device attributes match, the user can access the resources. Otherwise, the user cannot access the resources.
Log Violations – Device attributes are evaluated and matched to the security compliance requirements defined in the Device Posture tab (Step 2) of the Zero Trust Access Policy. If the defined device attributes fail, the user can access the resource. However, there is a log entry showing this violation.
Disable – If you select Disable, the Device Posture tab (Step 2) is disabled in the Zero Trust Access Policy.
Security Inspection – Click to enable/disable.
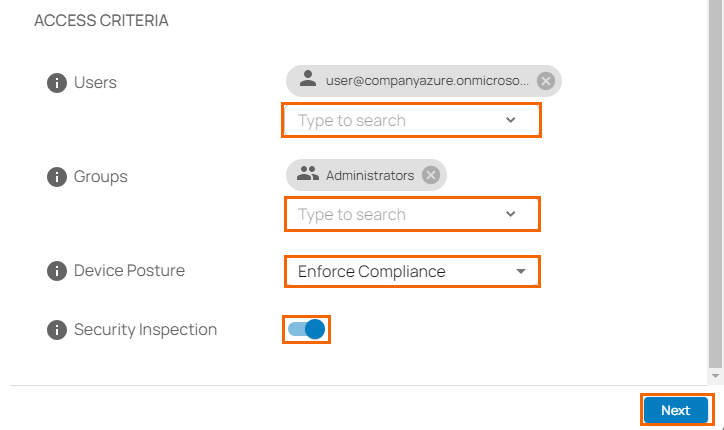
Click Next.
In the Device Posture tab, specify values for the following:
Screen lock enabled – Click to enable/disable. Supported platforms: Android and iOS.
Firewall enabled – Click to enable/disable. Supported platforms: MacOS and Windows.
Antivirus enabled – Click to enable/disable. Supported platform: Windows.
Block jailbroken devices – Click to enable/disable. Supported platforms: Android and iOS.
Enforce disk encryption – Click to enable/disable. Supported platforms: Android, Windows, MacOS, and iOS.
Barracuda SecureEdge Agent updates – Click to enable/disable. When enabled, specify Minimum Version of the Barracuda SecureEdge Agent. Supported platforms: Android, Windows, MacOS, Linux, and iOS.
OS updates – Click to enable/disable. Click + to add more than one OS platform. When enabled, specify values for the following:
Platform – You can select from the drop-down list. You can choose among the following platforms: Android, Windows, MacOS, and iOS.
Minimum Version – Specify the minimum version of the operating system.
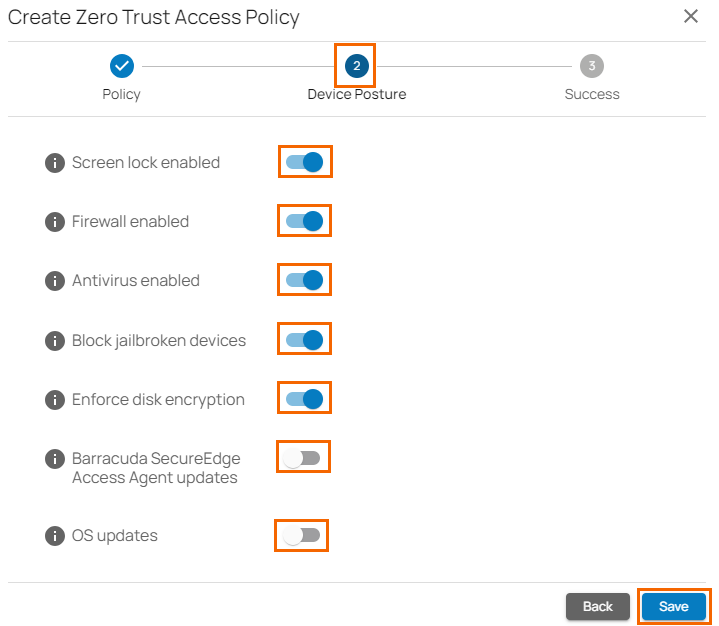
Click Save.
In the Create Zero Trust Access Policy window, verify the status of newly created zero trust access policy.
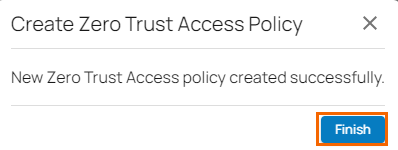
Click Finish.
After the configuration is completed, your zero trust access policy is created. On the Zero Trust Access page, you can see the new zero trust access policy.

Edit an Existing Zero Trust Access Policy
Expand the Access menu on the left and select Zero Trust Access. The Zero Trust Access window opens.
Click on the pencil icon next to the policy you want to edit.

The Edit Zero Trust Access Policy window opens. Edit the value you are interested in.
Click Save.
Remove an Existing Zero Trust Access Policy
Expand the Access menu on the left and select Zero Trust Access. The Zero Trust Access window opens.
Click on the trash can icon next to the policy you want to remove.

The Delete Zero Trust Access Policy < Name of Your Zero Trust Access Policy> window opens.

Click Ok to confirm.
Additional Information
Reporting
You can create reports and notifications using Azure Log Analytics Workspace. Your Barracuda SecureEdge service must be connected to Azure Log Analytics Workspace via Azure Monitor Agent. The Azure Monitor Agent is used to stream logs to a Microsoft Log Analytics workspace. Azure Monitor Agent is supported on SecureEdge appliances such as Sites and Private Edge Services.
For more Information, see:
