

Barracuda CloudGen Firewall F1000B allows administrators to stream logs and statistics to a direct-attached SSD in order to increase log file storage on the hardware unit. To enable the writing of log files to the SSD, configure Firewall Admin to use the additional SSD as log destination and shut down the firewall unit. Then, insert the SSD and reboot the device.
By default, log files are stored in the system directory /var/phion/logs. Statistics are stored in /var/phion/stat. After the additional SSD is plugged in and enabled, the firewall extends the log paths, and logs and statistics are written directly to the SSD. Log files written to the SSD can be viewed and filtered with the Firewall Admin Log Viewer. For information on how to view and filter log file entries, see the LOGS tab. For information on how to access statistics, see the STATISTICS tab.
Configure Log Streaming to the Additional SSD
Before plugging the additional SSD into your CloudGen Firewall, configure Firewall Admin to direct the log path to the SSD. Then, shut down the firewall and insert the SSD.
Requirements
- Streaming logs and statistics to an additional SSD requires firmware version 9.0.1.
Step 1. Configure the CloudGen Firewall to Use the Additional SSD
- Go to CONFIGURATION > Configuration Tree > Box > Advanced Configuration > Log Cycling.
- Click Lock.
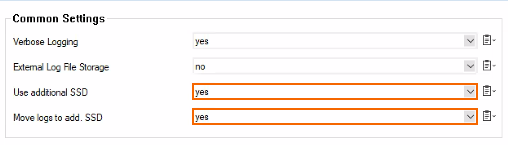
- From the Use additional SSD list, select yes.
- From the Move logs to additional SSD list, select yes.
- Click Send Changes and Activate.
Step 2. Shut Down the Firewall
- For the configuration to mount the paths correctly, you must shut down the Barracuda CloudGen Firewall. You can then insert the additional SSD.
Step 3. Insert the Additional SSD
- Insert the additional SSD into the slot provided for this purpose. It is located at the top left on the front.
- Restart the Barracuda CloudGen Firewall.
Your logs and statistics are now written directly to the additional SSD.
Removing or Replacing the Additional SSD
To remove the additional SSD from your hardware unit, e.g., for replacement, you must deactivate the usage in Firewall Admin before unplugging the SSD.
- Go to CONFIGURATION > Configuration Tree > Box > Advanced Configuration > Log Cycling.
- Click Lock.
- From the Use additional SSD list, select no.
From the Move logs to additional SSD list, select yes or no.
- Shut down the CloudGen Firewall.
- Unplug the additional SSD.