

After you have registered with Azure and installed the service module, you need to:
- define which groups/devices the service module will apply to
- enter Microsoft Office 365 credentials for each site that uses the service module
To define the groups and devices the service module can be applied to
The service module must be applied to groups or devices in a site before you can configure the service module. To do this, you can add the service module to a service. For more information, see Adding Service Modules to Services in the User Guide or online help.
A monitoring policy is a collection of monitors and associated alert rules for a specific application or hardware device.
In this procedure, you define which groups and devices will use the service module.
- In Service Center, with the Microsoft Office 365 2.0 Service Module installed, click Configuration > Service Modules.
- Click Microsoft Office 365 2.0.
- In Policies, click Office 365 Policy Module for Service Module.
- Do any of the following:
- Click the Automatic Application tab. Then click Add and define an auto-application rule.
- Click the Manual Application tab. In the Applied Groups area, click Add. Optionally, select an option in the Group Type to filter the list. Select the check boxes of the groups the service module will apply to, and click OK.
- Click the Manual Application tab. In the Applied Device area, click Add. Optionally, select options to filter the list and click Filter. Select the check boxes of the groups the service module will apply to, and click OK.
To configure a Microsoft Office 365 Site
On the Configuration page, enter the relevant Office 365 account information for each site.
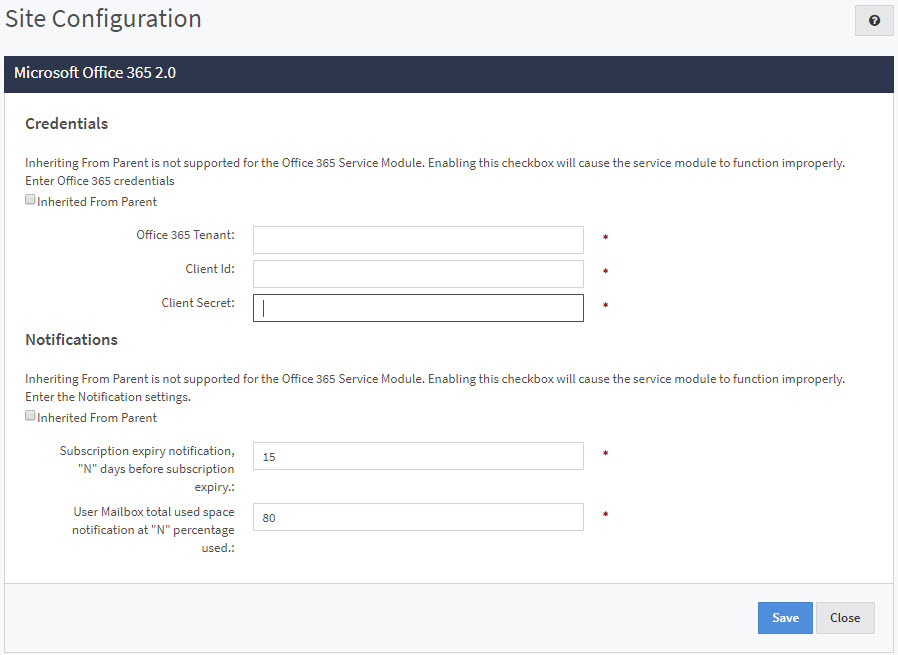
In the Credentials section, enter the credentials of the Office 365 subscription.
The Notifications section configures when alerts are created. The number in the Subscription expiry notification, "N" days before subscription expiry box is the number of days until subscription expiry to create an alert. The default is 15, which means that alerts will be created 15 days before the Office 365 subscription expires.
The number in the User Mailbox total used space notification at "N" percentage used box is the mailbox limit warning. If a mailbox approaches the specified percentage of its allocated space, an alert is generated. The default value is 80%.
- In Service Center, click Status > Service Modules.
- Do one of the following:
- Click the Microsoft Office 365 2.0 link.
- Under Management, on the right side, click Microsoft Office 365 2.0.
- In the Sites area, click a site link.
Click the gear icon
 .
.- Type your Office 365 Tenant name.
- Type your Client Id.
- Type your Client Secret.
- Type a number of days in the Subscription expiry notification, "N" days before subscription expiry box.
- Type a percentage in the User Mailbox total used space notification at "N" percentage used box.
- Click Save.