

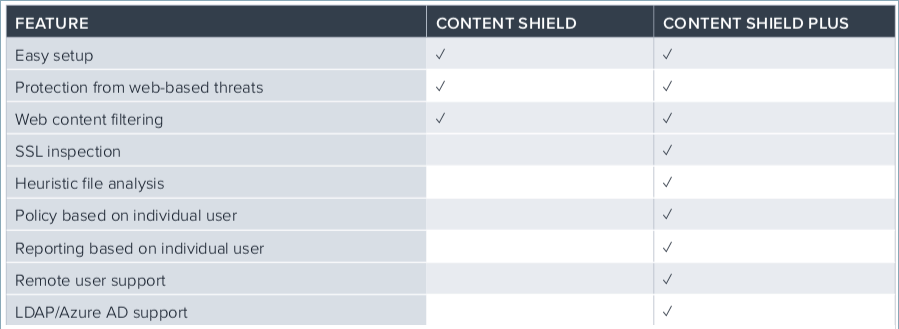
Barracuda Content Shield (BCS) agent delivers a powerful web content filtering solution. Both multi-tenant (for MSPs) and single-tenant (for non-MSPs) versions are available with either a BCS or BCS Plus subscription. Features available with each subscription type are compared in the table below. This article guides you through a thorough evaluation of the service.
When you are ready to convert your 30 day trial to a valid licensed subscription, see Converting Your Trial Subscription to a Valid License.
In this article you'll find initial steps for getting started with DNS filtering, creating basic policies, testing the BCS agent on endpoints (if you have a BCS Plus subscription), and optional synchronization of your LDAP/AD with BCS. If you have a BCS Plus subscription, you can also take advantage of Advanced Filtering Policies using agent-based filtering on user endpoints.
Important: To ensure that your policies apply to logged in users, verify requirements for Barracuda Cloud Control (BCC) authorization to work with BCS in order to be able to verify the user logging in. See Optionally Synchronize Your LDAP or Microsoft Entra ID Connection below.
After you sign up for a free trial at https://www.bcs.barracudanetworks.com/trial, you have 30 days use of a fully featured BCS Plus subscription. After creating your account for the free trial, you can log in at https://www.bcs.barracudanetworks.com/login.
To set the time zone for your BCS instance (note that this setting also applies to ALL of your Barracuda Cloud products), see How to Set the Time Zone.
Step 1. Configure BCS DNS Based Filtering
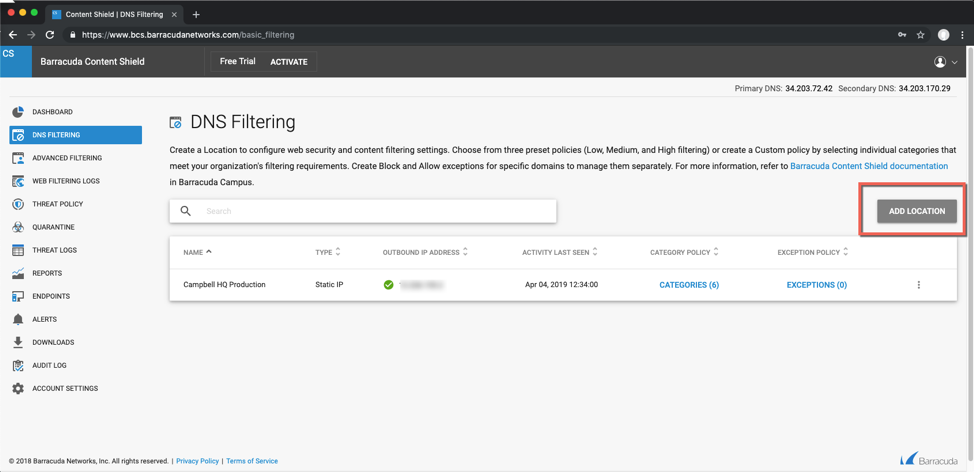
DNS filtering offers the ability to set a blanket policy for an entire network based on the network's egress IP address. DNS filtering introduces no latency to internet bound traffic, and can control any device type without installing an agent or having administrative control of the device. The BCS service will not respond to DNS requests from unregistered networks, so the first step is to register your egress IP address with BCS. If you are unsure of your egress IP address, you can use a site like whatismyip.com to determine what it is.
Navigate to the DNS filtering page using the left navigation menu and select ADD LOCATION. Follow steps in the wizard to complete adding the location.
The first step is to configure the IP address, either automatically or manually, in the Getting Started popup:
- Use the Manual setting if your ISP provides a static IP address that does not change. Click Start, and follow the prompts in the wizard.
- Use the Automatic setting if your ISP provides a dynamic IP address. Click Start, and follow the prompts in the wizard. In this case, you must install the Dynamic IP updater on a single machine that permanently resides within the environment. This allows the BCS service to be updated automatically when your IP address changes. The final step of the wizard provides links to download the Dynamic IP updater and installer key.
See How to Configure DNS Filtering and Policies for details.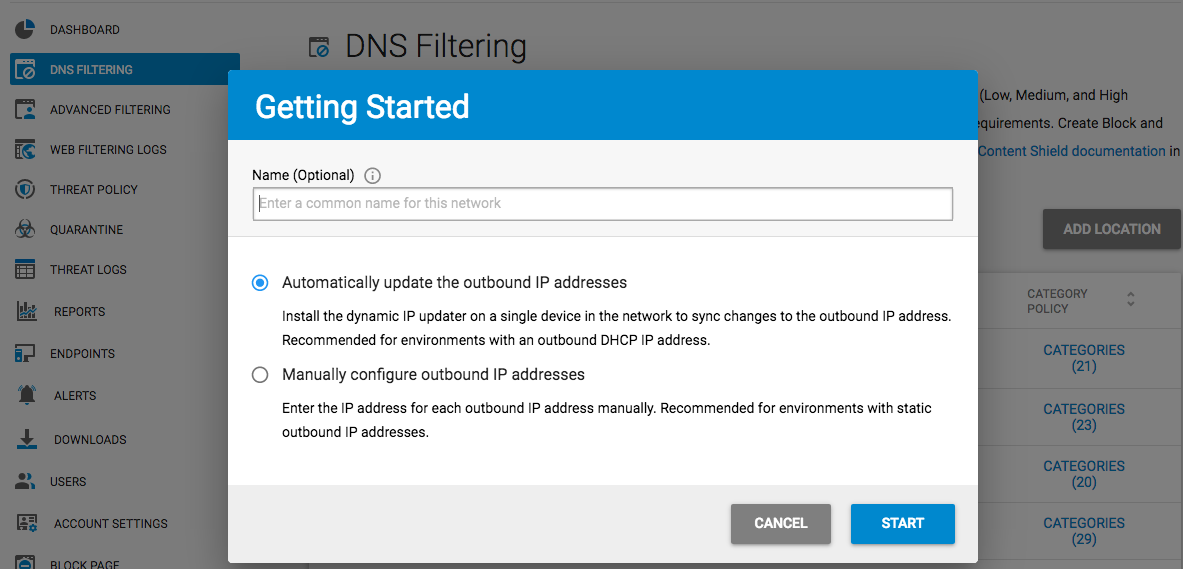
Step 2. Create a Filtering Policy
- In the Add Location screen of the wizard, select one of the preset category policies, or modify one to create a custom policy that meets your requirements. See How to Configure DNS Filtering and Policies for details.
TIP: If you create a custom policy, it is saved in the list of category policies which can be used later if you add additional locations. This allows you to easily duplicate the same policy across your locations in the future, and there is no limit on the number of locations you can add in one BCS account.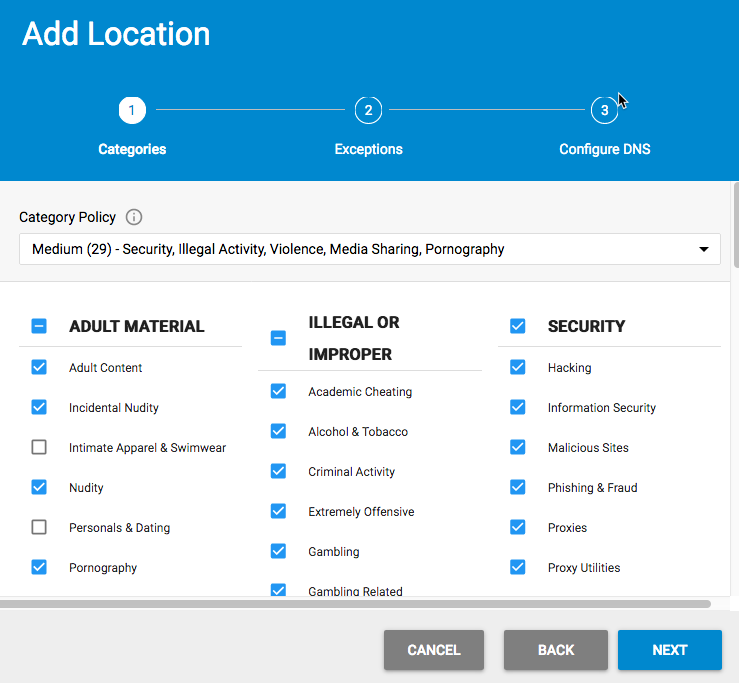
- When you click Next, you have the opportunity to create any block or allow exceptions to your category policy. These can be made in the form of domains (ex: google.com) or subdomains (ex: mail.google.com) There is no need to specify protocols like HTTP or leading with www. Exceptions take precedence over category policies and can be set to block or allow.
- The final step shows the DNS servers that you will provide to all of the clients on the network being filtered. Barracuda Networks recommends initially setting these DNS servers manually on the systems you are going to test policy with. After you are satisfied with your policy, these DNS servers can be added to your DHCP server, which can then pass out the Barracuda DNS IP address to clients connecting to your network. Alternatively, if you have your own internal DNS server, you can set that up as a conditional forwarder. This allows your DNS server to resolve any internal resources and forward any requests to the BCS service for external resources and filtering based on your set policy. See How to Configure a Local DNS Server to Forward to Barracuda DNS Nameservers for details.
Note that you can create network exemptions, and you can specify top level domains, like barracuda.com, or *.barracuda.com, for example. So you have the option to block all subdomains with *.barracuda.com and top level domains when necessary. See Exemption Policies for details.
Step 3. Evaluate Agent-Based Protection at the Endpoint
The BCS agent can be installed on endpoint computers to enable the BCS Plus features. The Web Filtering Component (WFC) controls web traffic and, if an agent is used inside a network that also has a DNS filtering policy, the agent policy takes precedence over the DNS network-based policy. The agent allows for a more granular policy, supporting user- and group-level rules in addition to the global 'Everyone' rule set. You can download the BCS agent from the DOWNLOADS page and install it on the endpoints of Windows and macOS machines.
- For Windows: See How to Manage Deployment of the Barracuda Content Shield Agent for Windows.
- For macOS: See How to Download and Install the Barracuda Content Shield Agent for macOS.
For Chromebooks, see How to Get and Configure Barracuda Chromebook Security for BCS.
Agent-based web filtering
The BCS web filtering component is an agent that uses a proxy-free architecture, so user traffic is not handled by the service directly. Rather, the agent identifies the user who is logged in, checks with the BCS service for which policy should be applied for that user and/or groups the user belongs to, and then caches the policy locally. The agent enforces the policies you configure on the Advanced Filtering page and uploads log files periodically to the service. The agent also checks periodically for updates to the policy settings. After installing the agent and defining the policy, test the policy. Keep in mind that when making policy changes, it can take up to 15 minutes to synchronize policies with the agent on the endpoint.
Optionally Synchronize your LDAP or Microsoft Entra ID Connection
Important: When setting up the BCS agent with an authentication method, make sure that the email attribute for an Active Directory user is filled in with an FQDN that the user will use to log in, and then sync with your Active Directory.
If you want to create user-based or group-based filtering policies, you can synchronize your users and groups with the service for web filtering by first configuring an LDAP or Microsoft Entra ID connection in Barracuda Cloud Control (BCC). See LDAP Active Directory and Barracuda Content Shield for details (if you already have a BCS account, you can log into BCC with your BCS credentials). Without a directory service, only the Everyone (default) policy will be applied to endpoints with the agent installed. BCS has a local user database which can be used in place of a directory service (see Manually Configure Local Users).
After the directory service is configured, verified, and synchronized, you will be able to select from a list of users and groups for whom to create policy. When the agent is installed on a domain–joined computer and a domain user logs into the computer, that username is matched with the user in the directory. Note that t he username MUST match the domain and the user's AD email attribute in order to completely match. If not, that user will only get the Everone policy. If a policy is defined for that user or a group they belong to, then that policy is synchronized to the agent. If no specific policy is defined for that user, or for a group they belong to, then only the Everyone policy will be synchronized and applied locally.