

Configure archive search criteria before running a search.
Run an Archive Search
- Log in to the ArchiveOne Admin Console, and click Archive Searches.
- Right-click the search you want to run, and then click Run.
Enter a comment about the search you are running.
- Once the search is complete, the Search Results dialog box displays:
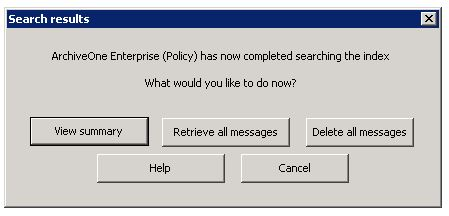
- Select from the available actions:
- View Summary – Click to view a summary of the results; click OK to close the results.
- Retrieve all messages – Click to retrieve the results without viewing messages.
- Delete all messages (not recommended) – Click to delete the results without viewing messages.
- Close the dialog when you are done.
Perform an Action on Search Results
Once you run an archive search using the steps in the previous section, the results display in the right pane and you can take actions on messages.
- Select one or more messages to retrieve, right-click, and then click Retrieve Message.
- In the Search retrieval dialog box, select where you want the messages to go:

Turn on Re-create the original folder hierarchy to recreate the folder structure that held the message(s).
Select from the available options to specify where you want the retrieved messages to go:
Put results into a public folder with a name chosen by ArchiveOne Enterprise (Policy) Manager – Copies your item(s) into a new folder within the Retrieval Folder.
Put results into a named public folder – Copies your item(s) into a specific folder within the Retrieval Folder.
Put results into a PST – Copies your item(s) into a specific PST; if the PST is not present, it is created.
Put results into the original mailbox – Copies your item(s) into a specific folder in the original mailbox.
Put results into a named mailbox – Copies your item(s) into a specific folder in a specific mailbox.
Put the results into a named repository – Moves archived messages from one repository to another.
To apply serial numbers to the subject line of messages when they are printed, turn on Enable Bates Stamping , and then click Configure.
Click OK to start the retrieval process; a confirmation message displays when the process is complete.