Microsoft VSS is the default backup method for Microsoft SQL 2012 and above. This article applies to customers backing up Microsoft SQL 2012 and above databases using Microsoft VSS. With Microsoft VSS, Barracuda Backup performs full and differential database backups.
Use the following steps to restore a Microsoft SQL Server 2012 or higher database:
- Log in to the Barracuda Backup web interface or local UI, go to the Restore > Restore Browser page. Select and expand the SQL server data source in the left pane:

- Click Microsoft SQL in the Contents list, and select the Instance:

- Click the database to be restored to see the available revisions:

-
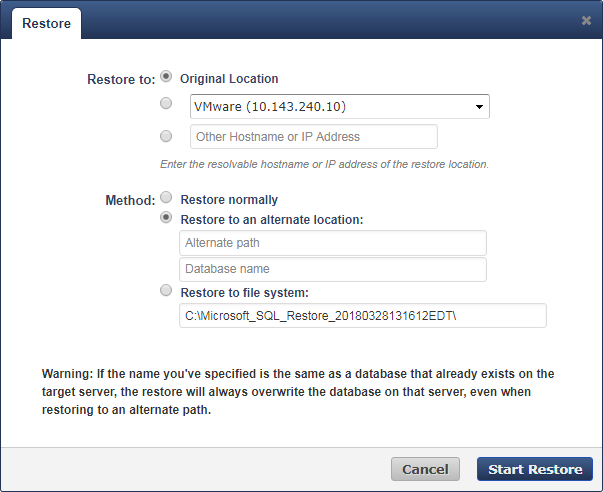
Click Restore to the right of the database to restore; the Restore dialog box displays:

Understanding the Restore Dialog Options
Restore to is the Destination Server for the restore location. Note that the restore location must be running the same version of SQL Server and the Barracuda Backup Agent must be installed on the location. There are three options to restore to:
-
Original Location is the original server where the backup came from
- From the drop-down menu, select a different server currently added as a Barracuda Backup data source
- In the restore field, enter the fully qualified domain name (FQDN) or IP address of a server currently on the network
Method is the restore method:
- Select Restore normally to restore to the original location, and write the .mdf and .ldf files back to that location.
- Select Restore to an alternate location to write the .mdf and .ldf files to a different file path that exists on the source server. Enter the Alternate path, for example, E:\restore, and the Database name in the associated fields. This option must be used if you select to change the database name.
Select Restore to file system to restore a full database to a file (.mdf/.ldf). Enter the restore file path in the associated field, or leave the default value, for example, C:\Microsoft_SQL_Restore_<date>.
Once you select the location and method, click Start Restore. Once the restore is complete, the Success dialog displays; click OK to close the dialog box.
Restore details are available on the Reports > Restore page:


