

There are three database recovery options in Barracuda Backup for Microsoft Exchange, designed to meet different recovery objectives. If you need to recover an entire database or multiple databases due to severe corruption or disaster recovery, you can restore the database(s) and overwrite an existing database or perform a restore when no existing databases are present. If selective or partial recovery is the objective, you can restore to a recovery database. Mounting the recovered data as a recovery database allows the Exchange administrator to restore individual mailboxes, and even individual items in a mailbox. The recovery database allows you to restore the backup of the original database side-by-side with the production database without overwriting or impacting the production database. The third option is to restore the database(s) as a flat file to the original or alternate Exchange Server. Restoring as a flat file allows you to manually import the database(s) into Exchange as opposed to restoring directly to Exchange.
Restore an Exchange Database to the Original or Alternate Location
In this option, all database and transaction log files will be recovered to the original or alternate location. If the original database is still present on the target server, the restore will overwrite all existing data. If you wish to keep the existing data and not overwrite, perform restoration to a recovery database.
To perform a successful Exchange recovery to the original or alternate location, ensure that the following prerequisites are met:
| Prerequisite | Explanation |
|---|---|
| Database name and file name must remain unchanged from the time the backup was performed. | The database name is the symbolic or displayable name of the database. For example, Mailbox Database or Mailbox1. The actual database file name, for example Mailbox1.edb, must also be unchanged since the backup was run. Note that the location of the database files and transaction log files may be changed after the backup has been performed, if needed. If the log files or database files must be moved to another volume or disk, the actual names of the database files must be preserved. |
| Databases must be dismounted. | Only the database being recovered must be dismounted. |
| Database must be in a Clean Shutdown state. | If the database is in a Dirty Shutdown state, you can recover the backup, but need to bring the database into a Clean Shutdown state to mount the database. After recovering, if you cannot mount the database, see the Microsoft article Exchange Database Is in a Dirty Shutdown State article to determine whether this is the problem. |
| Databases must be marked as overwrite allowed on restore. | All databases must have the overwrite allowed on restore flag set. This task can be performed using the Exchange server administrative console or the appropriate Exchange server command line utility. If this is not the case, the recovery fails. |
| Remove all existing database and transaction log files. | Barracuda Networks recommends that all database and transaction log files be removed from the recovery location. Recovering a full or incremental backup recovers the database to a specific point-in-time. To ensure that the database can be remounted without integrity errors, any existing database and transaction log files should be removed before performing the recovery. |
Use the following steps to restore an Exchange database to the original or alternate location:
- Verify that all prerequisites have been met, as described in the table above.
- Log into the Barracuda Backup interface and go to the Restore > Restore Browser page.
- Locate your Microsoft Exchange Server data source and navigate through to the Microsoft Exchange container:
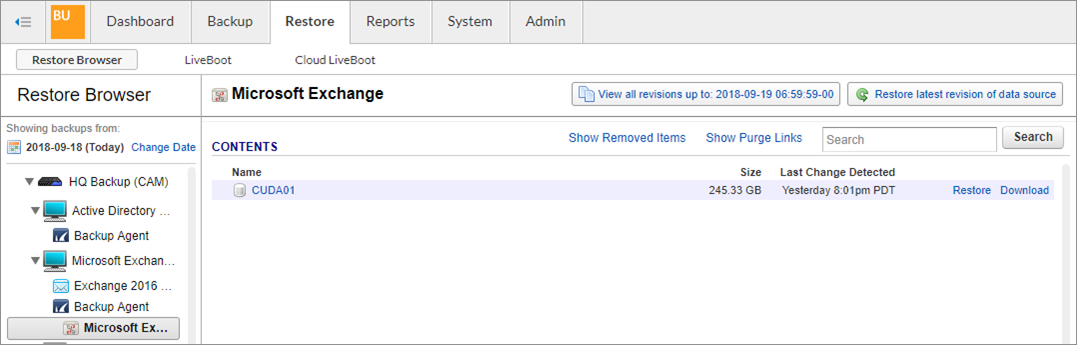
Click the Restore link next to the database you want to restore to restore the latest backup, or click the database to view a list of available revisions, and click Restore.
In the Restore dialog, select Original Location, or choose an alternate location in the Restore to section by selecting an existing data source from the drop-down menu or manually entering an IP address.
In the Method section, choose Restore normally:

Click Start Restore.
Go to the Reports > Restore page to monitor the progress of the restore job.
Once the restore job is finished, use the Exchange Management Shell or Exchange Admin Center to mount the database.
Exchange Database Flat File Recovery
Restoring as a flat file allows you to manually import the database(s) into Exchange as opposed to restoring directly to Exchange. This option can be useful if there are issues with VSS preventing the primary restore method from working or if you want to export a copy of the Exchange database files for archiving or future use. Flat file recovery still requires that Microsoft Exchange is present on the restore target since the Exchange VSS writers are used to perform the restore.
Use the following steps to restore an Exchange database as a flat file to the original or an alternate location:
- Log in to the Barracuda Backup interface and go to the Restore > Restore Browser page.
- Locate your Microsoft Exchange Server data source and navigate through to the Microsoft Exchange container:
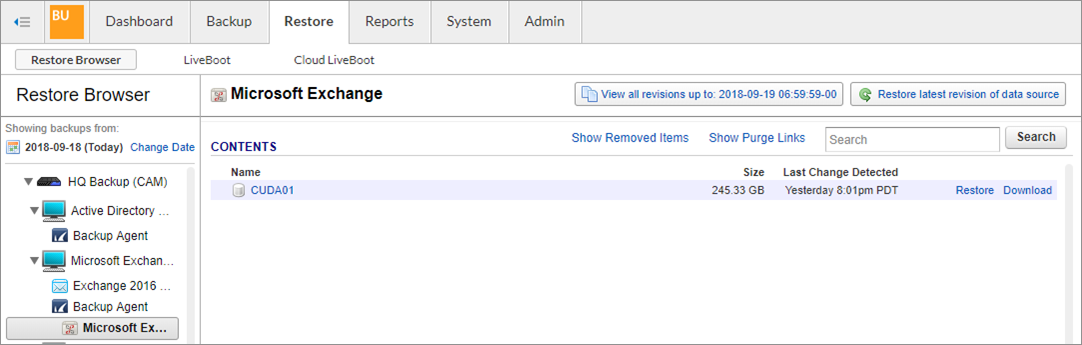
Click the Restore link next to the database you want to restore to, restore the latest backup, or click the database to view a list of available revisions, and click Restore.
In the Restore dialog, select Original Location, or choose an alternate location in the Restore to section by selecting an existing data source from the drop-down menu or manually entering an IP address.
In the Method section, choose Restore to file system, then specify a restore path:
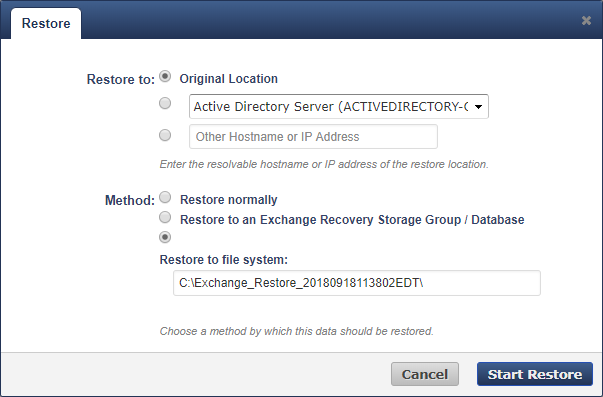
Click Start Restore.
Go to the Reports > Restore page to monitor the progress of the restore job.
Once the restore job has finished, use the Exchange Management Shell or Exchange Admin Center to import the database.
Restoring an Exchange Database to a Recovery Database
If selective or partial recovery is the objective, you can restore to a recovery database. Mounting the recovered data as a recovery database allows the Exchange administrator to restore individual mailboxes, and even individual items in a mailbox. The recovery database allows you to restore the backup of the original database side-by-side with the production database without overwriting or impacting the production database.
There are two ways that a recovery database can be created. The first option is to use the Exchange Management Shell to create a recovery database and its location on the Exchange Server. The second option is to have Barracuda Backup create the recovery database during the restore. When Barracuda Backup creates the recovery database, the database files will be stored in the default Exchange installation directory.
Use the following steps to recover an Exchange database to an Exchange recovery database:
- Log in to the Barracuda Backup interface and go to the Restore > Restore Browser page.
- Locate your Microsoft Exchange Server data source and navigate through to the Microsoft Exchange container:

- Click the Restore link next to the database you wish to restore to restore the latest backup or click the database to view a list of available revisions, then click Restore.
In the Restore dialog, select Original Location, or choose an alternate location in the Restore to section by selecting an existing data source from the drop-down menu or manually entering an IP address.
In the Method section, choose Restore to an Exchange Recovery Storage Group / Database:

Click Start Restore.
Go to the Reports > Restore page to monitor the progress of the restore job.
Once the restore job is complete, use the Exchange Management Shell or Exchange Admin Center to mount the recovery database.