

Client-to-site VPNs need X.509 certificates to authenticate.
Follow the instructions in this article to create a server and client certificate with XCA for use with a client-to-site IPsec VPN.
Before You Begin
Create and export a root certificate in PEM format. For instructions, see How to Create Certificates with XCA.
Step 1. Create a Server Certificate
To create the server certificate:
- In XCA, click the Certificate signing requests tab, and then click New Request. The Create Certificate Signing Request window opens.
- Configure the identifying information.
- Click the Subject tab.
- Configure the settings in the Distinguished name section.
- Click Generate a new key.
- In the New Key window, enter a name for the certificate, select a key size, and then click Create.
- Configure the X.509 extensions.
- Click the Extensions tab.
- From the Type list, select Not defined.
- (Optional) Modify the Validity dates for the certificate.
In the subject alternative name field, enter
DNS:vpn.yourdomain.com. The hostname must resolve to the IP address that the VPN service is listening on.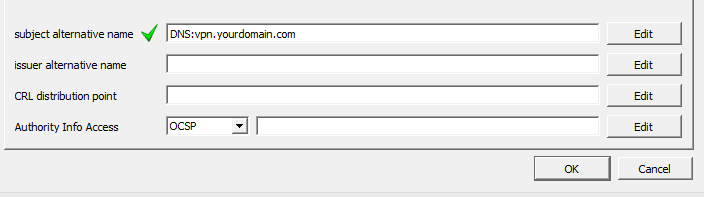
- Configure the key usage.
- Click the Key usage tab.
- From the left pane, select the following options:
- Digital Signature
- Key Agreement
- Certificate Sign
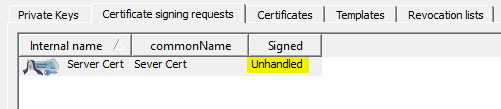
- Click OK to create the certificate. It then appears under the Certificate signing requests tab with a Signed status of Unhandled.
Step 2. Sign the Server Certificate
To sign the server certificate:
- Click the Certificate signing requests tab.
- Right-click the server certificate and then click Sign. The Create x509 Certificate window opens.
- In the Signing section under the Source tab, select Use this Certificate for signing and then select the root certificate from the drop-down menu.

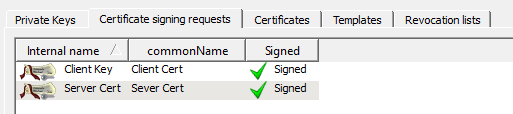
- Click OK to sign the certificate. It then appears under the Certificate signing requests tab with the status of Signed.
Step 3. Create a Client Certificate
To create a client certificate:
- Click the Certificate signing requests tab, and then click New Request. The Create Certificate Signing Request window opens.
- Configure the identifying information.
- Click the Subject tab.
- Configure the settings in the Distinguished name section.
- Click Generate a new key.
- In the New Key window, enter a name for the certificate, select a key size, and then click Create.
- Configure the X.509 extensions.
- Click the Key usage tab.
- From the left pane, select Digital Signature.
- From the right pane, select TLS Web Client Authentication.
- Click OK to create the certificate. It then appears under the Certificate signing requests tab with a Signed status of Unhandled.
Step 4. Sign the Client Certificate
To sign the client certificate:
- Click the Certificate signing requests tab.
- Right-click the client certificate and then click Sign. The Create x509 Certificate window opens.
- In the Signing section under the Source tab, select Use this Certificate for signing and then select the root certificate from the drop-down menu.
- Click OK to sign the certificate. It then appears under the Certificate signing requests tab with the status of Signed.
Step 5. Export the Client and Server Certificates
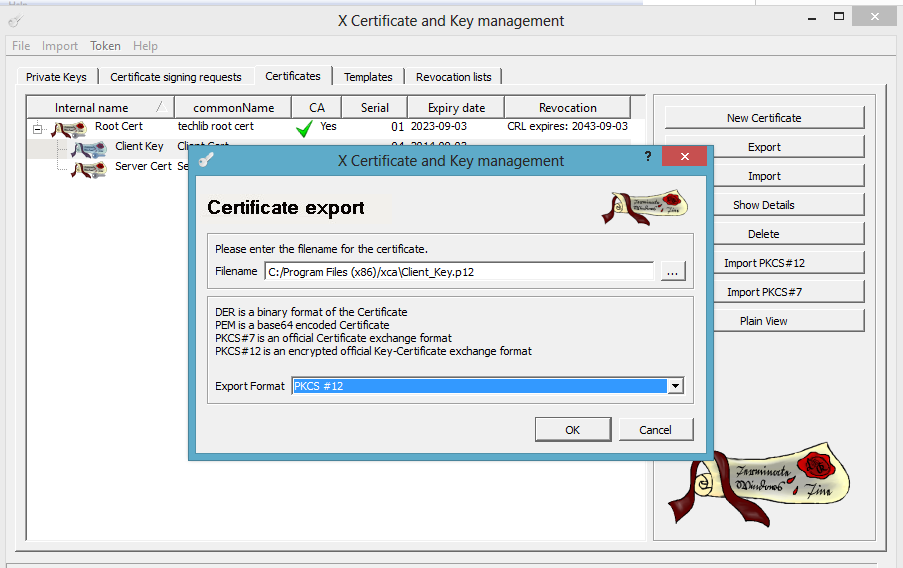
You must export the client and server certificates as PKCS#12 files.
- Click the Certificates tab.
- Select the certificate that you want to export and then click Export.
- In the Certificate Export window, select PKCS #12 from the Export Format list and then click OK.
Next Steps
You can import the certificates on the Barracuda CloudGen Firewall and clients that need X.509 certificates. For Windows clients, you can use an Active Directory Policy to distribute the certificates automatically. On iOS and Android, certificates must be imported manually or by the Mobile Device Management platform.
The following table lists the certificates that are required on each appliance or device:
| Appliance or Device | Required Certificates |
|---|---|
| Barracuda CloudGen Firewall |
|
Client | Client certificate |