

Before Getting Started
- Verify that you have the cage nuts and screws to attach the appliance to the rack; these are not provided by Barracuda;
- Verify that you have the rail kit included with your appliance including the hardware to assemble the rails;
- Verify the rack unit is set up in a Restricted Access Location, for example, dedicated equipment rooms, service closets, and other secure, clean, dust-free well ventilated environments;
Allow enough clearance in front of the rack to allow the front door to open completely (~25 inches);
- Verify approximately 30 inches of clearance is available in the back of the rack to allow for sufficient airflow and ease of servicing;
- Verify the area does not generate heat, electrical noise, or electromagnetic fields;
- A grounded power outlet is available.
Inspect the Packaging
Before getting started, inspect the shipping box and note if there is any damage. If the chassis itself shows any damage, file a damage claim with the carrier who delivered your Barracuda Networks appliance.
Install the Appliance in the Rack
Separate the Rack Rail Sections
The chassis package includes two rack rail assemblies in the rack mounting kit. Each assembly consists of two sections: an inner fixed chassis rail that secures directly to the appliance chassis, and an outer fixed rack rail that secures directly to the rack itself.
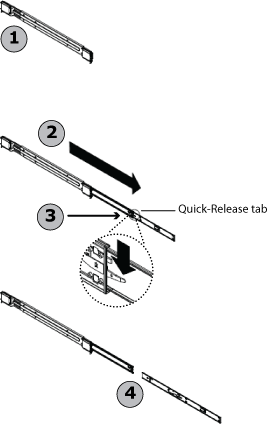
Use the following steps to separate the rack rail sections, as shown in Figure 1:
- Locate the rail assembly in the chassis packaging (1).
- Extend the rail assembly by pulling it outward (2).
- Press the quick-release tab (3).
- Separate the inner rail extension from the outer rail assembly (4).
Figure 1. Separating the Inner and Outer Rails.
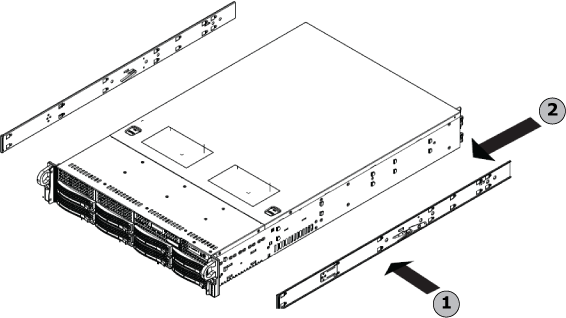
Install the Inner Rail Extensions
Both chassis rails have a locking tab. The tabs lock the appliance into place when it is installed and pushed fully into the rack. These tabs also lock the appliance into place when fully extended from the rack so as to prevent the appliance from coming completely out of the rack when pulled out for servicing.
- Place the inner rack extension (1) on the side of the chassis (2), aligning the chassis hooks with the rail extension holes. Verify that the extension faces outward like the pre-attached inner rail.
- Slide the extension toward the chassis front, and then secure with the provided screws.
Figure 2. Install Inner Rail Extensions.
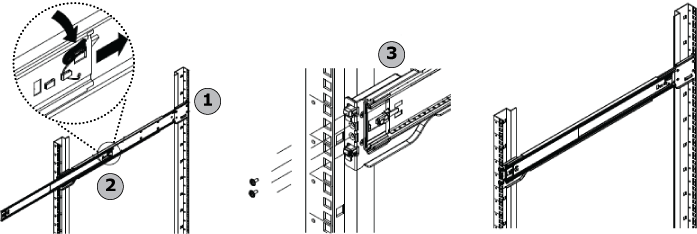
Assemble the Outer Rack Rails
Outer rails attach to the rack, holding the chassis in place. The outer rails for the SC829 chassis extend between 30"-33".- Using the provided screws, secure the back end of the outer rail to the rack (1).
Press the button where the two outer rails are joined to retract the smaller outer rail (2).
- Hang the hooks of the rails onto the rack holes (3), and secure the front of the outer rail to the rack.
- Repeats steps 1-3 for the remaining outer rail.
Figure 3. Assemble Outer Rack Rails.
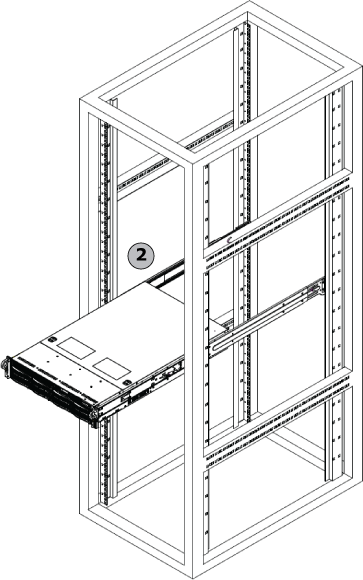
Install the Chassis in the Rack
Attach the outer rack rails and install the chassis into the rack using the following steps:
- Extend the outer rails, and align the inner rails of the chassis with the outer rails of the rack.
- Align the inner rails of the chassis with the outer rails on the rack (1), as shown in Figure 4:
Figure 4. Align Chassis Inner Rails with Rack Outer Rails.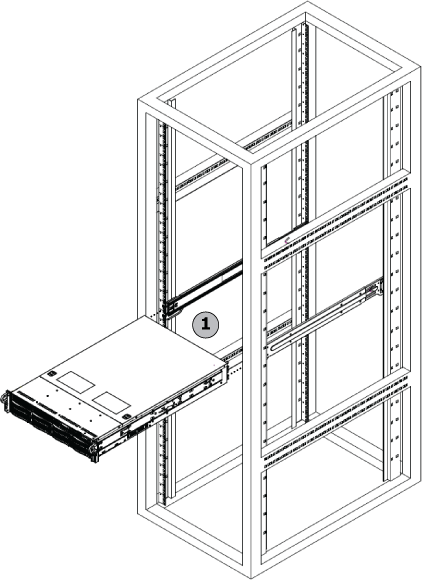
- Keeping the pressure even on both sides of the rails, slide the inner rails into the outer rails (2), as shown in Figure 5:
- Push the chassis all the way to the back of the rail, until it "clicks" into place.
- Secure with the provided screws.
For detailed configuration steps, refer to the Getting Started section of this TechLibrary for the rack mounted appliance.