

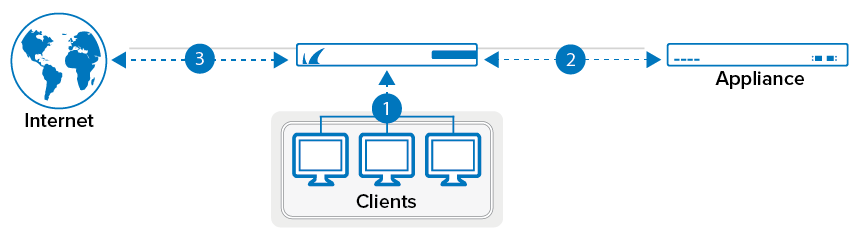
To transparently forward connections to a processing appliance located in a DMZ behind a CloudGen Firewall, configure the Dst NAT access rule to not rewrite the source and destination addresses of the connection. Using the original source and destination IP addresses allows the appliance to apply meaningful policies as if it were directly connected to the client.
Before You Begin
- Verify that the CloudGen Firewall and the proxy are directly connected to the same subnet (within the same ARP domain).
- (optional) Enable SSL Inspection in the firewall. For more information, see SSL Inspection in the Firewall.
- (optional) Configure the processing appliance to use transparent SSL Inspection.
Step 1. Create a Transparent Redirect Dst NAT Access Rule
Create the Dst NAT access rule to forward all traffic to the proxy.
- Go to CONFIGURATION > Configuration Tree > Box > Assigned Services > Firewall > Forwarding Rules.
- Click Lock.
- Create an access rule to forward selected traffic coming from your clients:
- Action – Select Dst NAT.
- Source – Select Trusted Networks. Or, you can enter the network the client using the appliance is in.
Destination – Select Internet.
Service – Select HTTP+S.
Target List – Enter the IP address without a port. You can use multiple proxies. E.g.:
172.16.0.10- Fallback/Cycle – If you have defined multiple target IP addresses, select how the firewall distributes the traffic between the IP addresses.
- Fallback – The connection is redirected to the first available IP address in the list.
- Cycle – New incoming TCP connections are distributed evenly over the available IP addresses in the list on a per-source IP address basis. The same redirection target is used for all subsequent connections of the source IP address. UDP connections are redirected to the first IP address and not cycled.
List of Critical Ports – Enter a space-delimited list of ports used.
Connection Method – Select Original Source IP.
- (optional) Application Policy – Enable Application Control and SSL Inspection to gain deeper insight on the traffic redirected to the appliance.
- If configured, select a policy from the SSL Inspection Policy drop-down list. For more information, see SSL Inspection in the Firewall.

- In the left menu, click Advanced.
- In the Miscellaneous section, set Transparent Redirect to Enable.
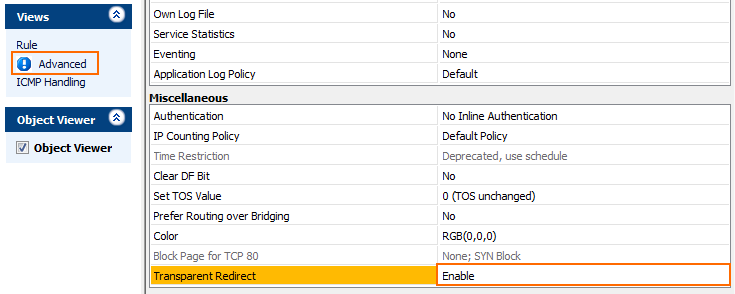
- Click OK.
Drag and drop the access rule so that it is the first rule that matches the traffic that you want it to forward. Ensure that the rule is located above the BLOCKALL rule; rules located below the BLOCKALL rule are never executed.
- Click Send Changes and Activate.
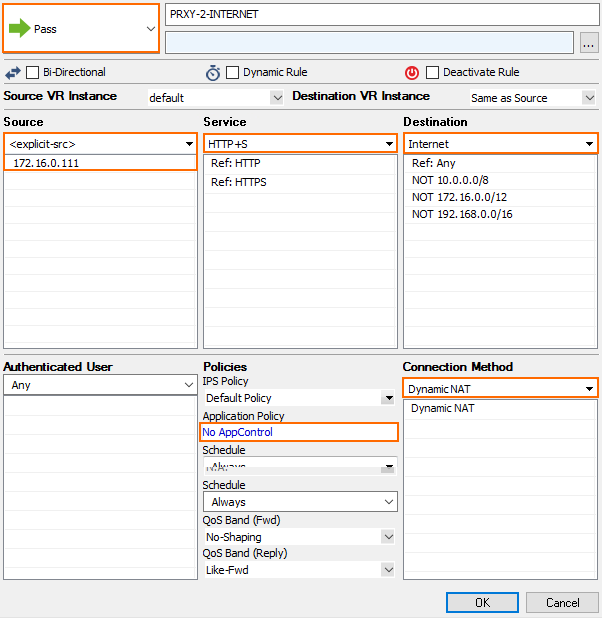
Step 2. Create a Pass Access Rule for the Proxy to Access the Internet
- Go to CONFIGURATION > Configuration Tree > Box > Assigned Services > Firewall > Forwarding Rules.
- Click Lock.
- Create a PASS rule to allow the HTTP proxy to access the Internet:
- Action – Select Pass.
- Source – Enter the IP address of the HTTP Proxy.
- Destination – Select Internet.
Service – Select HTTP+S.
- Connection Method – Select Dynamic NAT.
- (optional) Application Policy – Select Application Control policies.
- In the left menu, click Advanced.
- In the Dynamic Interface Handling section, set Source Interface to Any.
- Click OK.
- Click Send Changes and Activate.
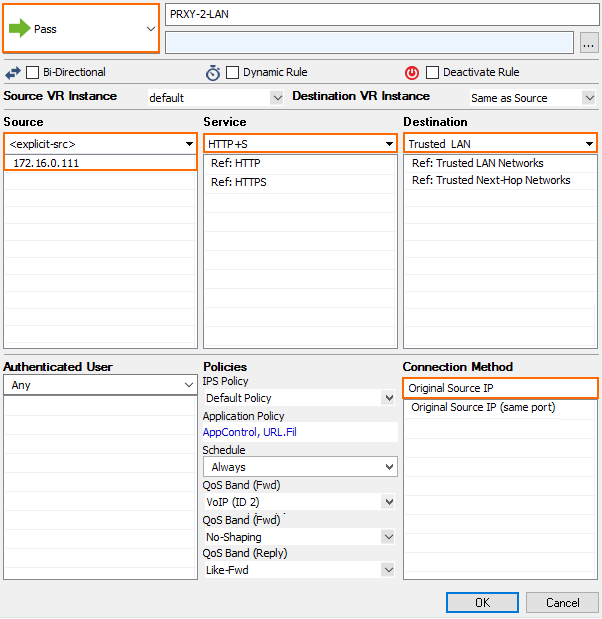
Step 3. Create a Pass Access Rule for the HTTP Proxy to Access the Client Network
To allow the HTTP proxy to access the client, you must create a PASS rule:
- Action – Select Pass.
- Source – Enter the IP address of the appliance.
- Destination – Select Trusted Networks.
Service – Select HTTP+S.
- Connection Method – Select Original Source IP.
- (optional) Application Policy – Select Application Control policies.
Step 4. Configure the Appliance
In order to successfully send the connection from the proxy to the Internet, you must configure the processing device:
- Route to the Internet using the firewall as the gateway.
- Route to the internal client network using the firewall as the gateway.
- Traffic must use the IP address of the appliance as the source IP address for outgoing connections.
- The appliance must accept the HTTP and HTTPS connections on the same port as the firewall.
Step 5. Import the Appliance's Root Certificate
If you are running SSL Inspection on the CloudGen Firewall, you must add the root certificate used for SSL Inspection to the Trusted Root Certificates.
- Download the root certificate on the appliance.
- On the CloudGen Firewall, go to CONFIGURATION > Configuration Tree > Box > Assigned Services > Firewall > Security Policy Settings.
- Click Lock.
- Click + in the Trusted Root Certificates list and select Import from PEM File.
- Select the file containing the root certificate you previously exported from the appliance.
- Enter a Name.
- Click OK.
- Click Send Changes and Activate.
The certificate is now listed in the Trusted Root Certificates list.
Next Steps
Import the root certificates from the CloudGen Firewall and the processing appliance on the clients to avoid SSL certificate errors.