To change the virtual IP (VIP) address of a centrally managed Barracuda CloudGen Firewall, edit the VIP settings and back up the firewall configuration in the Barracuda Firewall Control Center. Then, directly connect to the Barracuda CloudGen Firewall and restore it with the configuration backup that includes the new VIP settings.
Step 1. Add the New VIP Network Range
On the Barracuda Firewall Control Center, add the network range of the new VIP address. Keep the existing VIP network range.
- Go to CONFIGURATION > Configuration Tree > Multi-Range > Global Settings > Box VIP Network Ranges.
- In the left menu, select VIP Networks.
- Click Lock.
- In the VIP Networks table, add an entry for the network range. Configure the following settings for the entry:
- Name – A name for the network range.
- Network Address – The first IP address in the network range.
- Netmask – The netmask.
- Click OK.
- Click Send Changes and Activate.
Step 2. Change the Virtual IP Address of the Barracuda CloudGen Firewall
On the Barracuda Firewall Control Center, change the VIP address of the Barracuda CloudGen Firewall.
- Go to CONFIGURATION > Configuration Tree > Multi-Range > your range > your cluster > your box > Network.
- In the left menu, select Management Access.
- Click Lock.
- Write down the existing Virtual IP (VIP) address. You will need this address later.
- Change the Virtual IP (VIP) address.
- Click Send Changes and Activate.
Step 3. Create a PAR File for the Barracuda CloudGen Firewall
On the Barracuda Firewall Control Center, back up the configuration of the Barracuda CloudGen Firewall to a PAR file. For instructions, see How to Back Up and Restore Firewall, Secure Access Controller and Control Center Configurations.
Step 4. Modify the Management Access Firewall Rule for the Barracuda Control Center
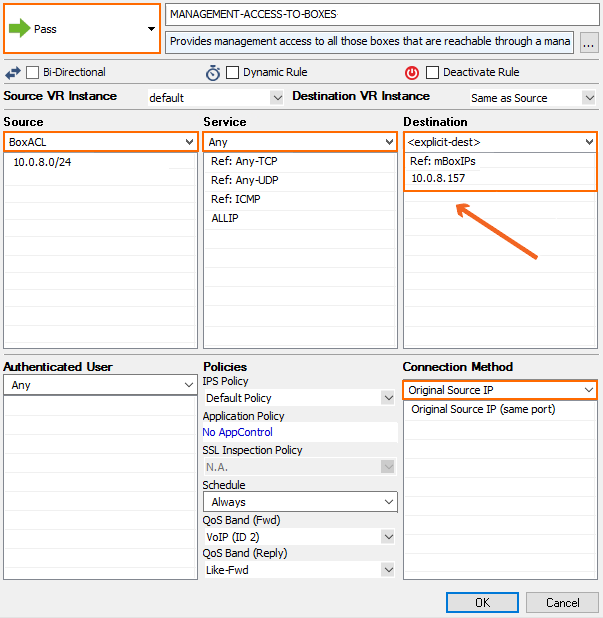
To ensure that the Barracuda Firewall Control Center can still connect to the old VIP address of the Barracuda Firewall, edit its MANAGEMENT-ACCESS-TO-BOXES forwarding firewall rule to allow access to the old VIP address.
In the Destination table of the MANAGEMENT-ACCESS-TO-BOXES rule, add the old VIP address of the firewall.

Step 5. Restore the Barracuda CloudGen Firewall
From the Barracuda Firewall Control Center, directly connect to the Barracuda CloudGen Firewall with the old VIP address because the firewall is still using this VIP address. Then, assign the new VIP address to the Barracuda CloudGen Firewall by restoring the firewall with the PAR file that you created in Step 3. Create a PAR File for the Barracuda CloudGen Firewall.
For more instructions on how to restore a Barracuda CloudGen Firewall with a PAR file, see How to Back Up and Restore Firewall, Secure Access Controller and Control Center Configurations.
