AutoVPN allows you to establish a VPN connection between two or more CloudGen Firewalls using the command line interface or the REST API. To use AutoVPN via REST API, see How to Create an AutoVPN Tunnel via REST API.

First, initiate a server session on the first firewall that listens to incoming VPN connection requests from the second firewall. Next, connect the second firewall to the first one by authenticating with a token that was previously generated on the first firewall. To connect more than one firewall to the listener, repeat the second step on each firewall you want to connect to the first one.
| First Firewall | Second Firewall | |
|---|---|---|
| Public IP | 34.241.43.25 | 52.213.101.46 |
| Private Network | 172.31.0.0/20 | 10.0.0.0/24 |
Before You Begin
- You must have root level access on the command line to both CloudGen Firewalls in order to initiate the configuration of an AutoVPN TINA tunnel.
- AutoVPN uses TCP port 694 for configuration and UDP port 691 for the TINA tunnel. Ensure that these ports are not used for any other purpose and are both reachable. For more information, see Best Practice - Core System Configuration Files and Ports Overview.
- AutoVPN listens on the IP address of the VPN service. If there is no VPN service, AutoVPN creates it and uses the default settings for the listening IP. Verify that the ports 691 and 694 are linked to the VPN service.
- On CloudGen Firewall deployments in the public cloud, Cloud Integration must be configured. For more information, see Cloud Integration.
Step 1. Create a Session on the First Firewall Initiating a Listener
The listener will wait for connection requests from a firewall in the network 52.213.101.0/24.
- Log into the first firewall (e.g., 34.241.43.25) as user root.
- On the command line, enter the following command to create a listener:
autovpn listen <allowed_subnet>e.g.autovpn listen 52.213.101.0/24. - AutoVPN will display an output to inform you that the listener is up and running. It also displays a token generated for authentication of the second firewall and the session ID:

- Double-click the password to copy the password to the clipboard.
Step 2. Create a Session on the Second Firewall to Connect to the First Firewall Waiting for Connection Requests
Repeat this step on each CloudGen Firewall you want to connect to the first firewall.
- Log into the second firewall (e.g., 52.213.101.46) as user root.
- On the command line, enter the following command to connect to the listener on the first firewall:
autovpn connect 34.241.43.25 <token>
To enter the token, right-click with your mouse at the cursor position. - AutoVPN will display an output to inform you that the connection has been established successfully:

Step 3. (for public cloud deployments only) Activate Routing Between Local Cloud Networks and the VPN-Site on Both Firewalls
This step is necessary only on CloudGen Firewall deployments in the public cloud. For all other deployments, continue with Step 4.
Activate the access rule CLOUD-NET-2-VPN-SITE. Repeat the following steps for both firewalls:
- Go to CONFIGURATION > Configuration Tree > Box > Assigned Services > Firewall > Forwarding Rules.
- Click Lock.
- Right-click the access rule CLOUD-NET-2-VPN-SITE.
- Click Activate Rule in the list.
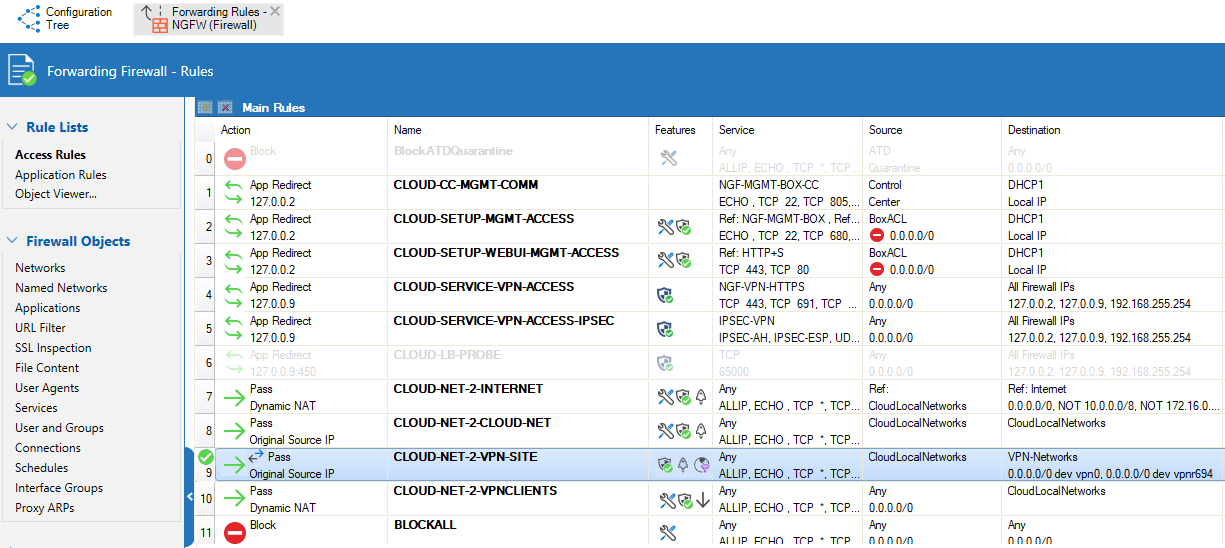
- Click Send Changes and Activate.
Step 4. (for all deployments except public cloud) Activate Routing Between Local Networks and the VPN-Site on Both Firewalls
This step is necessary on all deployments except public cloud deployments.
Activate the access rule BOX-LAN-2-VPN-SITE. Repeat the following steps for both firewalls:
- Go to CONFIGURATION > Configuration Tree > Box > Assigned Services > Firewall > Forwarding Rules.
- Click Lock.
- Right-click the access rule BOX-LAN-2-VPN-SITE.
- Click Activate Rule in the list.
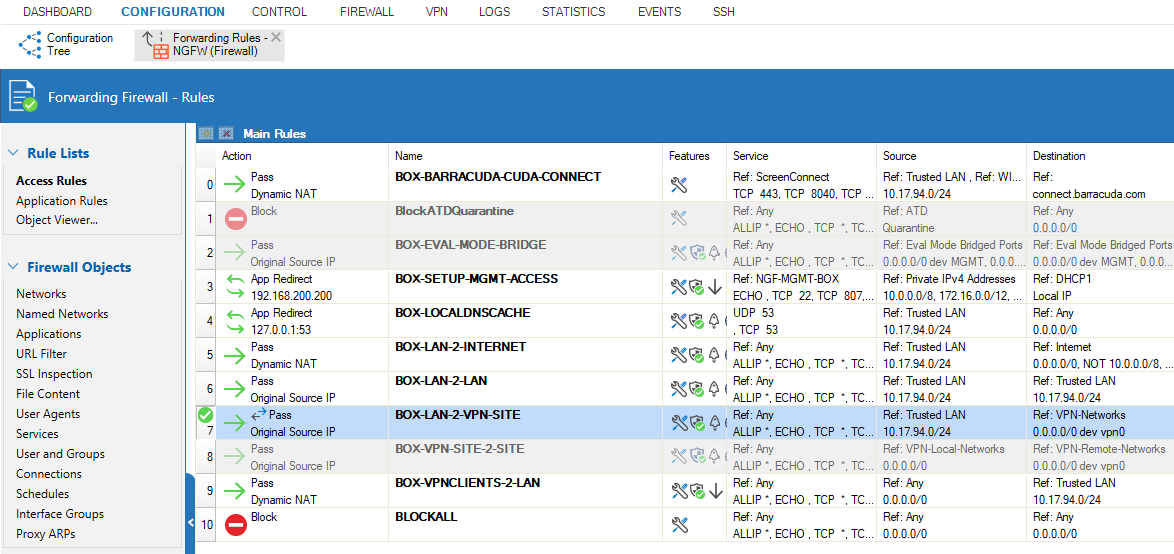
- Click Send Changes and Activate.
Step 5. Add AutoVPN to the Network Object VPN-Networks
- Go to CONFIGURATION > Configuration Tree > Box > Assigned Services > Firewall > Forwarding Rules.
- In the left menu, cli ck Networks.
- In the list, double-click the network object VPN-Networks for modifying.
- Click + to add
IP 0.0.0.0/0with interfacevpnr694to the network object VPN-Networks.
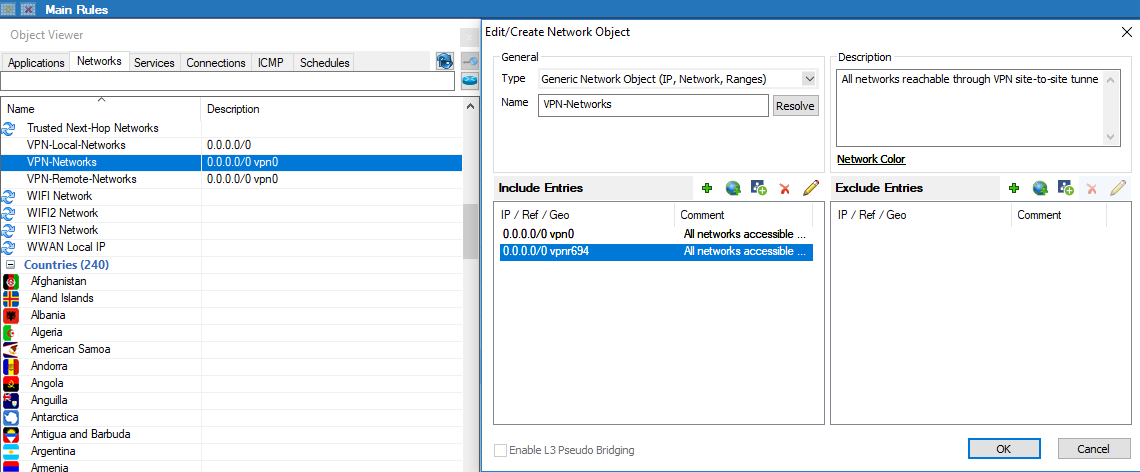
- Click OK.
- Click Send Changes and Activate.
Step 6. (optional) Verify the AutoVPN TINA Tunnel is Set Up Correctly on the First Firewall
Log into the first firewall. Verify that the VPN and dynamic routing services have been set up correctly and that the AutoVPN TINA tunnel is up:
- On your first firewall, go to CONFIGURATION > Configuration Tree > Box > Assigned Services . Because no VPN service has been set up prior to this configuration, you will now see the new, automatically configured VPN service:

- Also, you can see the service node created for dynamic routing:

- Go to CONFIGURATION > Configuration Tree > Box > Assigned Services > VPN > Site to Site. You will see that the VPN tunnel is up and running.

- Go to CONFIGURATION > Configuration Tree > Box > Network to verify that local cloud networks are propagated via the AutoVPN tunnel using RIP:
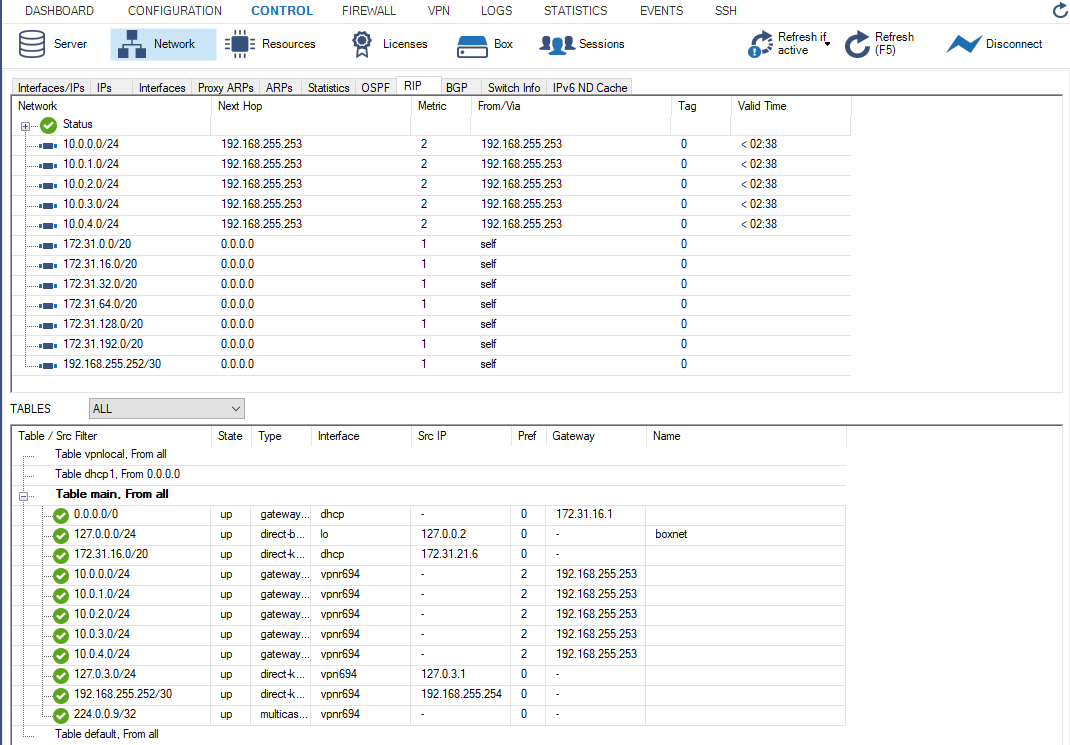
Step 7. (optional) Verify that the AutoVPN TINA Tunnel is Set Up Correctly on the Second Firewall
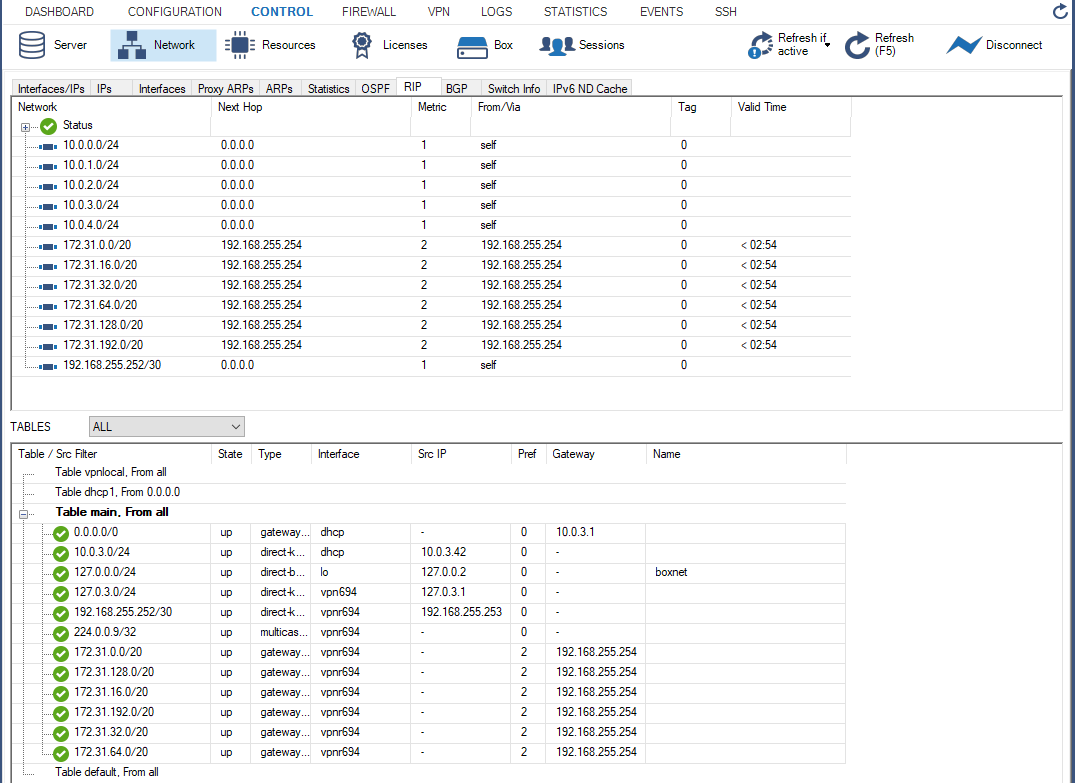
To verify the state of the AutoVPN TINA tunnel, log into the second firewall and repeat the steps from Step 6 above. For the services, the output will be the same. However, the entries for the network will be different on the second firewall:
Further Information
- For information about the AutoVPN feature, see AutoVPN.
- To use AutoVPN via REST API see, How to Create an AutoVPN Tunnel via REST API.
- For information about BGP and routing, see Dynamic Routing Protocols (OSPF/RIP/BGP).
