To configure a client-to-site or site-to-site VPN using certificates created by External CA, you must create the following VPN certificates for the VPN service to be able to authenticate.
Before You Begin
Use an external CA to create the following certificates. For an example using XCA, see How to Create Certificates with XCA.
| X.509 Certificate Type | Installation Location | File Type | Chain of Trust | X.509 Extensions |
|---|---|---|---|---|
Root certificate | VPN Settings on the firewall | PEM | Trust anchor |
|
Server certificate | VPN Settings on the firewall | PKCS12 | End instance |
|
Client certificate | Client operating system or VPN client | PKCS12 | End instance |
|
Step 1. Install the Root Certificate
- Go to CONFIGURATION > Configuration Tree > Box > Assigned Services > VPN > VPN Settings.
- In the left menu, select CA Certificates.
- Click Lock.
- Right-click the table and select Import Certificate from File.
- Select the file containing the root certificate and click Open. The window for root certificates opens.
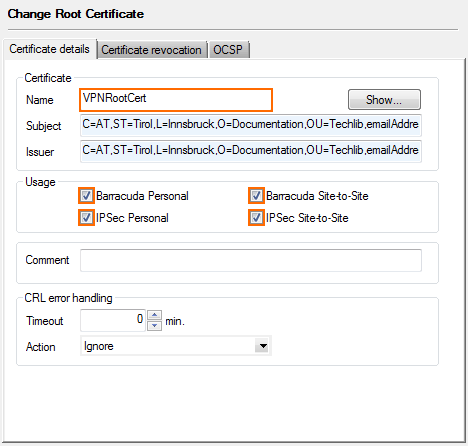
- Verify that the window displays the tab Certificate details.
- Enter a Name. This is the name that is displayed for this certificate throughout the VPN configuration.
- Select the Usage.
- Barracuda Personal – Select to use this certificate for client-to-site VPN using the TINA protocol.
- IPsec Personal – Select to use this certificate for client-to-site VPN using the IPsec protocol.
- Barracuda Site-to-Site – Select to use this certificate for site-to-site VPN tunnels using the TINA protocol.
- IPsec Site-to-Site – Select to use this certificate for site-to-site VPN tunnels using the IPsec protocol.

In the CRL error handling section, you can configure the actions to be taken in case a certificate referred within the Certificate Revocation List (CRL) is unavailable:
- Timeout (min.) – The length of time after which the fetching process is started again if all URIs of the root certificate fail.
- Action – The action that is taken if the CRL is not available after the fetching process that is started after the Timeout. You can select one of the following actions:
- Terminate all sessions – Every VPN session relating to this root certificate is terminated.
- Do not allow new sessions – New VPN sessions relating to this root certificate are not allowed.
- Ignore – A log entry is created but does not have any effect on VPN connections relating to this root certificate.
- (optional) Click on the Certificate revocation tab and configure the CRL host.
- Click Load paths from certificate to use the CRL information included in the certificate.
You can also manually enter the URI, Login, and optional Proxy settings.
(optional) Click on the OCSP tab and configure the OCSP server.
Host – Enter the DNS resolvable hostname or IP address of the OCSP server.
Port – Enter the listening port.
Use SSL – Click to enable SSL.
Phibs Scheme – Select ocsp. This allows you to use OCSP as a directory service.
OCSP Server Identification
This root certificate – This certificate is used as trusted root certificate authority when verifying the signature of OCSP responses.
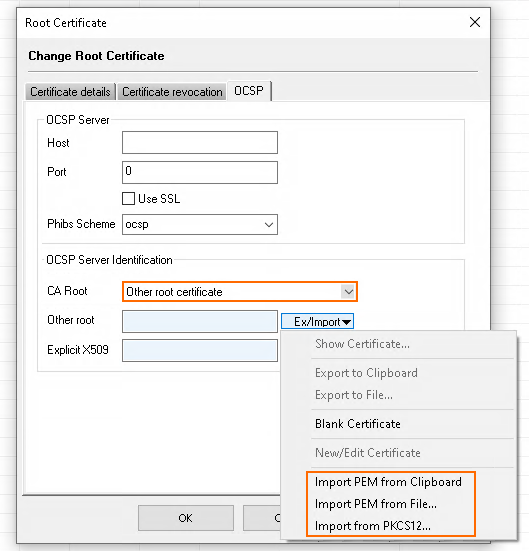
Other root certificate – The certificate that is imported via the Other root setting is used as trusted root certificate authority when verifying the signature of OCSP responses.
Option 1:
- Import the root certificate (at the top of the chain) as Other root certificate.
- For Other root, click Ex/Import.
- From the list, select the source where to import the root certificate from.

- Import the root certificate (at the top of the chain) as Other root certificate.
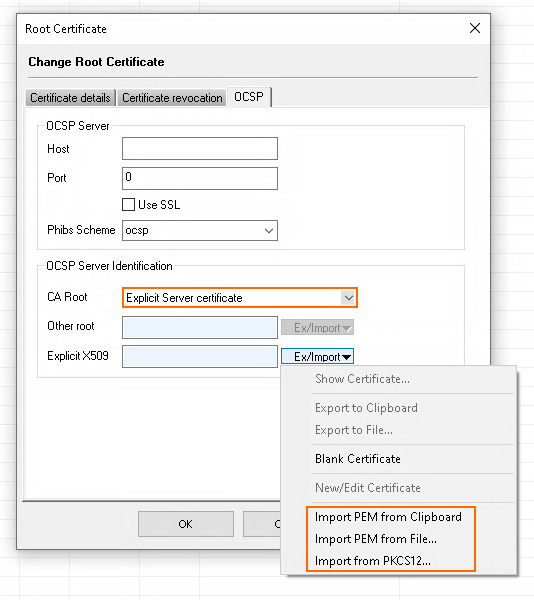
- Explicit Server certificate – The OCSP server certificate signing the OCSP answer might be self-signed or another certificate. This X.509 certificate must be imported via the Explicit X.509 setting.
- Option 2:
- Import the certificate as Explicit Server Certificate.
- For Explicit X509, click Ex/Import.
- From the list, select the source where to import the intermediate certificate from.

- Import the certificate as Explicit Server Certificate.
- Option 2:
- Click OK.
The root certificate is now displayed on the Root Certificates list.
Step 2. Install the Server Certificate
Install the server certificate signed by the root certificate uploaded in Step 1.
- Go to CONFIGURATION > Configuration Tree > Box > Assigned Services > VPN-Service > VPN Settings.
- In the left menu, select Service Certificates.
- Click Lock.
- Import the server certificate.
- Right-click the table and select Import Certificate from File.
- In the Open window, select the server certificate file and click Open.
- Enter the Certificate Name, and then click OK. The certificate is now listed in the Service Certificates tab.
- Import the private server key.
- Right-click the server certificate and select Import Private Key From File.
- In the Open window, select the private server key file and then click Open.
- Click Send Changes and Activate.
Your server certificate appears with the private key on the Service Certificates list.
Step 3. Create a Service Key
- Go to CONFIGURATION > Configuration Tree > Box > Assigned Services > VPN-Service > VPN Settings.
- In the left menu, select Service Keys.
- Click Lock.
- Right-click the table and select New Key.
- Enter a Key Name and click OK.
- Select the Key Length and click OK.
- Click Send Changes and Activate.
You now have root- and service certificates for your VPN service. Depending on the Usage selected in Step 1, you can now configure your client-to-site or site-to-site VPN.
