If you want to configure Quality of Service for a virtual interface (as in this example, a VPN tunnel), adapt the traffic shaping configuration.
Assign a QoS Profile to a VPN Tunnel
- Create a TINA VPN Tunnel.
- Configure the traffic shaping settings.
- To configure basic traffic shaping settings with the Basic profile template, see How to Configure Basic Traffic Shaping.
- To configure advanced traffic shaping settings, see How to Create a QoS Profile.
- Go to CONFIGURATION > Configuration Tree > Box > Assigned Services > VPN-Service > Site to Site.
- Locate the VPN tunnel and double-click the indented entry in the row below the tunnel name.
- The Edit Transport window is displayed.
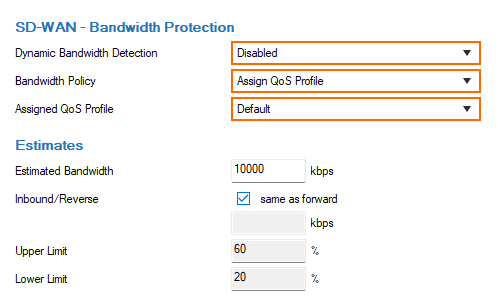
- In the left menu, click SD-WAN - Bandwidth Protection.
- For Dynamic Bandwidth Detection, select Disabled.
- For Bandwidth Policy, select Assign QoS Profile.
- A new line with the setting Assigned QoS Profile is displayed.
- For Assigned QoS Profile, select Default.
- In the Estimated Bandwidth field, enter the maximum rate for outbound traffic in KB/s. If you enter
0, no shaping occurs.
- Click OK.
Click Send Changes.
Click Activate.
Create the firewall rules for the VPN tunnel traffic. For more information, see see How to Create Access Rules for Site-to-Site VPN Access.
