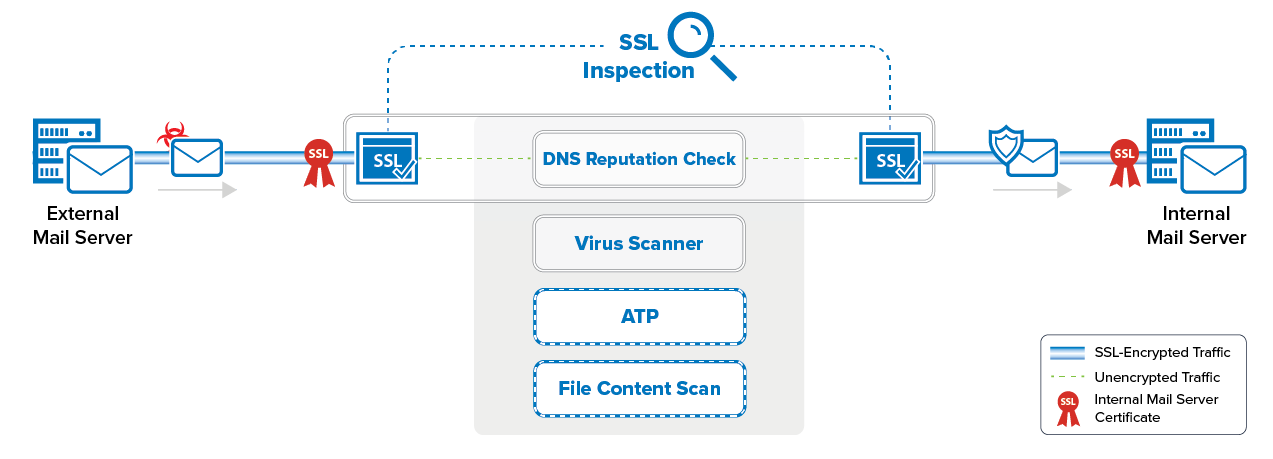
The Barracuda CloudGen Firewall scans inbound SMTP and POP3 traffic in two steps:
SSL Inspection decrypts SMTP and POP3 connections. For incoming connections, your mail server's SSL certificates are used.
The DNSBL base is queried via a DNS lookup using the sender's IP address. If the DNS reputation database is not available, the email is not modified. If the domain or IP address is blocklisted, the email's subject line is modified to start with [SPAM] and the following non-configurable MIME type headers are set:
X-Spam-Prev-Subject: Your email subject without the [SPAM] tag.
X-Spam-Flag: YES
X-Spam-Status: Yes
X-Spam-Level: ***
Email attachments are scanned by the Virus Scanner service on the firewall. If malware is found, the attachment is stripped from the email and replaced by a customizable text informing the user that the malicious attachment has been removed. For firewalls using ATP, the email attachments can also be checked via ATP using the deliver first, then scan mode. Scan results must be monitored by the admin because quarantining is not supported for SMTP and POP3.
Before You Begin
Enable Application Control. For more information, see How to Enable Application Control.
Configure SSL Inspection. For more information, see How to Configure Inbound TLS Inspection and How to Configure Outbound TLS Inspection.
Create a Virus Scanner service. For more information, see Virus Scanner.
Step 1. Configure the Virus Scanner Engine(s)
Select and configure a virus scanning engine.
Go to CONFIGURATION > Configuration Tree > Box > Assigned Services > Virus-Scanner > Virus Scanner Settings.
Click Lock.
Enable the virus scanner engine.
Click Send Changes and Activate.
Step 2. Configure Inbound SSL Inspection
Upload the mail server certificate to the certificate store and configure Inbound SSL Inspection for the mail server. For more information, see How to Configure Inbound TLS Inspection.
Step 3. Enable Virus Scanning
The firewall must use your internal mail server's SSL certificate to be able to pass identity checks carried out by some MTAs. You must also enable virus scanning and enter the FQDN (domain name).
Go to CONFIGURATION > Configuration Tree > Box > Assigned Services > Firewall > Security Policy.
Click Lock.
In the Virus Scanner Configuration section, select the check box for SMTP and/or POP3.

In the Scanned MIME types list, add the MIME types of the files that you want the virus scanner to scan. Default:
<factory-default-mime-types>and<no-mime-types>. For more information, see Virus Scanning and ATP in the Firewall.
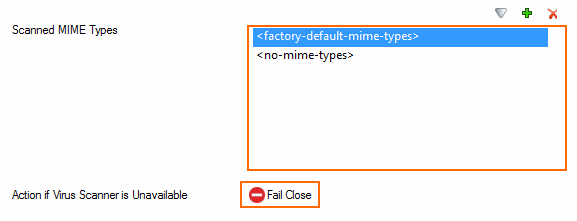
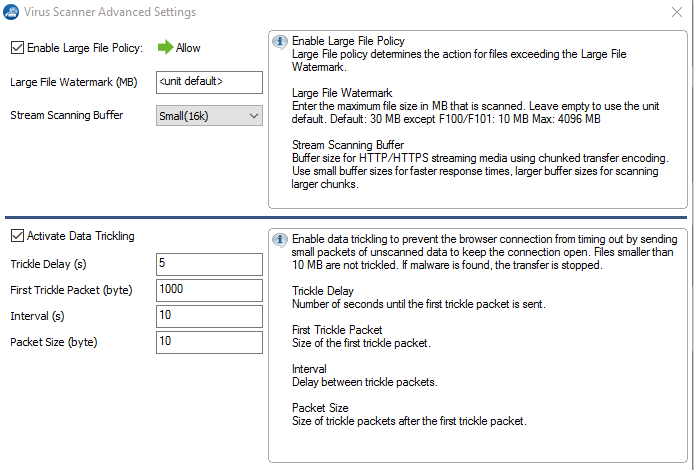
(optional) Click Advanced:

Large File Policy – The large file policy is set to a sensible value for your appliance. The maximum value is 4096 MB.
Data Trickling Settings – Not applicable for SMTP traffic.
Click Send Changes and Activate.
Step 4. Create a Dst NAT Access Rule for Incoming SMTP Traffic
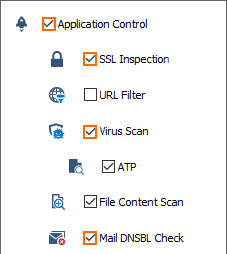
Enable Application Control, SSL Inspection, Virus Scanning, ATP (optional), and File Content Scanning (optional) in the access rule.
Go to CONFIGURATION > Configuration Tree > Box > Assigned Services > Firewall > Forwarding Rules.
Click Lock.
Either click the plus icon (+) at the top right of the ruleset, or right-click the ruleset and select New > Rule.

Select Pass as the action.
Enter a Name for the rule.
Specify the following settings to match your incoming SMTP traffic:
Action – Select Dst NAT.
Source – Select Internet.
Destination – Enter the public IP address that your mail server domain's MX record resolves to.
Service – Select SMTP or POP3.
Connection Method – Select Original Source IP.
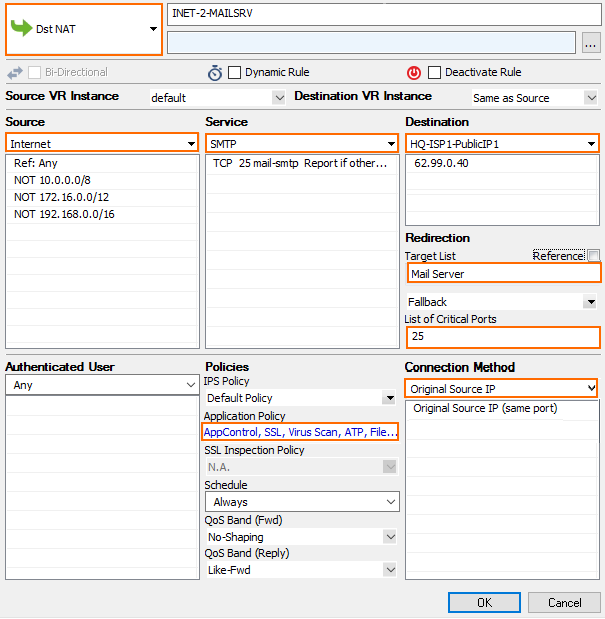
Click on the Application Policy link and select:
Application Control – required.
SSL Inspection – required.
Virus Scan – required.
ATP – optional.
File Content Scan – optional. For more information, see File Content Filtering in the Firewall.
Mail DNSBL Check – Select to enable DNSBL check.
Select a policy from the SSL Inspection Policy drop-down list. For more information, see How to Configure Inbound TLS Inspection.
Click OK.
Click Send Changes and Activate.
Step 5. (optional) Create a Pass Access Rule for Outgoing SMTP Connections
To also scan outgoing SMTP traffic from your internal mail server or mail clients for malware, create a PASS access rule.
Go to CONFIGURATION > Configuration Tree > Box > Assigned Services > Firewall > Forwarding Rules.
Click Lock.
Either click the plus icon (+) at the top right of the ruleset, or right-click the ruleset and select New > Rule.

Select Pass as the action.
Enter a Name for the rule.
Specify the following settings to match your incoming SMTP traffic:
Action – Select PASS.
Source – Select the network object containing your mail server IP addresses, or for SMTP client connections the network containing the SMTP clients.
Destination – Select Internet.
Service – Select SMTP or POP3 for outgoing mail server traffic. You can also create a service object for TCP port 587 (SNMP) or 110 (POP3) for outgoing mail client traffic. For more information, see How to Create Service Objects.
Connection Method – If used for an internal mail server, select a connection object using the public IP address that your mail server's MX record resolves to as the source IP address. If this rule applies to SMTP clients, select Dynamic NAT.
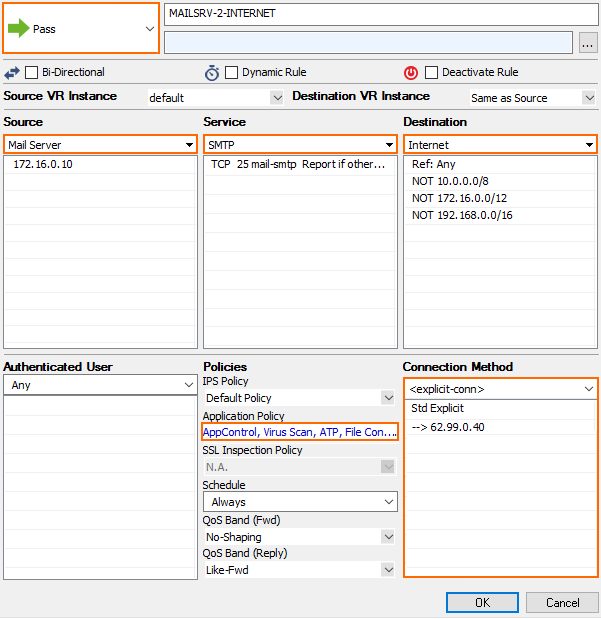
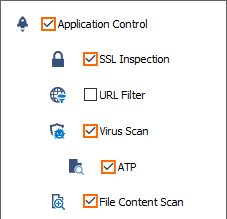
Click on the Application Policy link and select:
Application Control – Required.
SSL Inspection – Required.
Virus Scan – Required.
ATP – optional.
File Content Scan – optional.
Select a policy from the SSL Inspection Policy drop-down list. For more information, see How to Configure Outbound TLS Inspection.
Click OK.
Click Send Changes and Activate.
Monitoring and Testing
Test the virus scan setup by sending EICAR test files from http://www.eicar.com via email to a mail server located behind the firewall.
All information about mail scanning in the firewall is logged to the /firewall/virusscan.log log file.
To monitor detected viruses and malware, go to the FIREWALL > Threat Scan page.

Next Steps
Customize the text used to replace removed email attachments. For more information, see How to Configure Custom Block Pages and Texts.
To combine ATP with Mail Security in the Firewall, see Advanced Threat Protection (ATP).
