The CloudGen Firewall scans FTP(S) traffic for malware on a per-access-rule basis when Virus Scanning in the Firewall is enabled. Both active and passive FTP is supported; outgoing SSL-encrypted FTPS connection are also supported. Depending on the access rule, you can either protect your FTP server from uploads containing malware, or scan files downloaded from external FTP servers. Scanning incoming traffic for FTPS servers is not supported. Since the FTP protocol does not contain any MIME-type information, all files are scanned regardless of the MIME type list configured for the virus scanner. When an FTP download is initiated, the FTP client creates a local, zero-byte file. Normally, the transferred data would be written to this file until the download is finished. However, if the file is determined to be malware, the connection is terminated immediately, leaving the zero-byte file or file fragment (if data trickling is enabled) on the client. Depending on the FTP client, it may attempt to download the file multiple times; each time the connection will be reset by the firewall. If ATP is enabled, files passed by the virus scanner are then uploaded to be analyzed in the Barracuda ATP Cloud. ATP can be used only in the deliver first, then scan mode for FTP client connections. Files uploaded to FTP servers behind the firewall cannot be scanned by ATP.
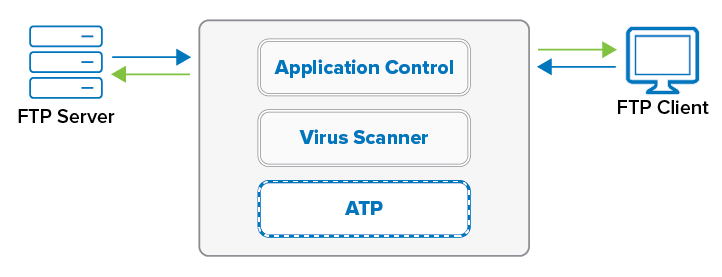
Before You Begin
- Enable Application Control. For more information, see How to Enable Application Control.
- Create a Virus Scanner service. For more information, see Virus Scanner.
- (optional) Configure File Content Filtering in the Firewall. For more information, see File Content Filtering in the Firewall.
- (optional) Configure ATP in the Firewall. For more information, see How to Configure ATP in the Firewall.
- Configure SSL Inspection for FTPS traffic. For more information, see SSL Inspection in the Firewall.
Step 1. Configure the Virus Scanner Engine(s)
Enable and configure the virus scanner. Barracuda CloudGen Firewall F18 and larger support the Avira AV engine.
- Go to CONFIGURATION > Configuration Tree > Box > Assigned Services > Virus-Scanner > Virus Scanner Settings.
- Click Lock.
- Enable Avira AV by selecting Yes from the Enable Avira Engine list.
- Click Send Changes and Activate.
Step 2. Enable Virus Scanning for FTP
Enable support for virus scanning FTP connections in the Firewall service.
- Go to CONFIGURATION > Configuration Tree > Box > Assigned Services > Firewall > Security Policy.
Click Lock.
In the Virus Scanner Configuration section, select the FTP check box.

(optional) Change the Action if Virus Scanner is unavailable.

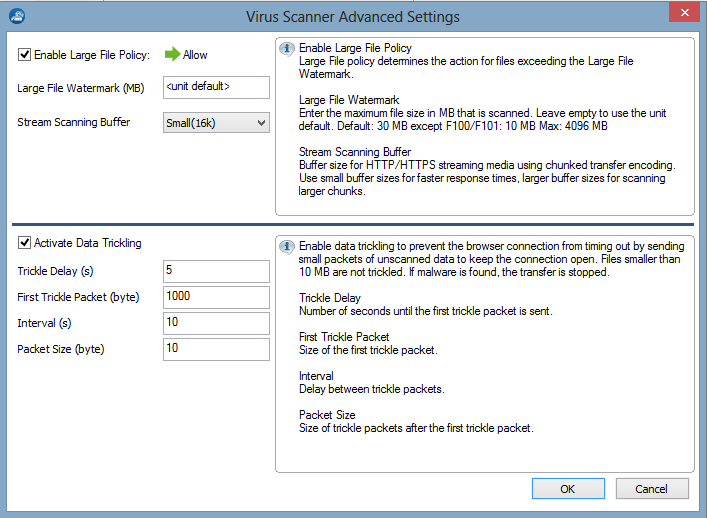
(optional) Click on Advanced:

- Large File Policy – Action taken if the file exceeds the size set as the Large File Watermark. Select Allow to forward the files unscanned, select Block to discard files that are too big to be scanned.
- Large File Watermark (MB) – The large file watermark is set to a sensible value for your appliance. The maximum value is 4096MB.
- Stream Scanning Buffer – Select the buffer size for HTTP/HTTPS streaming media using chunked transfer encoding. Select Small for faster response times, Big to scan larger chunks before forwarding the stream to the client.
- Data Trickling Settings – Change how fast and how much data is transmitted. Change these settings if your browser times out while waiting for the file to be scanned.
- Click Send Changes and Activate.
Step 4. Create Access Rule for FTP Client Downloads
To scan files downloaded from external FTP servers, create a matching access rule and enable Application Control and Virus Scanning.
- Go to CONFIGURATION > Configuration Tree > Box > Assigned Services > Firewall > Forwarding Rules.
- Click Lock.
- Either click the plus icon (+) at the top right of the ruleset, or right-click the ruleset and select New > Rule.

- Select Pass as the action.
- Enter a Name for the rule.
- Specify the following settings to match your incoming SMTP traffic:
- Action – Select PASS.
- Source – Select Trusted Networks.
- Destination – Select Internet.
- Service – Select FTP.
- Connection Method – Select Dynamic NAT.
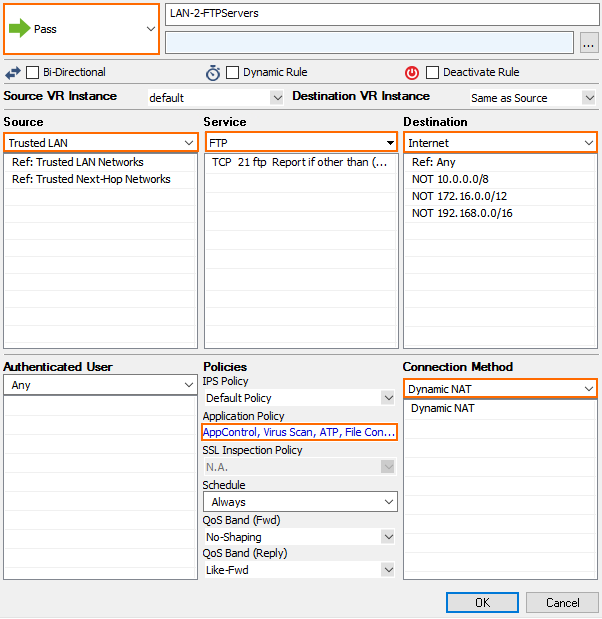
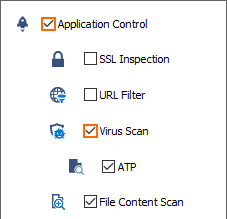
- Click on the Application Policy link and select:
- Application Control – required.
- SSL Inspection – optional.
- Virus Scan – required.
- ATP – optional.
- File Content Scan – optional.
- If configured, select a policy from the SSL Inspection Policy drop-down list. For more information, see SSL Inspection in the Firewall.
- Click Send Changes and Activate.
Step 5. (optional) Create a Dst NAT Access Rule to Protect Internal FTP Server
To protect an internal FTP server from receiving infected files, create a matching Dst NAT access rule, and enable Application Control, Virus Scanning, and, as an option, File Content Scan. Using ATP for incoming FTP connections is not supported.
- Go to CONFIGURATION > Configuration Tree > Box > Assigned Services > Firewall > Forwarding Rules.
- Click Lock.
- Either click the plus icon (+) at the top right of the ruleset, or right-click the ruleset and select New > Rule.
- Select Pass as the action.
- Enter a Name for the rule.
- Specify the following settings to match your incoming FTP traffic:
- Action – Select Dst NAT.
- Source – Select Internet.
- Service – Select FTP.
- Destination – Enter the public IP address the FQDN or the FTP server resolves to.
- Redirection – Enter the IP address of your internal FTP server. Enter multiple IP addresses separated by a space to enable failover or basic load balancing support. For more information, see How to Create a Destination NAT Access Rule.
- Connection Method – Select Original Source IP.
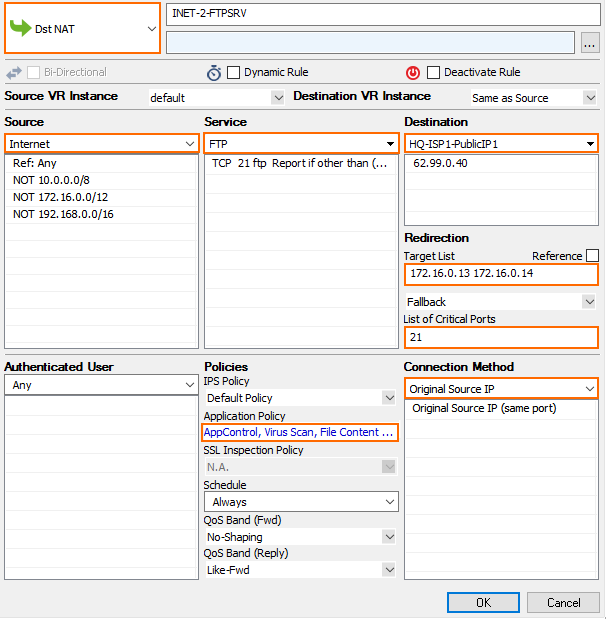
- Click on the Application Policy link and select:
- Application Control – required.
- Virus Scan – required.
- File Content Scan – optional.
- Application Control – required.
- Click OK.
- Click Send Changes and Activate.
Monitoring and Testing
Test the Virus Scanning setup by downloading EICAR test files from an FTP server. Files that are malware are not downloaded. 0-byte stub files are created by the FTP client.

To monitor detected viruses and malware, go to the FIREWALL > Threat Scan page.

Next Steps
- To combine ATP with virus scanning, see Advanced Threat Protection (ATP) and How to Configure ATP in the Firewall.
- To combine virus scanning with file content filtering, see File Content Filtering in the Firewall.
