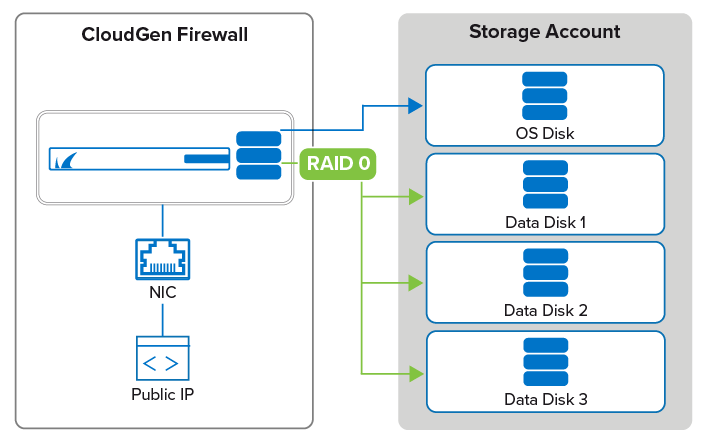
Add multiple data disks to your firewall or Control Center VM to better optimize accessing your disks in the Azure storage account. This can be done during deployment when using PowerShell or templates. To add data disks to existing firewalls or Control Center VMs, or VMs created via the Azure portal, you must manually attach the data disks and trigger the migration to the RAID device. During migration, all data disks are added to a RAID0 and mounted as the /phion0. Existing data on the /phion0 partition is copied to the new device.
Limits
The size of the RAID device may not exceed 2TB.
Up to 26 data disks can be used.

Adding Data Disks to the Firewall VM
Add the data disks to the VM configuration and then move the data on the /phion0 partition to the new RAID device.
Step 1. Add Data Disks to the Firewall VM
Shut down the firewall VM.
Go to the Azure Portal: https://portal.azure.com
Go to the firewall VM.
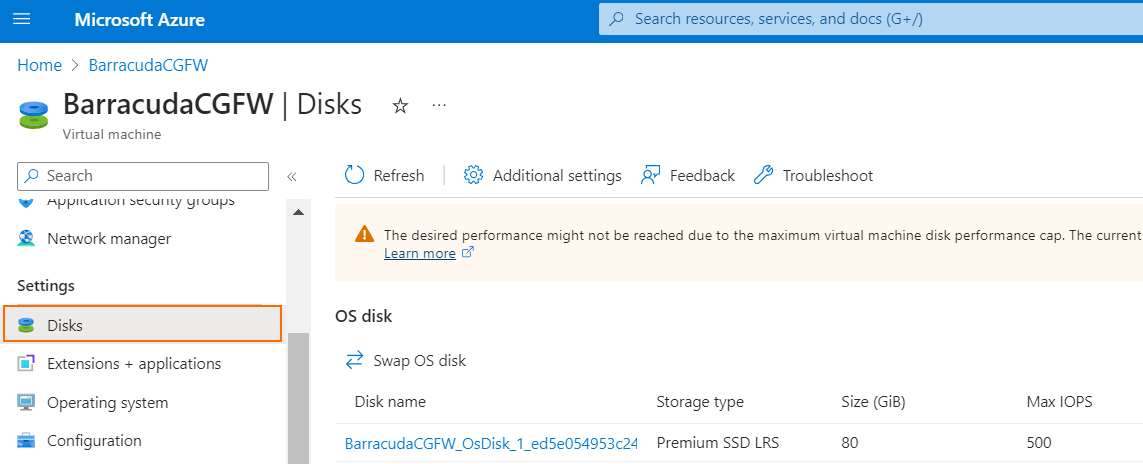
In the Settings section, click Disks.

In the Data disks section, click + Create and attach a new disk.

Configure the new data disk:
LUN – Define a Logical Unit Number for the disk. This value is used to identify data disks within the VM and therefore must be unique for each data disk attached to the VM.Disk name – Enter a unique name.
Storage Type – Select HDD or SSD.
Size (GiB) – Enter the size in GB. All data disk sizes combined must be 70 GB or larger.
Encryption – Leave default value.
Host caching – Select None.

Click Apply. Wait for the disk to be attached before adding additional data disks.
Attach the second and third data disks.
Start the firewall VM.
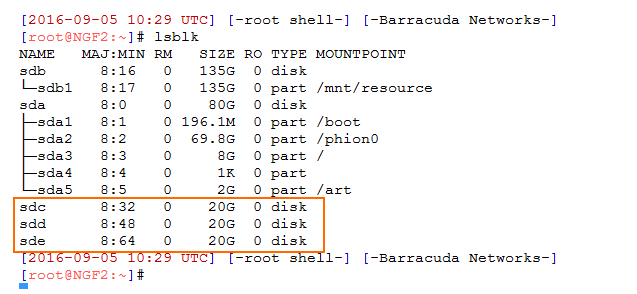
Log in via SSH and enter lsblk to verify that three data disks are now attached to the VM:

Step 2. Migrate /phion0/ to the Data Disks
Use the cloud-storctl command line script to migrate /phion0 to the new RAID device.
Log into the firewall via SSH.
Enter
nohup cloud-storctl migrate /phion0 auto &
Verify that /phion0/ is now mounted on the RAID device. Now use the command /bin/findmnt -t ext4:

Removing Data Disks from the Firewall VM
If the destination of the migration is not an empty disk, the migration must be forced (-f switch used).
Step 1. Move /phion0/ to the OS Disk
Log into the firewall via SSH.
Enter
cloud-storctl migrate -f /phion0 sda2
Step 2. Remove the Data Disks from the Firewall VM
Shut down the firewall VM.
Go to the Azure Portal: https://portal.azure.com
Go to the firewall VM
In the Settings section, click Disks.
Locate the data disk.
Next to the entry, click the Detach icon on the right.

Repeat for all data disks.
Start the firewall VM.
The firewall VM is now using the sda2 partition of the OS disk for /phion0.
