Barracuda Secure Connectors can connect to the Internet using DHCP client, static, or Wi-Fi client connections. The connections can be configured through the Secure Connector Editor or, for troubleshooting purposes, directly on the web interface of the Secure Connector.
DHCP Client
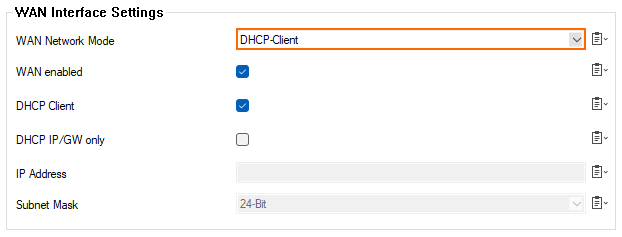
The Secure Connector receives a public IP address from the DHCP client of the ISP. All traffic is automatically sent out through the WAN interface.
Configuration Using the Secure Connector Editor
- Go to your cluster > Cluster Settings > Secure Connector Editor.
- Click Lock.
- Double-click to edit the device or Secure Connector template.
- In the left menu, click WAN Settings.
- (Template only) Enable WAN Interface Settings.

- From the WAN Network Mode drop-down list, select DHCP-Client.
- Click OK and Activate.
Configuration Using Web Interface Override
Use the web interface override to temporarily restore connectivity. Correct any misconfigurations on the Control Center beforehand because the configuration on the Secure Connector will be overridden immediately after the configuration lock in the web interface has been released.
- Log into the web interface.
- Click the Network tab.
- Click Retrieve Lock.
- In the WAN Interface section, set DHCP Client to Yes.
- Click Save.
- On the top of the page, click Activate Configs.
- To return to using the configuration stored on the Control Center, click Release Lock.
Static IP Address
You can configure a static IP address and route if you use a static IP address to connect to the Internet. Static IP addresses are unique to the device and, as such, cannot be configured via Secure Connector template.
Configuration Using the Secure Connector Editor
- Go to your cluster > Cluster Settings > Secure Connector Editor.
- Click Lock
- Double-click to edit the Secure Connector.
- In the left menu, click WAN Settings.
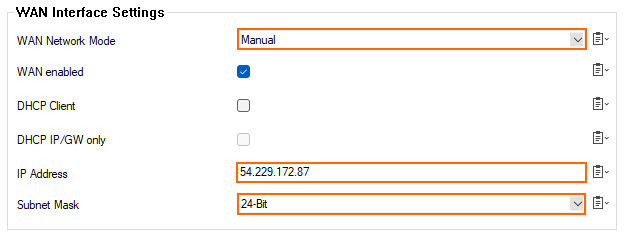
- From the WAN Network Mode drop-down list, select Manual.
- Enter the IP Address.
- Select the Subnet Mask.
- In the left menu, click Routing Settings.
- Enable System Routes.
- Click + to add a route to the System Routes table.
- Enter a Name and click OK. The System Routes window opens.
- From the Interface Name drop-down list, select WAN.
- Enter the Gateway IP address.
- Enter the
0.0.0.0/0as the Target Network Address. - From the Type drop-down list, select gateway.

- Click OK and Activate.
Configuration Using Web Interface Override
Use the web interface override to temporarily restore connectivity. Correct any misconfigurations on the Control Center beforehand because the configuration on the Secure Connector will be overridden immediately after the configuration lock in the web interface has been released.
- Log into the web interface.
- Click the Network tab.
- Click Retrieve Lock.
- In the WAN Interface section, set DHCP Client to No.
- Enter the WAN IP Address.
- From the Subnet Mask drop-down list, select the subnet mask.
- Click Save.
- In the Network Routes section, click + Add Route. The Add Network Route page opens.
- From the Device drop-down list, select WAN.
- Enter the Gateway IP address.
- Enter
0.0.0.0/0as the Target Network. - Click Add Route.
- On the top of the page, click Activate Configs.
- To return to using the configuration stored on the Control Center, click Release Lock.
Wi-Fi Client
When used in Wi-Fi client mode, the Secure Connector can connect to wireless networks to connect to the Internet.
Configuration Using the Secure Connector Editor
- Go to your cluster > Cluster Settings > Secure Connector Editor.
- Click Lock
- Double-click to edit the device or template.
- In the left menu, click Wi-Fi Settings.
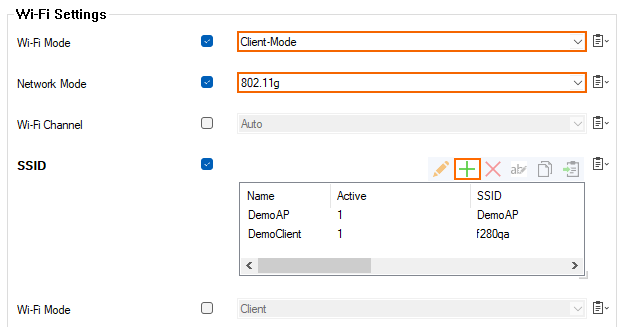
- From the Wi-Fi Mode drop-down list, select Client-Mode.
- Click + in the SSID to add a wireless network.
- Enter a Name and click OK. The SSID window opens.
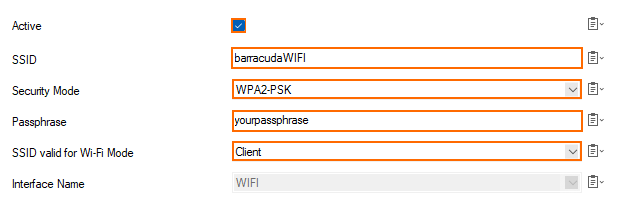
- Configure the following settings for the wireless network:
- SSID – Enter the SSID for your network.
- Security Mode – Select the security protocol used by the wireless network: None, WPA2-PSK, or WPA-PSK.
Passphrase – Enter the passphrase of the wireless network.
- SSID valid for Wi-Fi Mode – Select Client.
- Click OK.
- Select the Network Mode. The Barracuda Secure Connector supports 802.11b and 802.11g.
- Click OK and Activate.
Configuration Using Web Interface Override
Use the web interface override to temporarily restore connectivity. Correct any misconfigurations on the Control Center beforehand because the configuration on the Secure Connector will be overridden immediately after the configuration lock in the web interface has been released.
- Log into the web interface.
- Click the Wireless tab.
- Click Retrieve Lock.
- In the Wi-Fi Configuration section, set Operating Mode to Client.
- From the Country drop-down list, select your country.

- In the Wi-Fi-Client Interface section, configure the Wi-Fi interface settings:
- DHCP Client – Set DHCP Client to Yes.
- Static IP address – Set DHCP Client to No.
- (Static IP address only) Configure the default route for the WAN interface:
- Enter the IP Address and select the Subnet Mask.
- Click Save.
- Click the Network tab.
- In the Network Routes section, click Add Route. The Add Network Route page opens.
- From the Device drop-down list, select WAN.
- Enter the Gateway IP address.
- Enter
0.0.0.0/0as the Target Network. - Click Add Route.
- Click the Wireless tab.
- In the Wi-Fi SSIDS section, select Scan. The Wi-Fi Scan page opens.
- Locate the wireless network you want to connect to, and click Add. The Add Wi-Fi SSID page opens.
Enter the Passphrase.
- Click Add SSID.
- On the top of the page, click Activate Configs.
- To return to using the configuration stored on the Control Center, click Release Lock.
Wireless WAN Modem
Connect the Barracuda 3G/UMTS modem to the Secure Connector.
Configuration Using the Secure Connector Editor
- Go to your cluster > Cluster Settings > Secure Connector Editor.
- Click Lock
- Double-click to edit the device or template.
- In the left menu, click Wireless WAN Settings.
- Select the WWAN Active check box.

- Enter the Wireless WAN Connection Details matching your mobile provider:
- Access Point Name (APN)
- SIM PIN
- Phone Number

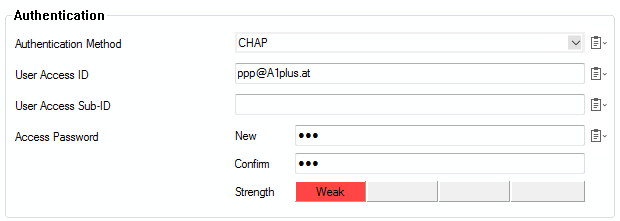
- Enter the Authentication settings matching your mobile provider:
- Authentication Method
- User Access ID
- User Access Sub-ID
Access Password
- Click OK and Activate.
Configuration Using Web Interface Override
Use the web interface override to temporarily restore connectivity. Correct any misconfigurations on the Control Center beforehand because the configuration on the Secure Connector will be overridden immediately after the configuration lock in the web interface has been released.
- Log into the web interface.
- Click the Modem tab.
- Click Retrieve Lock.
- Enable WWAN. The Modem Config section opens.
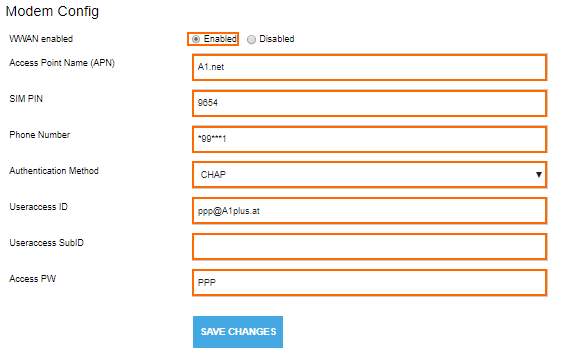
- Enter the configuration settings matching your mobile provider:
- Access Point Name (APN)
- SIM PIN
- Phone Number
- Authentication Method
- Useraccess ID
- Useraccess SubID
- Access PW
- Click Save Changes.
- Activate the configuration.
- To return to using the configuration stored on the Control Center, click Release Lock.
