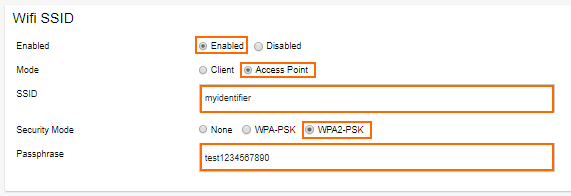
The Wi-Fi interface can be configured to act as an access point. In Access Point mode, the Secure Connector uses a DHCP server for clients connecting to the Wi-Fi. Depending on the configuration of the zone firewall, Wi-Fi clients can then access either the Internet via the WAN port, or send all traffic through the VPN to the Access Controller in your network. A gateway route for the Wi-Fi network is automatically created in Access Point mode. You can also disable the Wi-Fi interface.
Wi-Fi Access Point
Configuration Using the Secure Connector Editor
Go to your cluster > Cluster Settings > Secure Connector Editor.
Click Lock.
Double-click the device or template.
In the left menu, click Wi-Fi Settings.
From the Wi-Fi Mode drop-down list, select Access-Point.
Click + to add a SSID. The SSID window opens.
Enter a Name for the Wi-Fi network, and click OK.
Select the Active check box.
Enter the SSID.
(optional) Select the Security Mode.
Enter the Passphrase.

Click OK.
(optional) Select the Network Mode and Wi-Fi Channel.
(optional) Change the Wi-Fi Network: Click OK and Activate.
- IP Address – Enter the IP address of the Wi-Fi interface.
- Subnet Mask – Select the subnet mask.
- DHCP Start IP – Enter the first IP address of the DHCP range.
- DHCP End IP – Enter the last IP address of the DHCP range.
- Click OK and Activate.
Configuration Using Web Interface Override
Use the web interface override to temporarily restore connectivity. Correct any misconfigurations on the Control Center beforehand because the configuration on the Secure Connector will be overridden immediately after the configuration lock in the web interface has been released.
- Log into the web interface.
- Click the Wireless tab.
- Click Retrieve Lock.
- In the Wi-Fi CONFIGURATION section, set Operating Mode to Access Point.
- From the Country drop-down list, select your country.

- Click Save Changes.
- In the Wi-Fi AP INTERFACE section, configure the Wi-Fi interface settings:
- Automatic Network Assignment – Set Auto Mode to Enabled.
- Explicit Network Assignment – Set Auto Mode to Disabled.
- (Explicit network assignment only):
- Enter the IP Address assigned to the Wi-Fi interface. Do not use an IP address that is part of the Secure Connector network.
- Select the Subnet Mask.
- Set DHCP Server to Enabled.
- Click Save Changes.
- In the Wi-Fi SSIDS section, select Add SSID. The Add Wi-Fi SSID page opens.
- Configure the wireless network settings:
- Mode – Select Access Point.
- SSID – Enter the wireless network identifier.
- Security Mode – Select WPA-PSK2, WPA-PSK or None.
Passphrase (WPA-PSK2, WPA-PSK only) – Enter the passphrase.

- Click Add SSID.
- Enter the Passphrase.
- Click Add SSID.
- On the top of the page, click Activate Configs.
- To return to using the configuration stored on the Control Center, click Release Lock.
Disable Wi-Fi
Configuration using the Secure Connector Editor
- Go to your cluster > Cluster Settings > Secure Connector Editor.
Double-click the device or template.
In the left menu, click Wi-Fi Settings.
From the Wi-Fi Mode drop-down list, select Off.
- (optional) Alternatively, you can also disable individual SSID:
- Double-click the SSID.
- Clear the Active check box.
- Click OK.
- Click OK and Activate.
Configuration Using Web Interface Override
Use the web interface override to temporarily restore connectivity. Correct any misconfigurations on the Control Center beforehand because the configuration on the Secure Connector will be overridden immediately after the configuration lock in the web interface has been released.
- Log into the web interface.
- Click the Wireless tab.
- Click Retrieve Lock.
- In the Wi-Fi CONFIGURATION section, set Operating Mode to Off.
- Click Save Changes.
- On the top of the page, click Activate Configs.
- To return to using the configuration stored on the Control Center, click Release Lock.
