Barracuda Firewall Insights is a virtual appliance purpose-built for rapidly generating aggregated / dedicated reports for CloudGen Firewalls while maintaining or improving the accuracy of reporting data. Unlike a firewall that retains data for a maximum of 7 days, Firewall Insights caches data for up to 12 months. Creating reports is done using schedules. Since Firewall Insights enables CloudGen Firewalls to use less disk space on their internal SSDs, it contributes to longer SSD lifetimes. It also provides an aggregate view of data for customers with multiple connected devices.
Host names for stand-alone firewalls used on Firewall Insights must be unique. When using Firewall Insights in connection with more than one Control Center, the range IDs of the Control Centers must not overlap. This restriction does not apply to stand-alone firewalls. HA clusters are displayed as a single unit on Firewall Insights using the name of the primary firewall. The authentication data is transmitted through a TLS connection on TCP port 2400; the log stream is transmitted through a TLS connection on TCP port 8001.
The following data is sent to Firewall Insights:
- Firewall activity data
- SDWAN statistics
- Information about detected threats.
Before You Begin
- You must provide a shared secret that is configured beforehand on Firewall Insights. The shared secret will serve for authenticating the firewall to Firewall Insights, see Firewall Insights - Getting Started .
- Your Barracuda Firewall Insights must be running and reachable via the network for all local CloudGen Firewalls. For remote Firewalls, use a remote management tunnel to establish the connection to Firewall Insights. See How to Stream Data to Firewall Insights via a Remote Management Tunnel.
- Verify that your CloudGen Firewall is supported by Barracuda Firewall Insights. See Supported CloudGen Firewall Firmware.
Step 1. (optional) Enable SCADA Protocol Detection
If you are using SCADA, the corresponding protocol detection must be activated.
- Go to CONFIGURATION > Configuration Tree > Box > Infrastructure Service > General Firewall Configuration.
- Click Lock.
- In the left navigation menu, click Switch to Basic mode.
- In the left menu, click Application Detection.
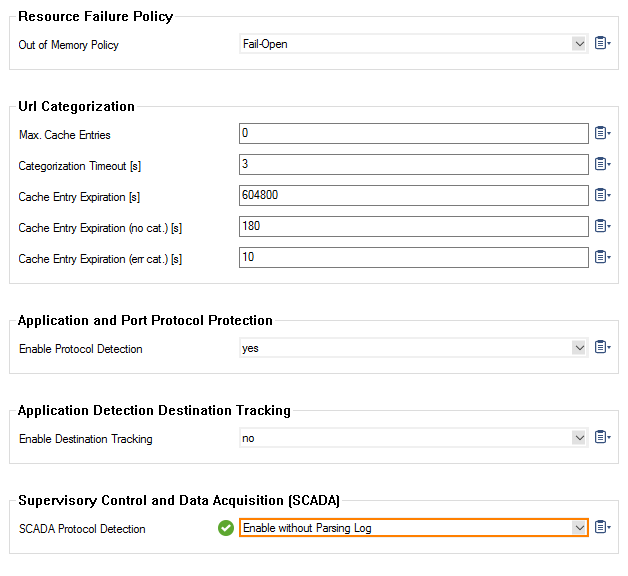
- In the Supervisory Control and Data Acquisition (SCADA) section, select Enable without Parsing Log for SCADA Protocol Detection.

- Click Send Changes and Activate.
Step 2. Enable Streaming to Barracuda Firewall Insights
- Go to CONFIGURATION > Configuration Tree > Box > Infrastructure Services > Syslog Streaming.
- In the left navigation bar, click Barracuda Firewall Insights.
- Click Lock.
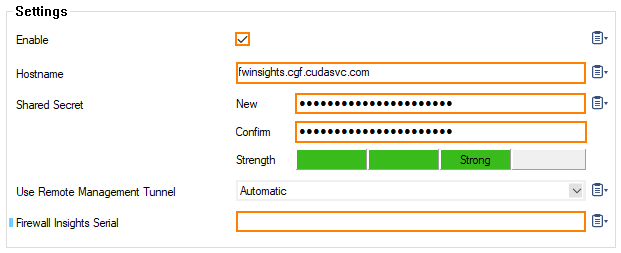
- Select the Enable check box.
- Enter the Hostname or the IP address of Firewall Insights.
- Enter the Shared Secret from your Firewall Insights in the New edit field.
- Re-enter the Shared Secret into the Confirm edit field.
(optional) Enter the Firewall Insights serial number you received together with the Barracuda Firewall Insights license.

- Click Send Changes and Activate.
Your firewall will now send data to Barracuda Firewall Insights.
Step 3. (optional) Specify the location of the CloudGen Firewall
On CC-manged boxes, you can specify the location of your CloudGen Firewall. This will make the location information on Barracuda Firewall Insights more precise.
- Go to CONFIGURATION > Configuration Tree > Multi-Range > your range > your cluster > your box > Properties.
- In the left menu, select Geo Location.
- Click Lock.
- Specify the location of the system in the Location Specific Settings section.
- Appliance Location – Enter the name of the geolocation.
- Located in Country – Select the country your appliance is located in from the drop-down menu .
Located in Timezone – Select the time zone your appliance is located in from the drop-down menu. - Enter the GPS Coordinates of the location of the CloudGen Firewall.
- In the Barracuda Earth Integration section, enable Include in Barracuda Earth by selecting yes from the drop-down menu.
- Click Send Changes and Activate.
Further Information
If you have several devices to configure, save the configuration to Repository and link your devices to it. See Repositories for detailed information.
