

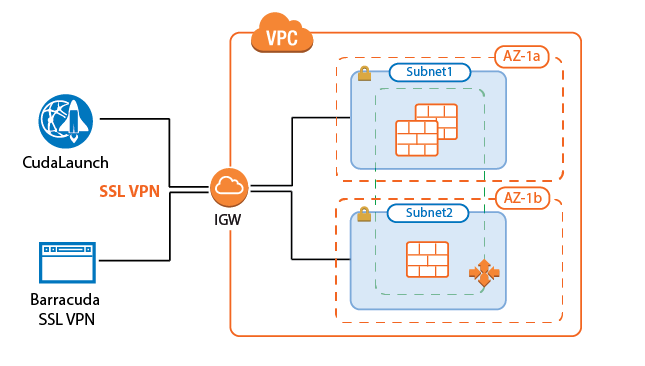
Let your users connect to a network in an AWS Auto Scaling cluster using SSL VPN. Enable the SSL VPN service and CudaLaunch, create a group access policy, and configure the login and authentication settings for the SSL VPN connections. To use SSL VPN, you must upload a certificate to the AWS certificate manager. For CudaLaunch on iOS, CloudGen Firewall Auto Scaling Clusters are supported for CudaLaunch 2.3.0 or higher.
Before You Begin
- Configure an external authentication server or NGF local authentication. For more information, see Authentication.
Step 1. Disable Port 443 for Site-to-Site and Client-to-Site VPN
- Go to CONFIGURATION > Configuration Tree > Box > Assigned Services > VPN-Service > VPN Settings.
- Click Lock.
- Set Listen on port 443 to No.
- Click OK.
- Click Send Changes and Activate.
Step 2. Enable the SSL VPN Service
- Go to CONFIGURATION > Configuration Tree > Box > Assigned Services > VPN-Service > SSL-VPN.
- In the left menu, click SSL VPN Settings.
- Click Lock.
- Set Enable SSL VPN to Yes.

- Click Send Changes and Activate.
Step 3. Configure SSL VPN General Service Settings
- Go to CONFIGURATION > Configuration Tree > Box > Assigned Services > VPN-Service > SSL-VPN.
- In the left menu, select Service Setup.
- Expand Configuration Mode and click on Switch to Advanced View.
- Click Lock.
- Verify that the Listen IP for the SSL VPN service is correct, or click + to add a Listen IP. E.g.,
127.0.0.9
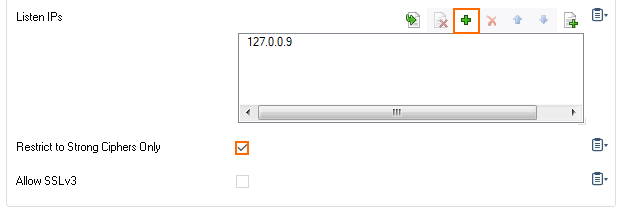
- Enable Restrict to Strong Ciphers Only.
- (optional) Configure a custom SSL Cipher Spec string to be used by the SSL VPN service.
Set Strict SSL Security to yes.
- Select the Identification Type:
- Generated-Certificate – The certificate and the private key is automatically created by the firewall.
- Self-Signed-Certificate – Click New Key to create a Self-Signed Private Key and then Edit to create the Self-Signed Certificate.
- External-Certificate – Click Ex/Import to import the CA-signed External Certificate and the External-Signed Private Key.

- Configure the following settings:
- Use Max Concurrent Users – Set to no.
- Session Timeout (m) – Set to
30. This setting must match with the timeout on the ELB.
- Click Send Changes and Activate.
Step 4. Configure a User Identity Access Control Policy
- Go to CONFIGURATION > Configuration Tree > Box > Assigned Service > VPN-Service > SSL-VPN.
- In the left menu, click Access Control Policies.
- Click Lock.
- Click + to add an Access Control Policy.
- Enter the Name for the access control policy.
- Click OK.
- In the Access Control Policy section, select the Active check box.

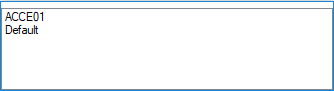
In the Group Access section, click + to add Allowed Groups and Blocked Groups. Click x to remove an entry from the table.
- In the Authentication section, click + to add an Authentication Scheme.
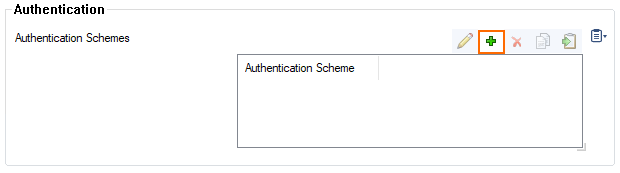
- Select Use Identity from the Authentication Scheme drop-down list and click OK.
- Click OK to exit the configuration.
- Click Send Changes and Activate.
Step 5. Configure Login to Log In with User Identity
- Go to CONFIGURATION > Configuration Tree > Box > Assigned Services > VPN-Service > SSL-VPN.
- In the left menu, click SSL VPN Settings.
- Click Lock.
- In the Access section, set the Identity Scheme to your preferred authentication method, e.g., MS-Active Directory.
- Click + to add your access control policy to the list of Access Control Policies.
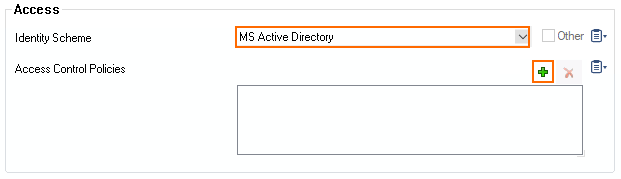
- From the pop-up menu, select the access control policy that you configured in Step 4 for Use Identity, i.e., ACCE01.
- (optional) In the Dynamic App Super Users field, add user groups that should be allowed to enable and disable dynamic apps.
- (optional) Customize the login messages and logos:
- Import a 200 x 66-pixel PNG or JPG image to customize the Logo.
- Enter a plain text Login Message. E.g.,
Welcome to the Barracuda CloudGen Firewall SSL VPN. - Enter a Help Text (HTML).
- Click Send Changes and Activate.
Step 6. Create Access Rules
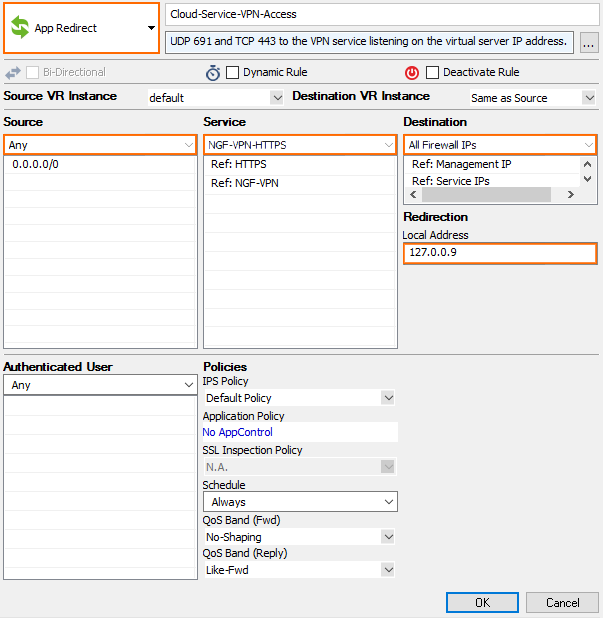
Verify the the access rule CLOUD-SERVICE-VPN-ACCESS is present in the forwarding ruleset. If not, create the rule. Use the following settings:
- Action – Select App Redirest.
- Source – Select Any.
- Service – Select NGF-VPN-HTTPS .
- Destination – Select the network object containing all firewall IPs.
- Redirection – Enter the IP address of the VPN service. E.g.,
127.0.0.9.
Troubleshooting
- If the sslvpn log contains the following line:
http_listener: failed to listen on <IP address>@443verify that no other service on the firewall is running on that port and that no Dst NAT access rules are forwarding TCP port 443 (HTTPS) traffic. - Updating certificates requires the SSL VPN service to be restarted. To do this in an ASG, scale the ASG to a size of one. Then restart the VPN (SSL VPN) service. Then scale out, or wait for the scaling policies to scale your ASG out to the desired size.