Traffic Duplication copies packets and sends them over the primary and secondary transport simultaneously to ensure that traffic continues uninterrupted even if one VPN transport goes down. At the other VPN endpoint, the packet stream is reassembled. Traffic Duplication should be used only for critical, real-time traffic using two transports with the same latency and bandwidth.

Limitations
- Not available for transports using IPv6 VPN envelopes.
- Latency (Round Trip Time) and bandwidth must be identical for both transports.
Before You Begin
Create a multi-transport VPN tunnel between two CloudGen Firewalls:
- Create a TINA site-to-site VPN tunnel. For more information, see How to Create a TINA VPN Tunnel between CloudGen Firewalls or How to Create a VPN Tunnel with the VPN GTI Editor.
- Add one or more additional transports to the VPN tunnel. For more information, see How to Add a VPN Transport to a TINA VPN Tunnel with Explicit Transport Selection or How to Configure SD-WAN Using the VPN GTI Editor.
Step 1. Create a Custom Connection Object for the SD-WAN Primary
- Go to CONFIGURATION > Configuration Tree > Box > Assigned Services > Firewall > Forwarding Rules.
- In the left menu, click Connections.
- Right-click the table and select New Connection. The Edit/Create a Connection Object window opens.
- Enter the Name.
- From the Translated Source IP list, select Original Source IP.
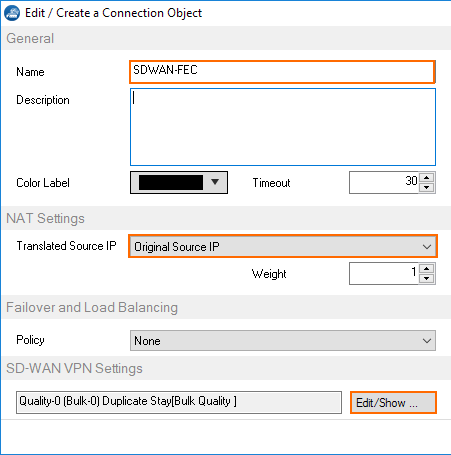
- To edit the SD-WAN VPN settings, click Edit/Show . The SD-WAN Settings window opens.
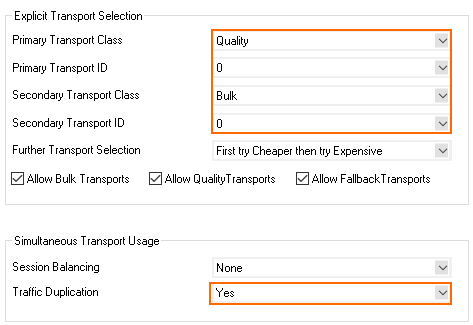
- Configure the Transport Policies:
- Transport Selection Policy – Select Explicit Transport Selection.
- SD-WAN Learning Policy – Select Primary.

- Configure the Explicit Transport Selection:
- Primary Transport Class – Select the primary transport.
- Primary Transport ID – Select the ID for the primary transport.
- Secondary Transport Class – Select the secondary transport.
- Secondary Transport ID – S elect the ID for the secondary transport.
- Primary Transport Class – Select the primary transport.
- From the Traffic Duplication (FEC) list, select Yes.
- Click OK.
- Click Send Changes and Activate.
Step 3. Create a Custom Connection Object for the SD-WAN Secondary
- Go to CONFIGURATION > Configuration Tree > Box > Assigned Services > Firewall > Forwarding Rules.
- In the left menu, click Connections.
- Right-click the table and select New Connection. The Edit/Create a Connection Object window opens.
- Enter the Name.
- From the Translated Source IP list, select Original Source IP.

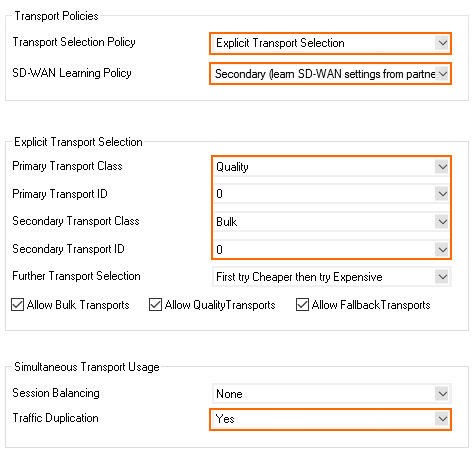
- To edit the SD-WAN VPN settings, click Edit/Show. The SD-WAN Settings window opens.
- From the SD-WAN Learning Policy drop-down list, select Secondary.
- Click OK.
- Click Send Changes and Activate.
Step 4. Modify Access Rule on the Firewall Acting as SD-WAN Primary
- Go to CONFIGURATION > Configuration Tree > Box > Assigned Services > Firewall > Forwarding Rules.
- Click Lock.
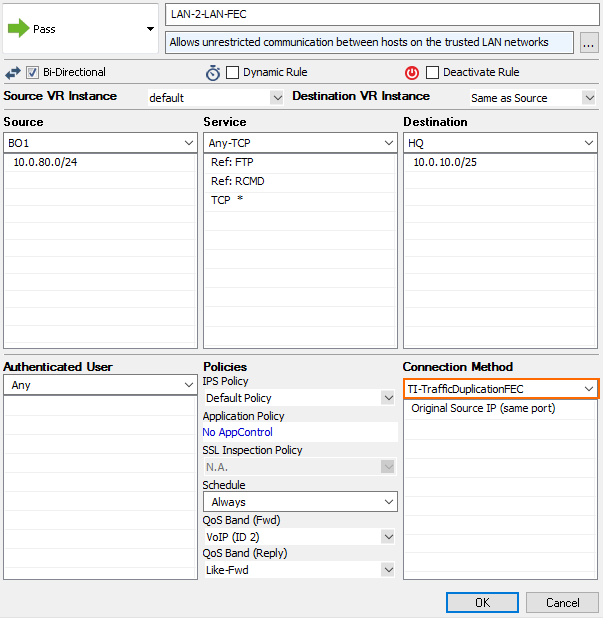
- Right-click the ruleset and select New > Rule to create an access rule to match the VPN traffic you want to balance:
- Action – Select Pass.
- Bi-Directional – Select the check box to apply the rule in both directions.
- Source – Select a network object for all local networks.
- Service – Select a service object from the list.
- Destination – Select the network object containing the remote networks.
- Connection Method – Select the connection object for the SD-WAN primary created in Step 2.
- Click OK.
- Click Send Changes and Activate.
Step 5. Modify Access Rule on the Firewall Acting as SD-WAN Secondary
- Go to CONFIGURATION > Configuration Tree > Box > Assigned Services > Firewall > Forwarding Rules.
- Click Lock.
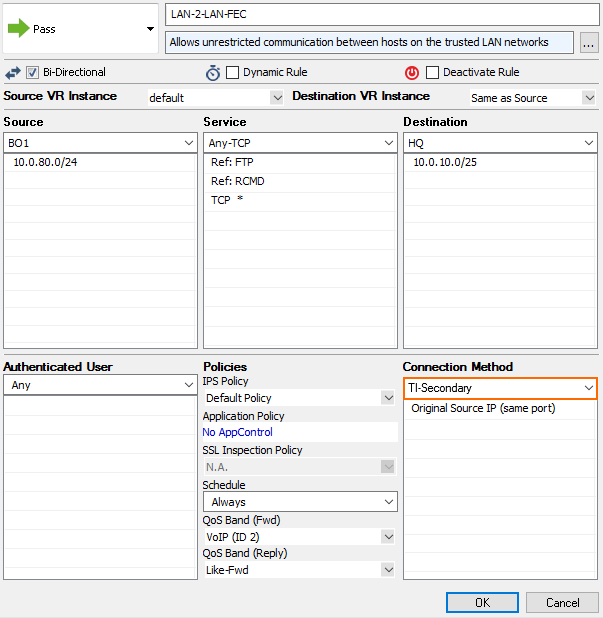
- Right-click the ruleset and select New > Rule to create an access rule to match the VPN traffic you want to balance:
- Action – Select Pass.
Bi-Directional – Select the check box to apply the rule in both directions.
- Source – Select a network object for all local networks.
- Service – Select a service object from the list.
- Destination – Select the network object containing the remote networks.
- Connection Method – Select the connection object for the SD-WAN secondary created in Step 3.
- Click OK.
- Click Send Changes and Activate.
Traffic matching these access rules is now duplicated on the primary and secondary transport. Failure of one of the transports is completely transparent and no packet is dropped. In the VPN tab, Traffic Duplication is not visualized. Traffic Duplication can be tested very easily by disabling one transport. If traffic fails over instantly with no packets dropped and with no delay, Traffic Duplication is working correctly.
