When configuring a CC-managed HA pair, the secondary firewall receives its configuration through the primary firewall. For a better overview and management of both firewalls, only the primary firewall is displayed in the Control Center’s configuration tree. Each change made on the primary firewall is immediately propagated to the configured secondary firewall.
On the Control Center's status map, both the primary and the secondary firewall is displayed as soon as the configuration for both firewalls is completed.
Before You Begin
- Ensure that a range and a cluster are configured where the primary and secondary firewalls are going to be configured.
- Ensure that both stand-alone firewalls are running firmware version 8.0.1.
- Ensure that the management IP address (MIP) of both firewalls are in the same subnet.
Step 1. Create the PAR File for the Primary Firewall
- Log into the firewall that will be the future primary firewall.
- Go to CONFIGURATION > Configuration Tree.
- Right-click Box.
- In the list, click Create PAR file…
Step 2. Import the PAR File into the Control Center
- Log into the Control Center.
- Go to CONFIGURATION > Configuration Tree > Multi Range > your range > your cluster > Boxes.
- Right-click Boxes.
- In the list, click Import Box from PAR…
- Click Activate.
Step 3. Create the Secondary Firewall
On the Control Center, the configuration node for the secondary HA firewall must be created within the Configuration Tree. For this, the two nodes Properties and Network will be replaced by a new node with the same name that also includes the edit fields for the secondary firewall.
- Go to CONFIGURATION > Configuration Tree > Multi Range > your range > your cluster > Boxes > your box .
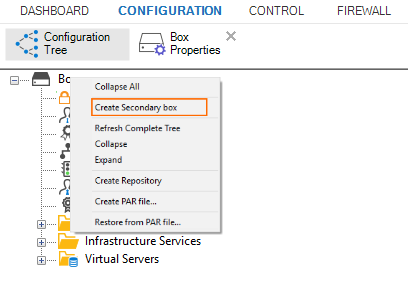
- Right-click Box and select Create Secondary Box.
- The Box Properties and Network nodes are replaced by a new node, each suitable for an HA configuration.
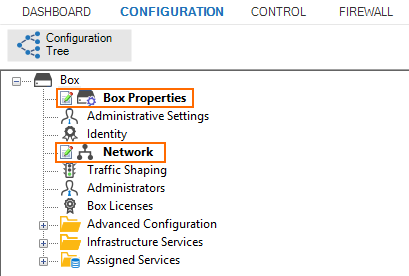
- Open the Network page.
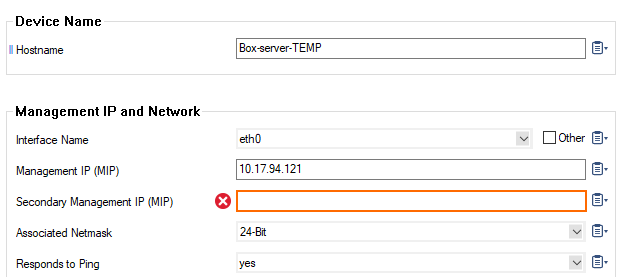
- Enter the Management IP (MIP) for the secondary firewall. The MIPs of the HA pair must be in the same subnet.
- Click Send Changes and Activate.
Step 4. Create the PAR File for the Primary Firewall
The new configuration in the Network node must be propagated to the primary firewall.
- Go to CONFIGURATION > Configuration Tree > Multi Range > your range > your cluster > Boxes > your box .
- Right-click Box and select Create PAR file for box…
- Save the PAR file for the primary firewall.
Step 5. Import the PAR File into the Primary Firewall
Log into your stand-alone firewall that must be turned into the primary firewall.
- Go to CONFIGURATION > Configuration Tree > Box.
- Right-click Box and select Restore from PAR file.
- Click OK.
- Select the PAR file that you already created for your primary firewall and click OK.
- Click Activate.
Step 6. Activate the New Network Configuration for the Primary Firewall
- On the primary firewall, go to CONTROL > Box.
- In the left navigation pane, expand Network and click Activate new network configuration.
- Select Failsafe as the activation mode.
- In the left menu, expand Operating System and click Reboot Box.
Step 7. Create the PAR File for the Secondary Firewall
The new configuration in the Network node must be also propagated to the secondary firewall.
- On the Control Center, go to CONFIGURATION > Configuration Tree > Multi Range > your range > your cluster > Boxes > your box .
- Right-click Box and select Create PAR file for box…
- Save the PAR file for the secondary firewall.
Step 8. Import the PAR File into the Secondary Firewall
Log into your stand-alone firewall that must be turned into the secondary firewall.
- Go to CONFIGURATION > Configuration Tree > Box.
- Right-click Box and select Restore from PAR file.
- Click OK.
- Select the PAR file that you already created for your secondary firewall and click OK.
- Click Activate.
Step 9. Activate the New Network Configuration for the Secondary Firewall
- On the secondary firewall, go to CONTROL > Box.
- In the left navigation pane, expand Network and click Activate new network configuration.
- Select Failsafe as the activation mode.
- In the left menu, expand Operating System and click Reboot Box.
Step 10. Verify the Configuration Change in the Control Center
On the Control Center, both the primary and the secondary firewall will be displayed in the Status Map after a successful reboot.
- On the Control Center, go to CONTROL > Status Map.
- Verify that both the primary and the secondary firewall are displayed in the Status Map.

Step 11. Verify that the Primary and Secondary Firewall are Managed by the Control Center
- In Firewall Admin, double-click the name of the primary and/or secondary firewall.
- Firewall Admin connects to the firewall and displays the configuration window.
- Go to CONFIGURATION > Configuration Tree.
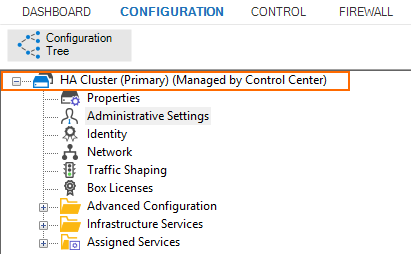
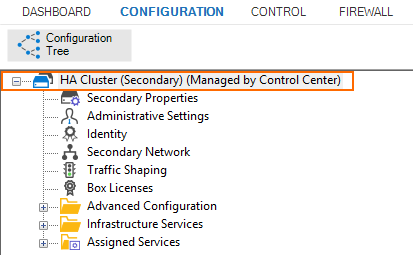
Verify that the top entry of the configuration tree displays the name HA Cluster (Primary / Secondary)(Managed by Control Center).
| Configuration Tree Primary Firewall | Configuration Tree Secondary Firewall |
|---|---|
 |  |
