If you are using the Barracuda Firewall Control Center either on-premises or in the cloud, you can modify the Azure template to retrieve the PAR file for the new CloudGen Firewall VM directly from the Control Center on deployment. The scripts authenticate either with CC admin credentials or a shared secret. Licenses that are already installed on PAYG firewall Instances are pushed to the Control Center before retrieving the PAR file. Firewalls using the BYOL images use the licenses configured on the Control Center.
'getpar' Command Line Parameters Usage
- -a|--address <address> – Control Center IP address.
- -u|--username <username> – CC admin user used to connect to the Control Center
- -c|--cluster <cluster> – Cluster name
- -r|--range <range> – Range number
- -b|--boxname <boxname> – Firewall name.
- -d|--destination <dest> – Destination directory and filename for the par file. E.g., /opt/phion/update/box.par
- -s|–spoe – Use Single Point of Entry to connect to the Control Center.
- -l|--pushlic auto|always|never – Configures if the licenses should be pushed to the Control Center before retrieving the PAR file.
Before You Begin
- Create an Azure template to deploy your CloudGen Firewall.
Step 1. Create the Firewall Configuration in the Control Center
Create the CloudGen Firewall configuration in the Control Center.
For more information, see How to Add a New CloudGen Firewall to the Control Center.
Step 2. Configure Authentication
The newly deployed firewall can authenticate either through a CC Admin account or with a shared key. The shared key is defined on a per-firewall level.
CC Admin Authentication
Create a CC admin and assign it an Administrative role with the following permissions:
- CC Configuration Permission – Select the Create PAR File check box.
For more information, see Control Center Admins and How to Configure Administrative Roles.
Shared Key Authentication
- Log in to the Control Center.
- Go to your firewall > Box Properties.
- In the left menu, click Operational.
- In the left menu, expand Configuration Mode and click Switch to Advanced View.
- Click Lock.
- Enter the PAR File Retrieval Shared Key.
- Click Send Changes and Activate.
Step 3. Add the Parameters to the Template
You must add the parameters you need to the template. The parameter names can be chosen individually, as long as they match with the customData script below.
- Add the following mandatory parameters to the parameter section of the template:
- ccip – The IP address of your Control Center if it is directly reachable, or the IP address of the border firewall forwarding the traffic to the Control Center.
- range – The range number.
cluster – The cluster name.
- firewallname – The name of the Firewall.
- Add the authentication parameters:
Control Center Admin:- ccuser – The CC admin.
- ccpwd – The password for the CC admin.
- ccsharedkey – The shared key used to authenticate to the Control Center.
- If you are deploying the template via Azure PowerShell, also add the parameters to the template parameter file or object.
Step 4. Modify the Template to Retrieve the PAR File
Add a script to the customData element of the template. Use the parameters defined above.
- Locate the OSProfile object in the Microsoft.Computer/virtualMachines resource object.
Add the getparfile script to the customData parameter depending on the authentication method:
Control Center Admin:"osProfile": { "computername": "[parameters('vmName')]", "adminUsername": "azureuser", "adminPassword": "[parameters('adminPassword')]", "customData": "[base64(concat('#!/bin/bash\n\n', 'echo \"', parameters('ccpwd'), '\" | /opt/phion/bin/getpar -a ', parameters('ccip'), ' -u ', parameters('ccuser'), ' -c ', parameters('cluster'), ' -r ', parameters('range'), ' -b ', parameters('firewallname'), ' -d /opt/phion/update/box.par -s >> /tmp/getpar.log' ))]" },Shared key authentication:
"osProfile": { "computername": "[parameters('vmName')]", "adminUsername": "azureuser", "adminPassword": "[parameters('adminPassword')]", "customData": "[base64(concat('#!/bin/bash\n\n', 'echo \"', parameters('ccsharedkey'), '\" | /opt/phion/bin/getpar -a ', parameters('ccip'), ' -c ', parameters('cluster'), ' -r ', parameters('range'), ' -b ', parameters('firewallname'), ' -d /opt/phion/update/box.par -s >> /tmp/getpar.log' ))]" },- Save the template.
Step 5. (optional) Allow Access to the Control Center
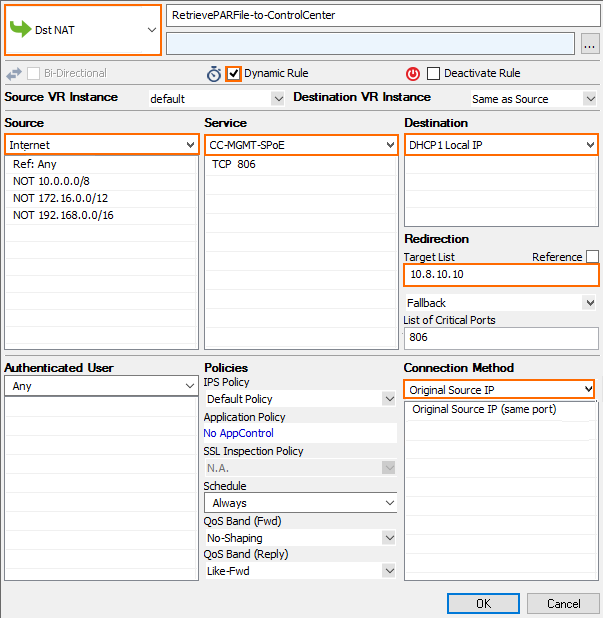
If the firewall VM cannot directly reach the Control Center, you must create a dynamic access rule on the border firewall. Using dynamic rules allows you to enable access only when deploying a new firewall. If SPoE is used, you must open port TCP 806.
- Action – Select Dst NAT.
- Source – If known, enter the public IP address of the Firewall, or select Internet.
- Service – Create and select a service object for TCP 806. For more information, see Service Objects.
- Destination – Enter the Point of Entry IP address of the border firewall.
- Redirect to – Enter the IP address of the Control Center.
- Connection Method – Select Original Source IP.

Next Steps
Deploy the firewall via the Azure template. For more information, see How to Deploy a CloudGen Firewall via Azure Templates.
