When replacing a hardware firewall with a new model, the firewall configuration must be migrated. You can migrate the firewall configuration to the last revision of the direct successor model, or to the last revision of the next larger model. In a high availability cluster, the primary firewall configuration is migrated. The secondary firewall is joined into the HA cluster by creating the PAR file for the secondary firewall on the primary firewall after the migration.
Before You Begin
Verify that the firewall model you are migrating to is supported for the source model. You can find the name and type of your firewall at CONFIGURATION > Configuration > Network, Appliance Model, Appliance Sub Model Type, and CONFIGURATION > Configuration Tree > Properties, section Product and Model, Product Type, and Firewall Model.
For more information on the supported models, see Migrating to a New Hardware Model.
Step 1. Create a PAR File from the Source Firewall
Log into the source firewall.
Go to CONFIGURATION > Configuration Tree.
Right-click Box and click Create PAR file. The Save as window opens.
Click Save.
Step 2. Import and Migrate on the Destination Firewall
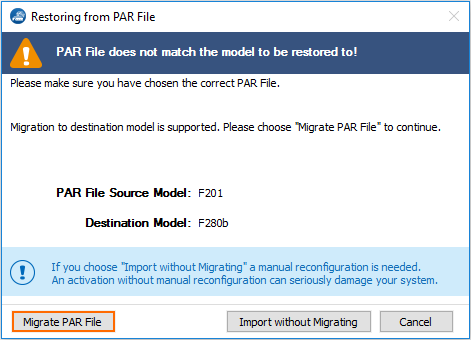
Import the PAR file on the destination firewall. The model mismatch is automatically detected.
Log into the destination firewall.
Go to CONFIGURATION > Configuration Tree.
Right-click Box and click Restore from PAR file. The Restore from PAR file window opens.
Click OK.
Select the PAR file and click Open. The Restoring from PAR file windows opens.
Click OK.
Click Migrate PAR File.

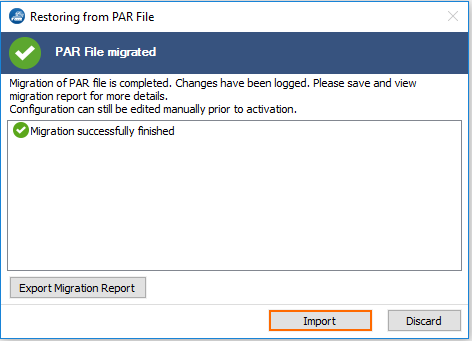
(optional) click Export Migration Report to create a log file with the changes.
Click Import.

(if required) Complete manual migrations, or verify configuration nodes that were not migrated automatically.
Click Activate.
Step 3. Restart the Firmware and Activate the Network Configuration
Log into the destination firewall.
Go to CONTROL > Box.
In the left menu, expand the Operating System section and click Firmware Restart. This may take some time.
If required, click Reconnect.
In the left menu, expand the Network section and click Activate new network configuration.
Click Failsafe.
Step 4. (HA cluster only) Create a PAR File for the Secondary Firewall
If you are migrating a high availability cluster, create the PAR file for the secondary firewall on the primary firewall that has already been migrated. For more information, see How to Set Up a High Availability Cluster.
The new hardware appliance is now running the same firewall configuration. You can now perform the hardware switch.
