In this network setup, a multicast stream is transmitted from a multicast source to two multicast clients over a network containing multiple multicast routers. The streaming path leads from the multicast source to a CloudGen firewall which forwards the stream to a layer 3 router that also works as a Rendezvous Point (RP) for all other involved multicast routers on the path.
The last device, which is a layer 2 switch, forwards the stream received from the last multicast router as soon as a multicast client subscribes for receiving the stream.
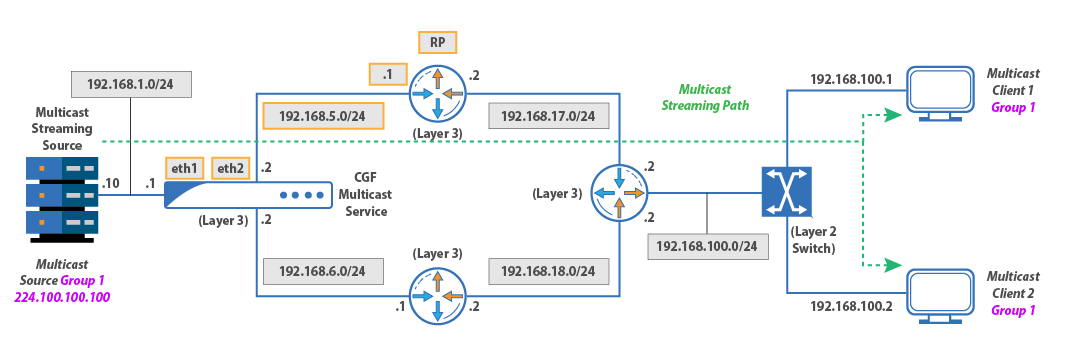
Based on this strategy, the stream can be transmitted only once, thus keeping network bandwidth low, and all subscribed clients will be able to receive the stream content synchronously.
In this example, the CloudGen Firewall and the streaming source are in the network 192.168.1.0/24. The streaming source sends the stream on its egress interface 192.168.1.10. The CloudGen Firewall receives the stream on the ingress interface eth1 with the IP address 192.168.1.1 and forwards it on the egress interface eth2 with the IP address 192.168.5.2, which is part of the 192.168.5.0/24 network.
The next router, which is also the Rendezvous Point (RP) for the other multicast routers, receives the stream on the interface with IP address 192.168.5.1, and forwards it on the egress interface with the IP address 192.168.17.2.
The final router receives the multicast stream analogous on 192.168.17.2, and forwards it from his egress interface with IP address 192.168.100.2 to a multicast layer 2 switch which finally distributes the stream to the receiving clients as long they are subscribed.
In this example, the users must subscribe to the multicast group 224.100.100.100.
Before You Begin
Ensure that the ingress and egress interfaces on your firewall are configured for the eth1 (IP address = 192.168.1.1) and eth2 (IP address = 192.168.5.2) interface.
How to Configure the CloudGen Firewall for Multicast Routing over other Multicast Routers
To make the CloudGen Firewall forward multicast traffic from a multicast source via multiple routers, perform the following steps:
Activate Multicasting:
Log into your firewall.
Go to CONFIGURATION > Config Tree > Assigned Services > OSPF-RIP-BGP-Service > OSPF/RIP/BGP Settings > Operational Setup.
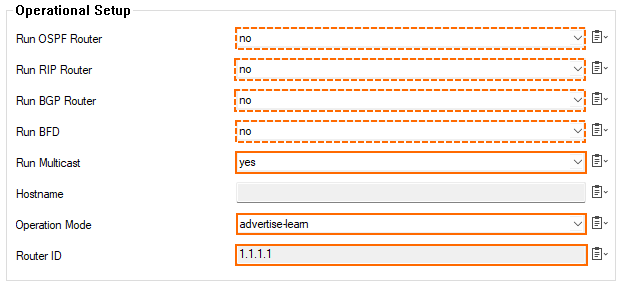
Ensure that the following parameters are turned ‘off’ (the following settings apply only to this article):
Run OSPF Router
Run RIP Router
Run BGP Router
Run BFD
Set Run Multicast to yes.
For Operation Mode, select advertise-learn.
Set Router ID to a value that meets your requirements (here: 1.1.1.1).
Configure PIM:
Go to CONFIGURATION > Config Tree > Assigned Services > OSPF-RIP-BGP-Service > OSPF/RIP/BGP Settings > Multicast Router Setup, section PIM Configuration.
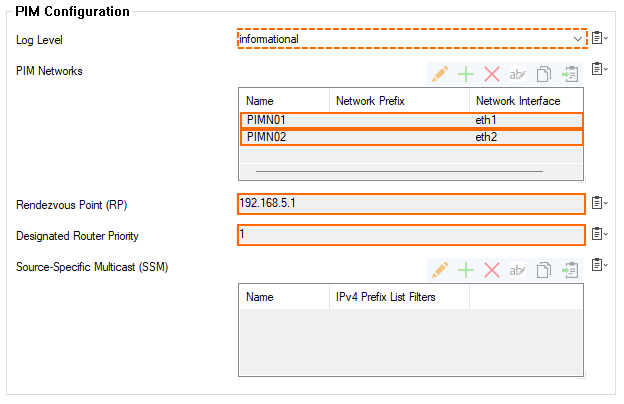
Ensure that Log Level is set to informational.
Configure the ingress multicast interface:
For PIM Network, click the green '+' icon.
The PIM Networks dialog window is displayed.
For Name, enter the name for the network in which the ingress interface is to be used.
Click OK… .
The dialog window for PIM Network : <your selected network name> is displayed.
For Network Interface, select eth1.
Click OK.
Configure the egress multicast interface:
For PIM Network, click the green '+' icon.
The PIM Networks dialog window is displayed.
For Name, enter the name for the network in which the egress interface is to be used.
Click OK… .
The dialog window for PIM Network : <your selected network name> is displayed.
For Network Interface, select eth2.
Click OK.
For Rendezvous Point (RP), enter 192.168.5.1.
Click Save Changes/Activate.
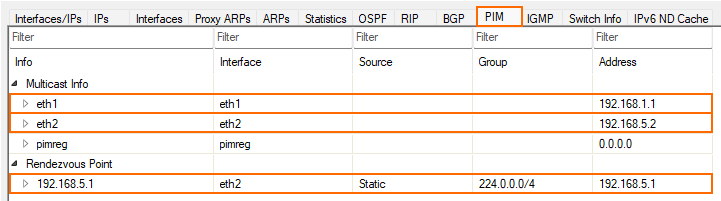
Check if Multicast Routing is up and running
Go to CONFIGURATION > CONTROL > Network.
Click the PIM tab.
The view displays the status of your configuration.