

Before migrating your CloudGen Firewall to 7.2.3, review the requirements and changes listed in the following sections. Some changes applied during the migration might require you to make preparations before the update or extra configurations after the update.
Migration Path to 7.2.3
You can upgrade to firmware 7.2.3 from the following firmware versions:
| Current Version | Target Version |
|---|---|
| 7.2.3 | |
| 6.0.0 - 6.0.7 | Yes |
| 6.1.0 - 6.1.3 | Yes |
| 6.2.0 - 6.2.4 | Yes |
| 7.0.0 - 7.0.4 | Yes |
| 7.1.0 EA - 7.1.4 | Yes |
| 7.2.0 EA1 | Yes |
| 7.2.1 EA2 | Yes |
| 7.2.2 | Yes |
Direct updating from firmware 5.x to 7.2.x is not possible. For more information, see Migrating from 5.4.x to 6.0.x.
Review Upgrade Requirements
Verify that your CloudGen Firewall or Control Center meets the upgrade requirements, and read the release notes for the firmware version.
Supported Models
You can upgrade the following CloudGen Firewall models to 7.2.3:
Barracuda CloudGen F-Series and Control Center Models | ||
|---|---|---|
Hardware Systems | F10 Rev B, F12 Rev A, F15 Rev A/B, F18 Rev A, F80 Rev A, F82 Rev A, F100 Rev B, F101 Rev B, F180 Rev A, F183 Rev A, F183R Rev A, F200 Rev C, F201 Rev C, F280 Rev A/B, F300 Rev B, F301 Rev B, F380 Rev A, F400 Rev B, F600 Rev C, F800 Rev B/C, F900 Rev A/B, F1000 Rev A, C400, C610 | |
| Virtual Systems | VF10, VF25, VF50, VF100, VF250, VF500, VF1000, VF2000, VF4000, VF8000, VC400, VC610, VC820, VFAC400, VFAC610, VFAC820 | |
| Public Cloud | AWS, Azure, Google Cloud | |
Standard Hardware Systems | ||
|---|---|---|
| Standard Hardware | A standard hardware system is a Barracuda CloudGen Firewall F-Series running on 3rd-party server hardware using an SF license. Consult the Barracuda Networks Technical Support to find out if your specific standard hardware is supported. | |
Disk Space Requirements
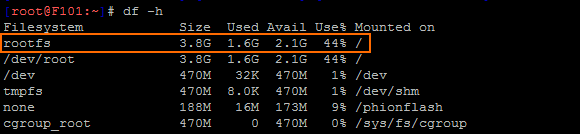
To upgrade a system to version 7.2.3, you must have at least 50 MB of free space in the /boot/ partition and at least 2.1 GB in the / (root) partition. If you are upgrading an F10 Rev B, F100 Rev B, F101 Rev B, verify that enough disk space is available:
To free up disk space, download the following cleanup script, and apply it via remote execution to centrally managed firewalls. For standalone firewalls, the script can be executed locally on firewall.
- Block the Virus Scanner service.
Download the Barracuda Cleanup Script for F10, F15, F100 models. Deploy it via remote execution to centrally managed firewalls. Alternatively run the commands manually in the command line interface.
Upgrading One Firewall in a High Availability Cluster
If you are upgrading a firewall in a high availability (HA) cluster without upgrading its partner, you must re-synchronize the firewalls:
- Go to FIREWALL > Live > Show Proc.
- Select the Sync Handler process and select Kill Selected.
The process is automatically restarted after a couple of seconds, and the primary and secondary firewalls automatically synchronize their sessions.
Barracuda Firewall Admin
After updating a system, you must also download Firewall Admin with the same version. Firewall Admin is backward-compatible. That means you can manage 5.2.x, 5.4.x, 6.x and 7.x F-Series Firewalls and Control Centers with Firewall Admin 7.2.3.
Migration Instructions for 7.2.3
When upgrading according to the migration path above, you must complete the migration steps listed below:
First-Generation ATP to Second-Generation Barracuda ATP Cloud Migration
As of January 31, 2019, the first-generation ATP cloud services used by default with firmware versions 6.2.x, 7.0.x, 7.1.0, 7.1.1, and 7.2.0 will be discontinued. Firewalls using ATP must switch to the second-generation ATP cloud service, which is known as Barracuda Advanced Threat Protection (BATP).
The following table gives an overview of the options you have when you run a special firmware version:
| Product | Your Firmware Version | Migrating Option |
|---|---|---|
| Stand-alone Box or Manged Box | 6.x ... 7.0.x | Firmware 7.0.x is end-of-support in December 2018! Update to the latest 7.1.x or 7.2.x releases, which are using BATP, without the need for further changes. |
| Stand-alone Box | 7.1.0, 7.1.1, 7.2.0 | Update to the latest 7.1.x or 7.2.x releases, which are using BATP, without the need for further changes. If you cannot update your standalone box(es) to the latest releases, you can also migrate manually. |
Control Center | CC: 7.1.0, 7.1.1, 7.2.0 and Box: 7.1.0, 7.1.1, 7.2.0 | Update your managed boxes via the Control Center to the latest firmware release. |
Control Center | CC: 7.1.2, 7.2.1 or newer and Box: 7.1.0, 7.1.1, 7.2.0 | If you cannot update your managed box(es) to the latest release, contact the Barracuda Networks Support Team. |
| Stand-alone Box Managed Box | 7.1.2 or newer 7.2.1 or newer | These firmware versions already support BATP. No changes are necessary. |
How to Migrate Boxes with 7.1.0, 7.1.1, and 7.2.0 to BATP
Step 1. Enable Expert Settings in Barracuda Firewall Admin
For more information, see Barracuda Firewall Admin Settings.
Step 2. Enable the BATP Cloud Service
Enabling BATP cloud service disconnects your firewall from the first-generation ATP service and connects it to the second-generation Barracuda ATP Cloud.
- Log into your firewall.
- Go to CONFIGURATION > Configuration Tree > your virtual server > Assigned Services > AV (Virus Scanner) > Virus Scanner Settings.
- In the left menu, click ATP.
- Click Lock.
- In the ATP Cloud Communication section, select the check box Enable BATP Cloud.
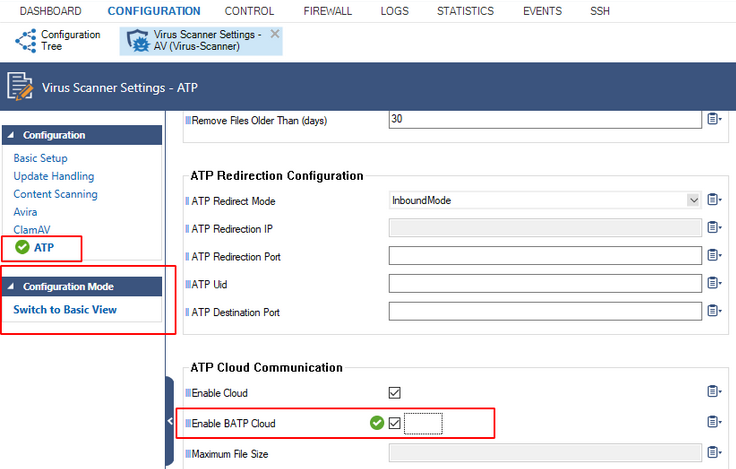
- Click Send Changes.
- Click Activate.
Your firewall now is connected to the second-generation Barracuda ATP Cloud service.
Change to List of Available Ports for Barracuda Download Servers
Barracuda Networks download servers no longer provide downloads on port 8000. Instead, downloads are delivered only through ports 80 and 443.
For more information, see Best Practice - Hostname List for Barracuda Online Services.
Source-Based VPN Routing Table Entries
If you are using source-based VPN routing tables, you have the option of moving the entries to the main routing table. For this, you must set the switch Add VPN Routes to Main Routing Table (Single Routing Table) to yes in CONFIGURATION > Configuration Tree > your virtual server > VPN > VPN Settings > Server Settings.
Unlike before, entries with identical destination addresses in the main routing table are now aggregated regardless of their source address to save valuable memory for even more routing entries. You must be aware that when moving source-based VPN routing entries to the main routing table, the source address of a VPN routing entry will be ignored. Therefore, if you want to route VPN traffic based on a special source address, it is recommended not to use the option as described above.
Firewall Activity Log
When updating a box to 7.2.3, logging of the actions Drop/Remove is disabled by default.
In case the log policy Activity Log Data is set to Log-Info-Text, the setting needs to re-configured after the update to 7.2.3. The update will introduce the default value Log-Info-Code.
Update for SNMP, PHION-MIB.txt File
A new PHION-MIB.txt file is provided that solves an issue where throughput data now can exceed the limit of a 32-bit integer. If your CloudGen Firewall is also part of your SNMP, you should download this new file version. For more information, see PHION-MIB Field Descriptions.
Transfer and Reassign Certificates
In case you are running a standalone firewall and want to manage it in a Control Center, all certificates stored in the local Certificate Store must be saved on the standalone firewall, imported to the Certificate Store on the Control Center and reassigned at their appropriate location of usage. For more information, see How to Import an Existing CloudGen Firewall into a Control Center.
SSL VPN, NAC, and SSL VPN Authentication
SSL VPN authentication and NAC are automatically migrated into the default access control policy.
For more information see How to Configure Access Control Policies for Multi-Factor and Multi-Policy Authentication.
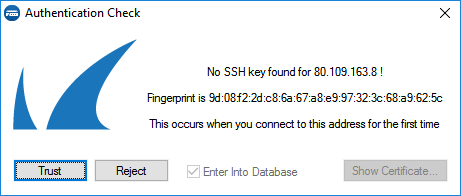
ECDSA SSH Key
Depending on the cipher preferred by the SSH client, you may be prompted to accept the new ECSDA key.
Rename SSL Interception
SSL Interception has been renamed to SSL Inspection.
Initial Grace Period for Default Password
When licensing a hardware appliance or a virtual firewall, the initial default password must immediately be changed to a new password after logging in. The new password will be valid even after the license has expired.
Start the Update
You can now update the CloudGen Firewall or Control Center.
For more information, see Updating CloudGen Firewalls and Control Centers.