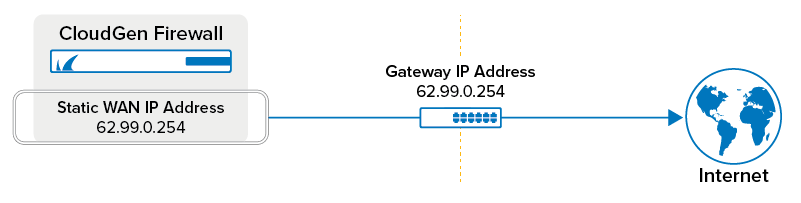
If your Internet connection is using static IP addresses or entire network ranges assigned by your ISP, you must create routing entries on box level and then assign the IP address(es) to the box. Choose the network type Untrusted to automatically create a default route (0.0.0.0/0) for the connection.
Before You Begin
Connect the network equipment installed by your provider to an unused port (not the management port) of your Barracuda CloudGen Firewall.
Step 1. Add the Static IP Address and a Direct Route
Configure the individual WAN IP address you want to use as a shared IP address. Be sure to create the route on the port the ISP is plugged into. In an HA cluster, these IP addresses will be transferred over to the secondary box in case of a failover.
- Go to CONFIGURATION > Configuration Tree > Network > IP Configuration.
- Scroll down to the section Shared Networks and IPs.
- Click Lock.
- For Shared Network and IPs, click + to add the relevant IP addresses.
- The Shared Networks and IPs window is displayed.
- Enter the name for the entry.
- The configuration window for Shared Networks and IPs is displayed.
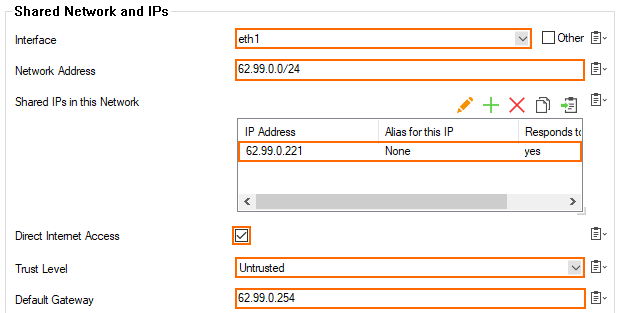
- For Interface, select the interface for the static IP address, e.g.,
eth1. - For Network Address, enter the network address of the attached network, e.g.,
62.99.0.0/24. - Click +.
- The Shared IPs in this Network window is displayed.
- For IP Address, enter the static IP address assigned by your ISP, e.g.,
62.99.0.221. - For Responds to Ping, select yes.
- Click OK.
- For Direct Internet Access, select the check box.
- For Trust Level, select Untrusted.
- For Default Gateway, enter the IP address of the gateway, e.g.,
62.99.0.254. - If the default route will be introduced in an environment where multiple dynamic links are available, specify a Route Metric.
- Click OK.
- Click Send Changes / Activate.
Step 1a. (Optional) Configure Link Monitoring
Configure link monitoring for the static Internet connection. This is important for cases where e.g., the ISP router in front of the firewall does not go down but the uplink beyond does.
- Go to CONFIGURATION > Configuration Tree > Network > IP Configuration.
- Scroll down to the section Shared Networks and IPs.
- In the Configuration Mode menu, select Switch to Advanced View.
- Click Lock.
- Edit the entry for the ISP in the Shared Network and IPs section.
- In the Reachable IPs table, add one or more target IP addresses of hosts that should be reachable for probing.
- Enter commands to be run when the gateway or none of the reachable IP addresses is reachable.
- Click OK.
- Click Send Changes and Activate.
Step 2. Perform a Network Activation
After you create or change the basic network configurations such as routing, you must activate your new network configurations.
- Go to CONTROL > Box.
- In the left menu, expand the Network section and click Activate new network configuration.
- Select Failsafe.
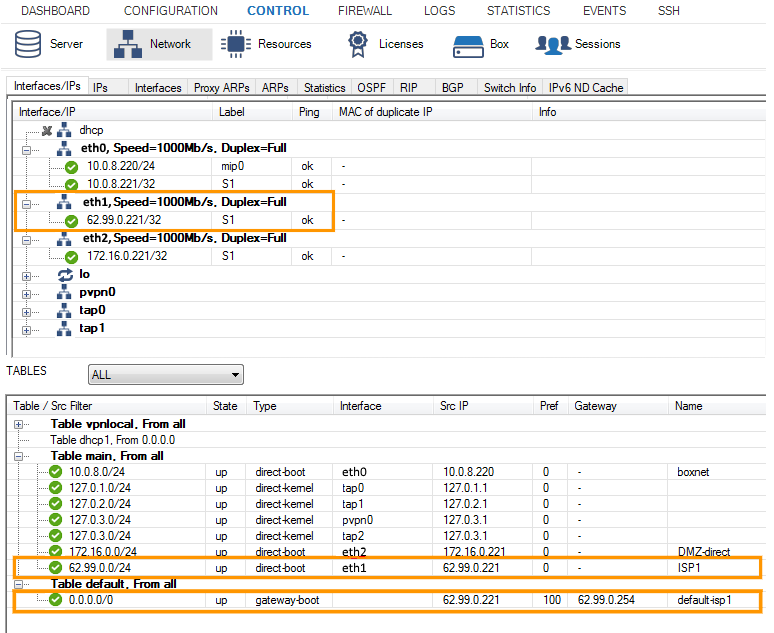
Verify the Network Configuration
Open the CONTROL > Network page to verify that all network routes have been introduced successfully. Verify that the WAN IP addresses are displayed with a green status icon. In addition, verify that the newly introduced routes are available in the tables Main and Default and that the default route is directing traffic through your ISP connection.