

Each Access Control service is assigned to a trustzone. All Access Control Services within the same trustzone share the same set of security policies and signing key, so that the trust relationship can be established. Each trustzone contains three policy rulesets:
- Local Machine – Used to determine a policy for a connecting machine. A connecting machine is an endpoint system that does not request user authentication.
- Current User – Used for policy matching when the connecting client requests user authentication.
- VPN – Adopted if an intermittent VPN service mediates the connection attempt.
Each policy ruleset contains policy rules that are processed from top to bottom. The policy set in the first matching rule is executed. If none of the rules match, the no-rule-exception policy is applied. The client is then considered to be untrusted.
Each policy rule consists of three parts:
- Identity Matching – An identity-related part that defines the applicable matching policy and criteria.
- Required Health State – A health policy part is used to determine the health state by comparing the status information sent by the client with the specified required status. There are only three health states: healthy, unhealthy, and untrusted.
- Policy Assignments – Contains firewall rule sets, messages, pictures, and network access policies that are assigned to a healthy client.
Trustzones can be created on a stand-alone CloudGen Firewall or in a global-, range-, or cluster-level configuration in the Control Center.
Create a Policy Rule
- Go to CONFIGURATION > Configuration Tree > Box > Assigned Services > Access Control Service > Access Control Service Trustzone.
- Click Lock
- Click on the Local Machine, VPN, or Current User tab to select the ruleset the policy rule is created in.
- Right-click in the main area and select Add. The Create Policy Rule window opens.
- Configure Identity Matching:
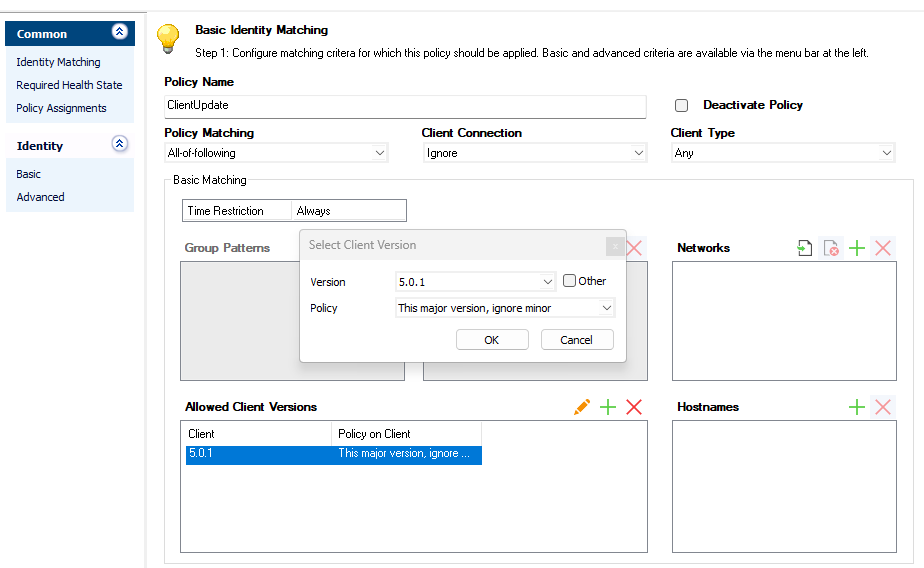
Enter a Policy Name.
Configure Basic Matching:
Client Connection
- External – Effects that this policy rule is ignored for internal connections (connections to an IP address not defined in Access Control Service Settings > System Health-Validator > External IPs).
- Ignore – Means that the policy rule is neither ignored for internal nor external connections.
- Internal – Effects that this policy rule is ignored for external connections (connections to an IP address defined in Access Control Service Settings > System Health-Validator > External IPs).
Time Restriction – Each policy rule can be assigned with a date and time restriction. The date restriction consists of a Start Date and an End Date. Outside that time period, this policy rule will be ignored. The granularity of the time restriction is 1 hour on a weekly base. A rule is allowed at all times by default; that is, all check boxes in the Time Interval window are cleared. Selecting a check box denies a rule for the given time.
- Click the respective icon to configure allowed and disallowed time intervals simultaneously.
- Click the respective icon to clear selected check boxes.
- Click the respective icon to configure disallowed time intervals.
Select Continue if Mismatch to proceed the health evaluation within the policy ruleset with the next rule (default).
Select Block if Mismatch to stop the health evaluation process and set the client to "unhealthy" immediately.
Configure Policy Matching settings:
Policy Matching – Set this to All-of-following if all of the identity-matching parameters (basic and advanced), except the empty ones, must match for a successful identity verification. If just one field does not match, the identity is not verified successfully within this policy rule and the health match process will proceed with the next policy rule in the policy ruleset. Set this to One-of-following to let the identity verification succeed if just one field matches.
For the pattern to match, at least one user group must match at least one defined group pattern.
Group Patterns – At least one user group must match at least one of these patterns for successful identity verification. Ensure that you are using the accurate syntax for the group patterns. For example, MSAD groups must be entered as distinguished name as follows:
CN=group-*, OU=my-unit,CD=mycompany,DC=atAllowed Client Versions
- Version – Select one of the listed Microsoft Windows Versions. The minimum build number must to be the OS build number and is checked only if Policy on Client is set to This major version, ignore minor.
- Policy – Select whether you want to allow or deny the selected version.
- Possible values for Policy on Client are:
- Exactly this one – The client OS must match the selected version and service pack number.
- Explicitly deny this version – If the client OS matches the selected version, the current policy rule will be ignored for the current match, and health evaluation processing proceeds with the next policy rule in the policy ruleset.
- This major version, ignore minor – The client OS must be identically equal to the selected client version. The service pack, if selected, must be equal or greater than defined.
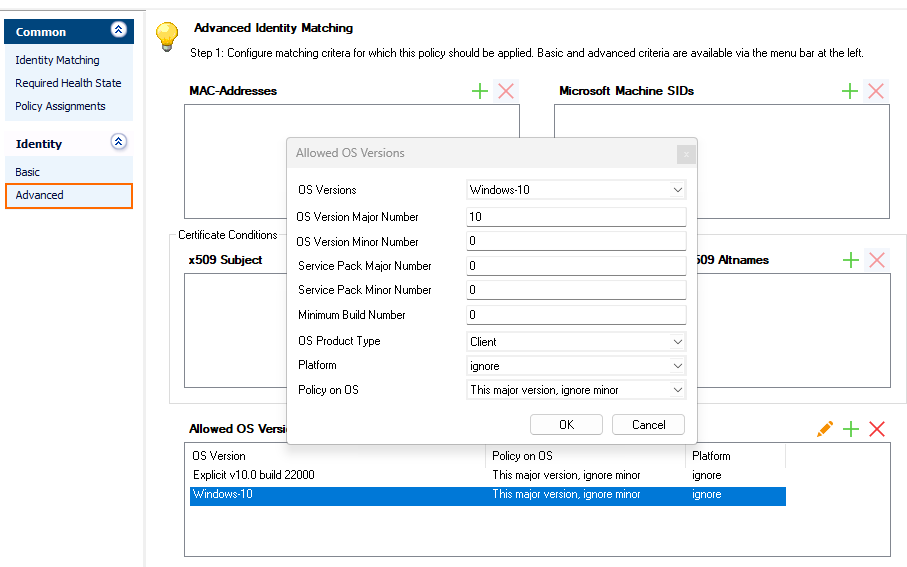
(optional) In the Identity section of the left menu, click Advanced and configure the following settings:
Advanced Identity Matching
- MAC Addresses –Patterns may be used.
- Microsoft Machine SIDs–A SID is a globally unique machine identifier generated by Microsoft operating systems. It is visualized in the Access Control Server’s access cache. Patterns may be used.
Certificate Conditions
- x509 Subject – The X.509 subject of the client's authentication certificate must match at least one of these patterns. For example:
CN=name-*, O=my-company - x509 Issuer – The subject of the issuer of the client's certificate must match at least one of these patterns. For example:
CN=name-*, O=my-company x509 Altnames – The subject alternative name of the client's authentication certificate must match at least one of these patterns. For example:
IP:10.0.10.*
- x509 Subject – The X.509 subject of the client's authentication certificate must match at least one of these patterns. For example:
Allowed OS Versions
OS Versions – Must be one of the listed Microsoft Windows Versions.
OS Version / Service Pack Major Number – Select the version and service pack major number if applicable.
OS Version / Service Pack Minor Number – Select the version and service pack minor number if applicable.
Minimum Build Number – Must be the OS build number and is checked only if Policy on OS is set to This major version, ignore minor.
OS Product Type – Select the OS platform if applicable.
Platform – Select Client or Server (explicit).
Possible values for Policy on OS are:
Exactly this one – The client OS must match OS Versions, Service Pack Major Number, and Service Pack Minor Number.
Explicitly deny this version – If the client OS matches OS Versions, Service Pack Major Number, and Service Pack Minor Number, the current policy rule will be ignored for the current match, and health evaluation processing proceeds with the next policy rule in the policy ruleset.
This major version, ignore minor – The client OS must be identically equal to OS Versions. The client Service Pack Major Number and Service Pack Minor Number need to be equal or greater than those defined here.
- Configure Required Health State criteria:
Configure Service Settings:
- Personal Firewall On
- Required
- Required <Auto-Remediation>
- Not Required (default) – Set to Required if a client must have the Personal Firewall up and running to be healthy. If the client does not meet this requirement, the user will be advised to turn on the firewall.
Continue Match
STOP on Health Mismatch (default)
Continue on Health Mismatch
Set this to Continue on Health Mismatch if the health validation should continue with the next policy rule in the policy ruleset in cases where the health evaluation in the current rule returned that the client is not healthy.
Set this to STOP on Health Mismatch if health validation should not continue with the next policy rule in the policy ruleset if the client is not healthy. In this case, the policy attributes of the current rule are assigned to the client and the client is advised to heal itself.
Registry Check Rules – Select a registry check object. The client’s registry entries must match those of the selected registry check object to be healthy.
- Windows Security Center Settings – Select which Windows Security Center states to query.
- Allowed Health Suite – Select the client OS Version and Policy. For more information, see the above Identity section.
- Required Security Updates – Click + to add IDs for the required Microsoft hotfixes in KB123456 format.
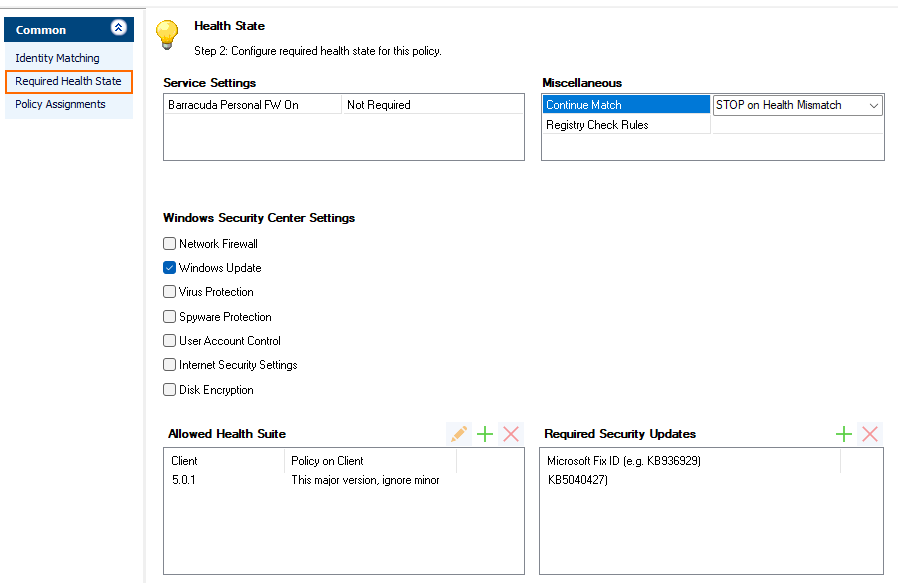
- Personal Firewall On
- Configure Policy Assignments:
Configure the Policy Assignment Attributes:
- Personal Firewall Settings
- Ruleset Name – Select one of the created Personal Firewall Rule objects. If the client does not already have this ruleset installed, the health state will be set to a value other than healthy and the client will be advised to update the personal firewall ruleset from the remediation server. Implicit policy roles are: unhealthy, healthy, probation and untrusted.
- Client Action Attributes – Select one of the created Welcome Message objects. If the client does not already have this message, it will be advised to get the message from the remediation server.
- Limited Access
- Ruleset Name
- Message
- Client Emerg. Quarantine Time (s)
Configure the quarantine ruleset. Assignment of Limited Access rulesets and messages is only available for the Local Machine ruleset.
- Policy Roles – Add implicit policy roles. For more information, see Example - Barracuda Network Access Client Configuration in the NAC Client documentation.
- Personal Firewall Settings
- (optional) Configure Policy Assignment Exceptions:
Software Update Required
- Yes
- No (default)
- Yes-Even-Major
Change this to Yes for the client to automatically perform software updates if a new software minor version is available on the CC.
Yes-Even-Major will cause the client to also perform major version updates.
- User Authentication Required
- Yes
- No
- Like Service Settings (default)
Only available for the local machine ruleset. If this is set to No, user authentication is not performed even if a user logs in.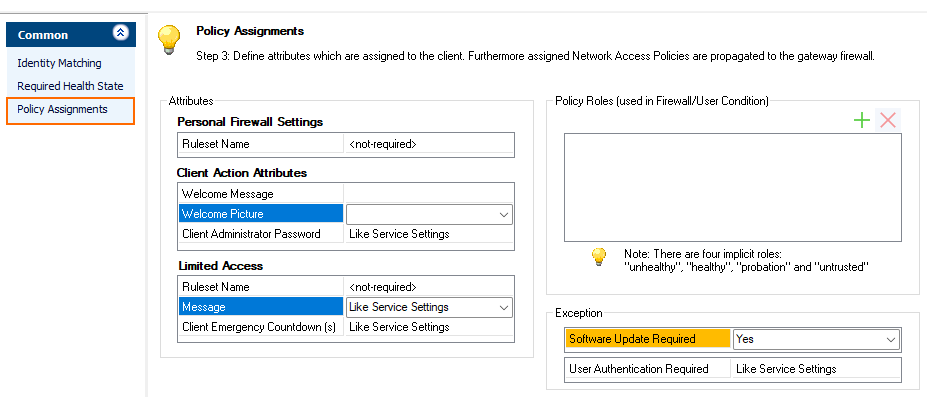
- Click OK.
- Click Send Changes and Activate.
Configure Access Control Service Trustzone Settings
If no policy rule matched the identity for a client, or at least one matched but the Continue Match parameter was set on that/those policy rule(s), the client's state will be untrusted and it will be assigned the No Rule Exception attributes.
To access the Access Control Service Trustzone settings,
- Go to CONFIGURATION > Configuration Tree > Box > Assigned Services > Access Control Service > Access Control Service Trustzone.
- Click Lock
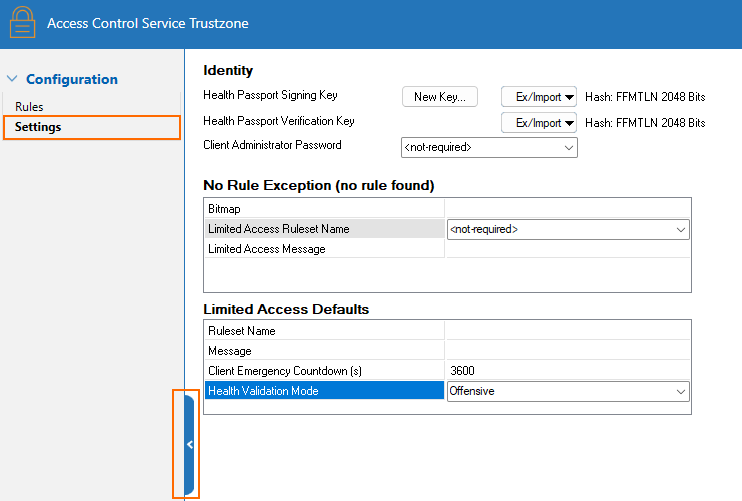
In the left menu, select Settings. The Settings. window provides the following parameters:
- Identity
Health Passport Signing Key – The RSA key for digital passport signing. The Health Validator returns a digital passport to the client as result of the health validation. The passport contains all information required for the remediation server. To ensure authenticity, the passport is digitally signed.
- Health Passport Verification Key – The RSA public key for verifying a digital passport signature. If one Access Control Server instance acts exclusively as a remediation server, it is not necessary to set the Health Passport Signing Key. However, the Health Passport Verification Key must be set.
- Client Administrator Password – If a passphrase is set here, the Access Control service will lock the Advanced Settings locally on the clients unless the local user enters the correct passphrase. In addition, the client can only be terminated on the workstation after the passphrase has been entered. The default setting <not-required> disables these restrictions and enables the local user to administer and terminate the client.
- No Rule Exception (no rule found)
- Bitmap – Select one of the Picture objects. The client will then be advised to get the respective bitmap from the remediation server.
- Limited Access Ruleset Name / Limited Access Message – For more information on these two parameters, see Limit Access in the Access Control Service Trustzone > Rules > Policy Assignments > Attributes list.
- Limited Access Defaults
- Ruleset Name – Select one of the Personal Firewall Rules objects. The client will be advised to get the respective bitmap from the remediation server.
- Message – Select one of the Welcome Messages objects. The client will be advised to get the respective bitmap from the remediation server.
Client Emergency Countdown (s) – If the Access Control Server is not reachable anymore for the client, it switches automatically to the Unhealthy restricted state. Entering a value of 0 disables this. For more information, see Limit Access in the Access Control Service Trustzone > Rules > Policy Assignments > Attributes list.
- Health Validation Mode
- Moderate – Health checks are executed after connection establishment.
- Offensive – Health checks are executed during connection establishment.
- Identity
The Health Validation Mode parameter can also be configured on the client via the following registry key:
| Path | .DEFAULT\Software\Phion\phionha\settings\ |
| Key | SpeedVPNValidation |
| Value |
|
The Client Emergency Quarantine Time (s) parameter can also be configured on the client using the following registry key:
| Path | .DEFAULT\Software\Phion\phionha\settings\ |
| Key | QuarantineCountDown |
| Value | [Default: 3600000 (= 1 hour in milliseconds)] |