

Since the TINA protocol offers significant advantages over IPsec, it is the main protocol used for VPN connections between CloudGen Firewalls. Many of the advanced VPN features, such as SD-WAN or WAN Optimization, are supported only for TINA site-to-site tunnels.
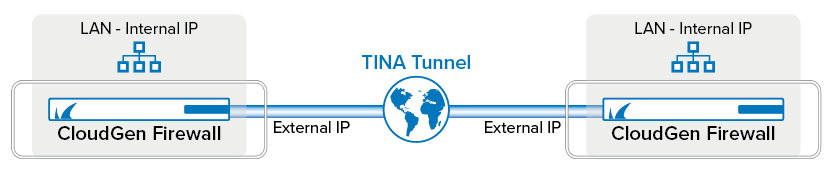
You must complete this configuration on both the local and the remote Barracuda CloudGen Firewall by using the respective values below:
| Setting | Example values for the local firewall | Example values for the remote firewall |
|---|---|---|
| VPN local networks | 10.0.10.0/25 | 10.0.81.0/24 |
| VPN remote networks | 10.0.81.0/24 | 10.0.10.0/25 |
| External IP address (listener VPN service) | 62.99.0.40 | 212.86.0.10 |
Before You Begin
If not already present, configure the Default Server Certificate in CONFIGURATION > Configuration Tree > Box > Assigned Services > VPN > VPN Settings. For more information, see VPN Settings
Step 1. Configure the VPN Service Listeners
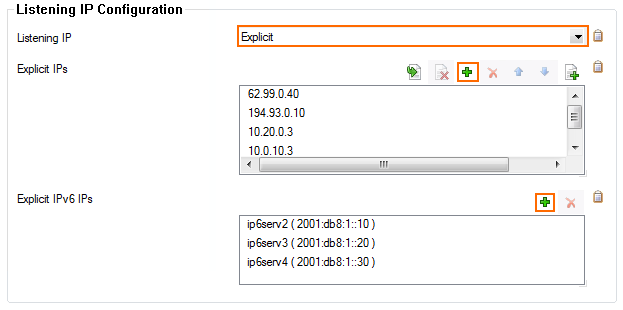
Configure the IPv4 and IPv6 listener addresses for the VPN service.
- Go to CONFIGURATION > Configuration Tree > Box > Assigned Services > VPN > Service Properties.
- Click Lock.
- From the Listening IP list, select the source for the IPv4 listeners:
- First+Second IP – The VPN service listens on the first and second Shared IP addresses.
- First IP – The VPN service listens on the first Shared IPv4 address.
- Second IP – The VPN service listens on the second Shared IPv4 address.
- Explicit – For each IP address, click + and enter the IPv4 addresses in the Explicit IPs list.
- (optional) Perform the following subordinated steps optionally for IPv6:
- Click + to add an entry to the Explicit IPv6 IPs.
- Select an IPv6 listener from the list of configured explicit IPv6 Shared IP addresses.
- Click Send Changes and Activate.
Step 2. Configure the TINA Tunnel at Location 1
For the firewall at Location 1, configure the network settings and export the public key. For more information on specific settings, see TINA Tunnel Settings.
- Log into the firewall at Location 1.
- Go to CONFIGURATION > Configuration Tree > Box > Assigned Services > VPN > Site to Site.
- Click Lock.
- Click the TINA Tunnels tab.
- Right-click the table and select Add.New Tunnel.
- Alternatively, you can click the + sign in the top-right corner of the window.
- Then, select Add Tunnel.
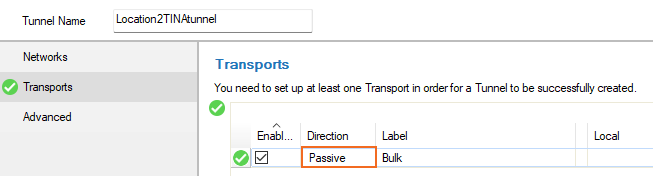
- In the Tunnel Name field, enter a name for the new VPN tunnel.
- For each local network, add the address in the Local section. E.g.,
10.0.10.0/25 - For each remote network, add the address in the Remote section. E.g.,
10.0.81.0/24 - (optional) To propagate the remote VPN network via dynamic routing, select Yes for Advertise Route.

- In the left menu, click Transports.

- Click + to add a new transport for the VPN tunnel. The New Transport for window opens.
Select the Call Direction. (At least one of the firewalls must be active.)

Configure the Basic transport settings. For more information, see TINA Tunnel Settings.
- SD-WAN Class – Depending on your requirements, select either Bulk, Quality, or Fallback from the list.
- Transport – Select the transport encapsulation (recommended: UDP).
- Encryption – Select the data encryption algorithm.
- Authentication – Select the hashing algorithm for packet authentication.
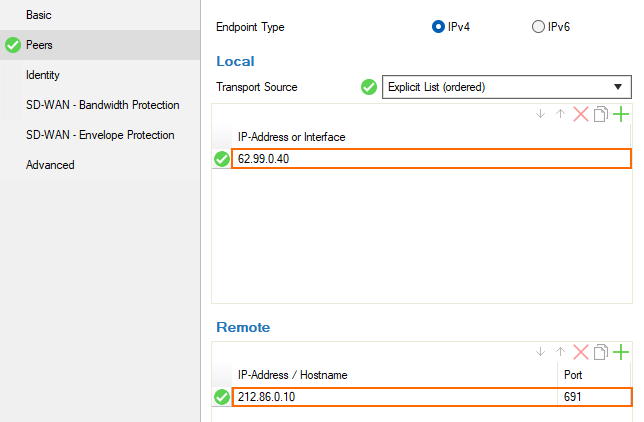
In the left menu, click Peers.
For Transport Source, select one of the following options:- First IP – The connection gets established from the first Shared IP address.
- Second IP – The connection gets established from the second Shared IP address.
- Dynamic (via routing) – The firewall uses a routing table lookup to determine the IP address.
- Explicit List – Enter one or more explicit IP addresses. Multiple IP addresses are tried in the listed order. Click + and add the IP address(es) or interface(s) used as tunnel address.
- In the Remote section, add the external peer IP Address / Hostname for the tunnel destination.
Configure SD-WAN and Advanced transport settings to match the settings configured for the local firewall. For more information, see the lower section in TINA Tunnel Settings.
- Configure the Advanced tunnel settings to match the settings configured for the local firewall. For more information, see the lower section in TINA Tunnel Settings.
Click OK.
- Click Send Changes and Activate.
Step 3. Create the TINA Tunnel at Location 2
- Log into the firewall at Location 2.
- Go to CONFIGURATION > Configuration Tree > Box > Assigned Services > VPN > Site to Site.
- Click Lock.
- Click the TINA Tunnels tab.
- Right-click the table and select Add new TINA Tunnel. Alternatively, you can click the + sign in the top-right corner of the window.
- Select Add Tunnel.
- In the Tunnel Name field, enter a name for the new VPN tunnel.
- Select a configured Scheme for the local network, or select Explicit.
- For each local network at Location 2, add the address in the Local section. E.g.,
10.0.81.0/24 - For each remote network, add the address in the Remote section. E.g.,
10.0.10.0/25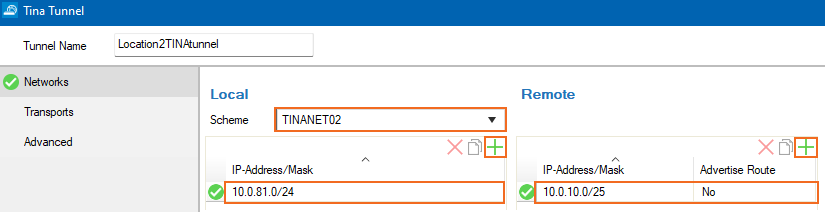
- Configure the TINA tunnel settings to match the settings configured for Location 1. For more information, see the upper section in TINA Tunnel Settings.
- In the left menu, click Transports.
- Click + to add a new transport. The Edit Transport window opens, showing the Basic tab.
Select the Direction. (At least one of the firewalls must be active.)
- In the left menu, click Peers.
- From the Transport Source list, select the IP address used to establish the VPN connection:
- First Server IP – The connection gets established from the first Shared IP address.
- Second IP – The connection gets established from the second Shared IP address.
- Dynamic (via routing) – The firewall uses a routing table lookup to determine the IP address.
- Explicit List – Enter one or more explicit IP addresses. Multiple IP addresses are tried in the listed order. Click + and add the addresses to the lists.
- In the Remote section, add the tunnel destination network.
- Configure the remaining transport and tunnel settings to match the configuration for Location 1. For more information, see the lower section in TINA Tunnel Settings.
Step 4. Exchange the Public Keys Between the Local and Remote Firewall
Start with exporting the public key in the displayed window on the remote firewall.
- Go to CONFIGURATION > Configuration Tree > Box > your remote firewall > Assigned Services > VPN > Site to Site.
- Edit the transport for the TINA tunnel.
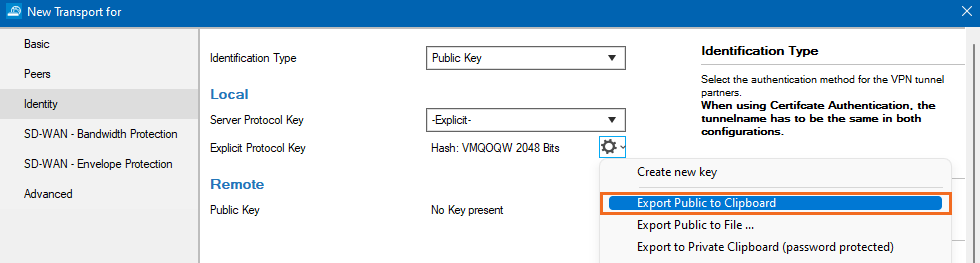
- In the left menu, click Identity.
- From the Identification Type list, select Public Key.
- In the Local section, click the cog wheel icon next to Server Protocol Key, and export the public key to clipboard.
Click OK and close the TINA Tunnel configuration.
- Go to CONFIGURATION > Configuration Tree > Box > your local firewall > Assigned Services > VPN > Site to Site.
- Click Lock.
- Select TINA Tunnels.
- Open the configuration for the site-to-site tunnel transport created in Step 1.
- In the left menu, click Identity.
- In the Remote section, click the cog wheel icon next to Public Key, and import the key from the clipboard.

- Click OK.
- Click Send Changes and Activate.
- In the Local section, click the cog wheel icon next to Server Protocol Key, and export the key to the clipboard.
- Click OK to close the TINA Tunnel window.
- Go to CONFIGURATION > Configuration Tree > Box > your remote firewall > Assigned Services > VPN > Site to Site.
- Click Lock.
- Select TINA Tunnels.
- Open the configuration for the site-to-site tunnel transport.
- Click the Identity tab.
- In the Remote section, click the cog wheel icon next to Public Key, and import the public key from the clipboard.
- Click OK and close the TINA Tunnel window.
- Click Send Changes and Activate.
After configuring the TINA VPN tunnel on both firewalls, you must also create an access rule on both systems to allow access to the remote networks through the VPN tunnel.
Next Step
Create access rules to allow traffic in and out of your VPN tunnel: How to Create Access Rules for Site-to-Site VPN Access.