

Layer 3 bridging is best used for client and server groups that include just a few clients that usually communicate with machines in their group. The bridge consists of two proxy ARPs and a firewall rule to pass traffic back and forth. If you want to bridge multiple clients, use a routed transparent layer 2 bridge instead.
- All network traffic is delivered using Layer 3 (routing) lookups.
- All bridged network nodes must be entered into the configuration.
- Bridging is not Layer 2 transparent; the source MAC is not propagated in connection requests.
- Traffic between routed and bridged destinations is forwarded.
- Bridged network nodes may (if allowed) locally communicate with the interface.
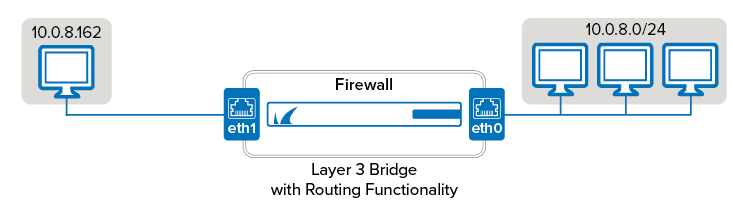
An example setup appropriate for layer 3 bridging would be if one PC in the network must be separated from the other clients and protected by the firewall. The PC that is to be singled out is placed in its own small network (e.g., 10.0.8.160/29) and the firewall acts as a non-transparent translational bridge between the 10.0.8.0/24 and the 10.0.8.0/29 networks. The Barracuda CloudGen Firewall will answer all ARP requests that are transmitted between the networks.
Before You Begin
Assign an IP address to each network interface of the CloudGen Firewall that you want to use for the bridge. (CONFIGURATION > Configuration Tree > Box > Network).
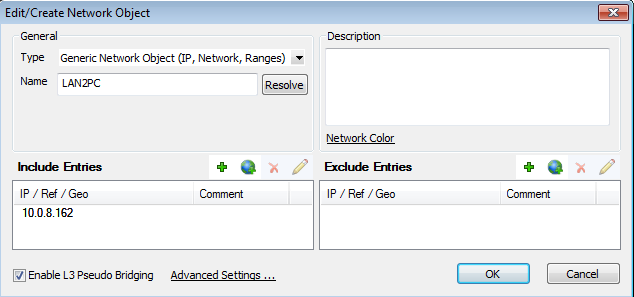
Step 1. Create a Network Object for the Client PC
Create a network object for the clients that should be bridged:
- Go to CONFIGURATION > Configuration Tree > Box > Assigned Services > Firewall > Forwarding Rules.
- Click Lock.
- Create a network object for the clients that must be bridged.
- In the IP/Ref table, add the IP address of the client:
- In the Bridging Parameters window, edit the following settings:
- Interface Addresses Reside - Enter the network interface that points to the bridged clients. For example, enter
eth1. - Parent Network - Enter the parent network address. E.g.,
10.0.8.0/24 - Select the Introduce Routes and Restrict PARP to Parent Network check boxes.
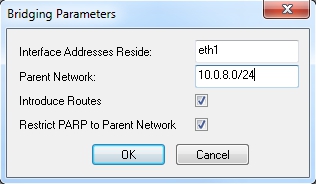
- Interface Addresses Reside - Enter the network interface that points to the bridged clients. For example, enter
- Click OK.
- Click Send Changes and Activate.
You now have a network object for the client that you can use when creating the layer 3 bridge.
Step 2. Create Access Rules for Layer 3 Bridging
To allow network traffic to pass between the bridged interfaces, create Pass and Broad-Multicast access rules for every bridged interface group.
- Go to CONFIGURATION > Configuration Tree > Box > Assigned Services > Firewall > Forwarding Rules.
- Click Lock.
- Create a pass access rule with the following settings:
- Action – Select Pass.
- Bi–Directional – Select the check box.
- Source – Select Any (0.0.0.0/0).
- Service – Select Any.
- Destination – Select a network object containing all networks or IP addresses for the bridged interfaces. E.g.,
10.0.8.0/24 - Connection Method – Select Original Source IP.
- Create a Broad–Multicast access rule with the following settings:
- Action – Select Broad-Multicast.
- Source – Select a network object containing all networks or IP addresses for the bridged interfaces. E.g.,
10.0.8.0/24 - Service – Select Any.
- Connection Method – Select Original Source IP.
Destination – Enter the destination networks/IP addresses. E.g.,
10.0.8.255Broad Multicast - Propagation List – Enter the propagation interface or IP address(es). E.g.,
eth0,eth1:10.0.8.167
- Rearrange the order of the access rules so the new rules can match incoming traffic.
Click Send Changes and Activate.
You can now use the separated PC as if it were on the same network with the exception that the MAC address of the PC will be replaced by the MAC of the CloudGen Firewall when traversing the bridge.