

You can activate the HA auto-pairing feature to turn two separate firewalls into an HA pair with minimum effort in configuration. For HA auto-pairing, hardware models must be identical, and virtual models may be different.
Starting with firmware release 8.2.1, HA auto-pairing is already enabled by default and now supports automated pairing of managed firewalls. HA auto-pairing uses a direct link between the two HA firewalls. This direct link is tied to the interface p5 as a default. This interface can be changed manually, but it is not recommended to do so. The direct link will be used by the two boxes for communicating during configuration and further operation.
Before You Begin
- Ensure that both firewalls are pre-installed with firmware release 8.2.1.
- Ensure that you can access both firewalls with Firewall Admin through their management IP address.
Limitations
There are some important limitations to consider before using HA auto-pairing:
- Logging into a firewall for the very first time that is running with a web UI will disable the HA auto-pairing feature.
- If a firewall has the web UI activated, it will not allow the creation of a primary configuration.
- If a firewall operates as a secondary box during a new pairing process, it will deactivate the web UI before applying the PAR file.
How HA Auto-Pairing Works
Initiation of the HA Configuration Process
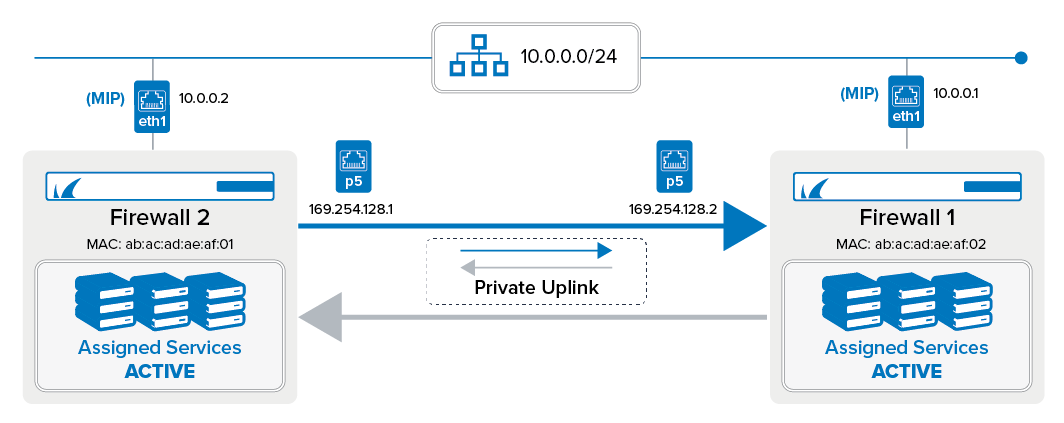
On firewalls delivered with firmware 8.2.1, HA auto-pairing is already enabled. On both firewalls, the interface p5 is reserved for a private uplink for HA auto-pairing. The administrator must connect the two firewalls through the port p5 with a network cable.
After powering on, the background process for HA auto-pairing is started, and both firewalls will start to negotiate their IP addresses for the private uplink. At the end of the negotiation phase, the firewall with the lower MAC address will be configured with the IP address 169.254.128.1, and the other firewall will be configured with the IP address 169.254.128.2.
Selecting the Primary Firewall
Before continuing the HA auto-pairing process, it is necessary to choose which of the two firewalls will be the primary firewall.
You must select the box that you want to be the primary one and log into this firewall with Firewall Admin. You then must determine the serial number from the other firewall and enter the serial number into a related edit field on your now primary firewall. The firewall will send the serial number through the private uplink to the other firewall for checking. If the check is OK, both firewalls will start to complete the auto-pairing process.
Completing the HA Configuration Process
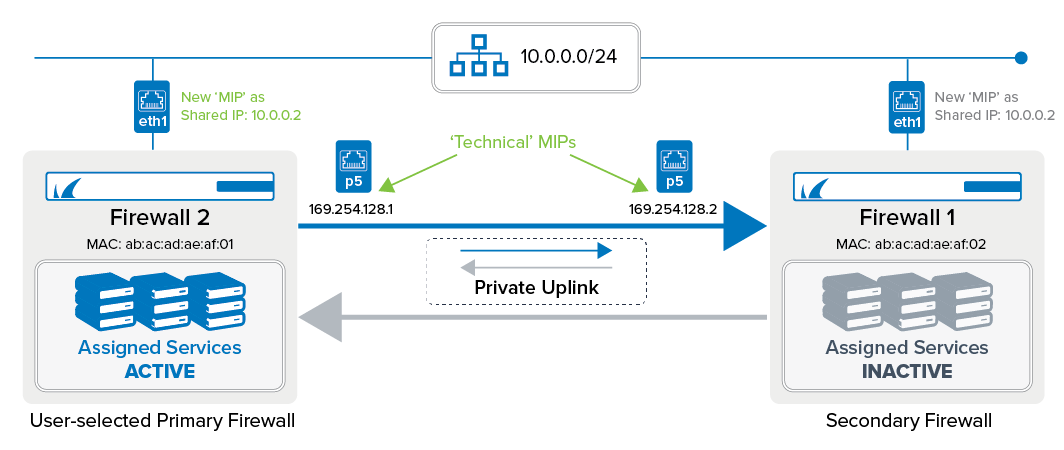
During this configuration process, two new IP addresses will be introduced as new management IP addresses on both firewalls. In order for the primary firewall to stay reachable, its former management IP address is converted into a shared IP address that is assigned to the same former interface. Sessions initiated from Firewall Admin to the primary firewall are redirected to the new technical management IP address 169.254.218.1 (or 169.254.128.2 depending on which appliance was selected to be the primary) by an access rule in the forwarding firewall called BOX-SERVICEIP-MGMT-ACCESS. The secondary firewall will receive its configuration and will be managed through the primary firewall.
During this automated configuration process, the two private uplink IP addresses will be configured as an Additional IP and will be displayed in the section CONFIGURATION > Configuration Tree > Network > IP Configuration > Additional Local IPs with the name ADHA (Automated Distributed HA) for interface p5.
From a user perspective, this approach is completely transparent for a Firewall Admin user who can continue to access the primary firewall by the same management IP address as before. From a technical point of view, however, only the former management IP address of the primary firewall will provide access to both appliances, depending on which of the two is operating as the active one.
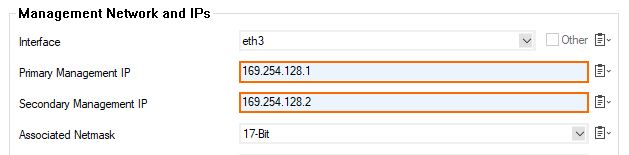
The user interface will show the configured management IP addresses in CONFIGURATION > Configuration Tree > Network > IP Configuration, section Management Network and IPs. The order of the management IP addresses cannot be modified and depends on which firewall was selected to be the primary one:
Final Setup Steps
During the pairing process, the secondary firewall receives its configuration from Firewall Admin through the direct link from the primary firewall. From then on, the secondary firewall will only be reachable by its shared IP after performing a failover.
Completion of the HA Auto-Pairing Process
As soon as the auto-pairing is completed successfully, the configuration tree will indicate the new role of your HA primary firewall showing HA Cluster (Primary):
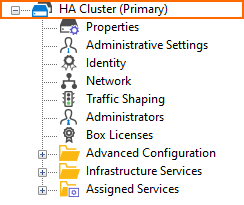
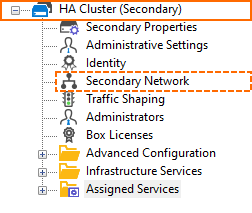
After a failover, the root and the network node will be displayed updated in the configuration tree and will now show the nodes of the secondary firewall:
Logging
The HA auto-pairing process is logged during execution. You can check the results and the state of the pairing process by inspecting the logs.
- The pairing daemon writes information to the file
/phion0/logs/box_Config.log. The logging entries for HA auto-pairing are prefixed with the string[AutoPairing].
In Firewall Admin, you can check the logged entries in LOGS > Box > Config > Config. - Post-pairing information can be inspected in the file
/phion0/logs/box_Control_daemon.log.
In Firewall Admin, you can check the logged entries in LOGS > Box > Config > daemon. Watch out for entries starting with'Listen on 169.254.128.1:809'followed by several lines about the pairing process.