

Important Note for Users Operating Firmware 7.2.5 or 7.2.6
Important Note for Users Wanting to Upgrade from Firmware Release 8.2.2
As of February 6, 2023, you can now upgrade from firmware release 8.2.2 to firmware release 8.3.1. This upgrade can be installed both on CloudGen Firewalls and on Control Centers. However, as this is a special upgrade, there are two different methods of how you must perform the upgrade depending on the type of your appliance.
These two installation methods are covered at the end of this article.
Before You Begin
Barracuda Firewall Admin
After updating a system, you must also download Firewall Admin with the same version. Firewall Admin is backward-compatible. That means you can manage 7.x and 8.x F-Series Firewalls and Control Centers with Firewall Admin 8.x.
New 2-Layer Service Architecture
With firmware release 8.0.2, Barracuda introduced a new 2-layer service architecture that makes the former server node in the configuration tree obsolete. As already announced in previous migration notes, converting the former 3-layer server-service architecture to the new 2-layer service architecture was optional within the period of firmware version 8.0.2 to 8.0.4
New IPS Implementation
Firmware version 8.3.1 includes a new implementation of the IPS system with a new signature database. IPS exceptions created with a version earlier than 8.3 will be deleted after the update.
There are certain restrictions for Control Centers and clusters:
- IPS pattern updates of 8.3.x firewalls in Control Centers with firmware earlier than or equal to 8.2.x is not supported.
Client-to-Site VPN
If you use Client-to-Site VPN and after updating to 8.3.0, you must also either update all NAC clients to 5.3.0 or manually set the MTU size as a pre-update value to 1398 for pvpn0 interface until all clients are updated.
If you do not do this, uploads from the clients to or over the firewall may lead to packet drops because the uploads are too large.
After updating the clients, you can remove the workaround of manually setting the MTU size of 1398 for pvpn0.
Supported Models for Firmware Version 8.3.1
The following models are capable of running firmware version 8.3.1:
Barracuda CloudGen F-Series and Control Center Models | ||
|---|---|---|
Hardware Systems | F12 Rev A, F18 Rev A/B, F80 Rev A/B, F82 Rev A, F93 Rev A, F180 Rev A/B, F183 Rev A, F183R Rev A, F193 Rev A, F280 Rev B/C, F380 Rev A/B, F400 Rev B/C, F600 Rev C/D, F800 Rev C, F900 Rev B, F1000 Rev A | |
| Virtual Systems | VF10, VF25, VF50, VF100, VF250, VF500, VF1000, VF2000, VF4000, VF8000, VC400, VC610, VC820, Proxmox running with KVM images | |
| Public Cloud | AWS, Azure, Google Cloud | |
| WWAN USB Modems | M30, M40, M41, M42 | |
Standard Hardware Systems | ||
|---|---|---|
| Standard Hardware | A standard hardware system is a Barracuda CloudGen Firewall F-Series running on 3rd-party server hardware using an SF license. Consult the Barracuda Networks Technical Support to find out if your specific standard hardware is supported. | |
Disk Space Requirements
Upgrading to version 8.3.1 requires your disk partitions to have enough free disk space. Firmware 8.3.1 requires the following partition spaces:
Disk Space Requirements FIREWALL:
| Hard Drive Partition | Disk Space Required |
|---|---|
| swap | 2 GB |
| boot | 1 GB |
| / | 8 GB |
| /phion0 | 4 GB |
| /art | 3 GB |
Disk Space Requirements CONTROL CENTER:
| Hard Drive Partition | Disk Space Required |
|---|---|
| swap | 2 GB |
| boot | 1 GB |
| / | 10 GB |
| /phion0 | 4 GB |
| /art | 10 GB |
Migration Path to 8.3.1
You can upgrade to firmware 8.3.1 via 8.0.6 from the following firmware versions:
Current Version | Via 8.0.6 | Follow Migration Instructions |
|---|---|---|
| 7.0.0 - 7.0.4 | Yes |
|
| 7.1.0 EA - 7.1.5 | Yes | |
| 7.2.0 - 7.2.6 | Yes | |
| 8.0.0 | Yes | |
| 8.0.1 - 8.0.5 | Yes | Migration from 8.0.1/8.0.2/8.0.3/8.0.4/8.0.5 to 8.0.6 |
Your firewall is now prepared to upgrade to firmware version 8.3.1.
Important Note before Upgrading to Release 8.3.1
Migration Instructions for 8.3.1
Before upgrading to firmware version 8.3.1, you may first need to complete a few additional steps. Check the following topic(s) and, if applicable, complete the migration steps listed below:
1. Upgrade of Virtual Machines for Forward Error Correction (FEC), and IPS
- Firmware version 8.3.1 now contains the new VPN feature Forward Error Correction (FEC).
- The IPS system has been replaced with a new implementation from Barracuda.
In order for these features to work as expected on virtual deployments, the virtual hardware must be upgraded to the newest version to work on the ESXi hypervisor directly after the deployment of the virtual machine. For using FEC, the supported version of your hypervisor must be greater than or equal to version 6.5.
For more information, see Step 2 in How to Deploy a CloudGen Firewall Vx OVA on VMware Hypervisors.
2. VPN, Usage of VPN Next Hop IPs
Before firmware version 8.3.0, certain VPN scenarios required you to configure next-hop interface IP addresses for the shared networks. Due to the new 2-layer service architecture, which is represented through the Assigned Services node in the configuration tree, it is no longer necessary to explicitly configure these IP addresses.
However, in this special case, it is necessary to apply some additions to the host firewall rule set.
For updating the host firewall rule set, you have two options:
- Add the missing rules manually
- Update the host firewall rule set with Copy from Default.
How to Update the Host Firewall Rule Set
Step 1. (optional) In case you have made additions/changes to the host firewall rule set manually:
Create a copy of all these firewall rules.
Option 2.1 (recommended): Add the missing rules to the host firewall rule set manually.
For more information on how to create a pass rule, see How to Create a Pass Access Rule.
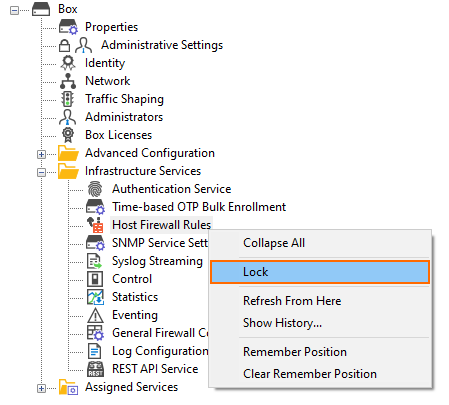
- Go to CONFIGURATION > Configuration Tree > Box > Infrastructure Service > Host Firewall Rules.
- Ensure that Inbound is selected in the top-left corner of the rule list display area.
- Click Lock.
- Add each of the rules in the list to the Inbound Host Firewall Rule Set.

Click Outbound in the top-left corner of the rule list display area.
Add each of the rules in the list to the Outbound Host Firewall Rule Set.

- Click Send Changes.
Option 2.2: (Only if you did not complete Option 2.1) Update the host firewall rule set with Copy from Default.
After the transformation to the new 2-layer service architecture, the host firewall rule set can be rebuilt by copying it from the default.
- Log into the firewall.
- Go to CONFIGURATION > Configuration Tree > Box > Infrastructure Services.
- Right-click Host Firewall Rules.
- In the list, click Lock.
- Right-click Host Firewall Rules.
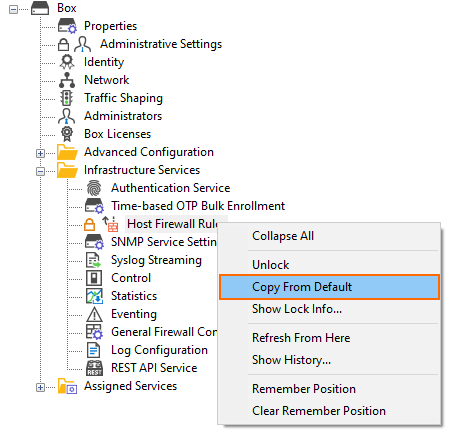
- In the list, click Copy from Default.
- Click Activate in the top-right corner of the window.
Step 3. (optional) In case you have made a copy of individual firewall rules, you must restore them now.
Add your individual firewall rules that you copied before to the host firewall rule set.
How to Migrate to Version 8.3.1
Download the appropriate download file:
If You Migrate from Versions 8.0.0 - 8.2.2 to 8.3.1
- Go to the download portal https://dlportal.barracudanetworks.com/#/packages/5580/update.GWAY-8.3.1-0086+5hotfixes.tgz
- Download the update package.
If You Migrate from Versions 8.3.0 to 8.3.1
- Go to the download portal https://dlportal.barracudanetworks.com/#/packages/5579/patch.GWAY-8.3.1-0086+5hotfixes.tgz
- Download the patch package.
Start the Update
If you want to upgrade a Control Center from firmware 8.2.2 to 8.3.1, perform the following steps:
- Log into your Control Center as root via SSH.
- Copy the downloaded file
update.GWAY-8.3.1-0086+5hotfixes.tgzto the directory/phion0/packages/. - Change to the directory
/phion0/packages/. - Enter the following command and wait until the installation is finished:
installUpdate -f update.GWAY-8.3.1-0086+5hotfixes.tgz
In any other case, perform the following steps:
You can now update the CloudGen Firewall or Control Center.
For more information, see Updating CloudGen Firewalls and Control Centers.