

The Barracuda CloudGen Firewall Virus Scanner service supports the Avira virus scanning engine. To use the Virus Scanner service, a Malware or Web Security subscription is required.
The virus scanner can be integrated with the following services:
- Firewall
- HTTP Proxy
- Mail Gateway
- FTP Proxy
Enable and Configure the Virus Scanner
- Go to Configuration > Configuration Tree > Box > Assigned Services > Virus-Scanner > Virus Scanner Settings.
- Click Lock.
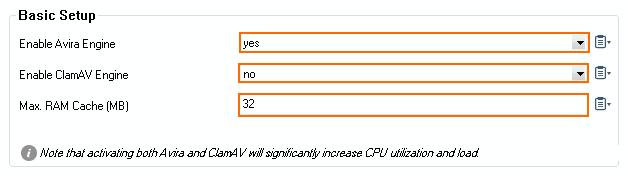
- Enable the virus engine(s):
- Avira – Set Enable Avira Engine to yes.
- Enable ATP Engine – (Advanced Configuration Mode) Enable this setting to use ATP scanning. For more information, see Advanced Threat Protection (ATP).
- (optional) Adjust the Max. RAM Cache (MB) to your preferences. Files exceeding the cache size are stored on the hard drive. Increase to cache more files in memory and reduce the I/O load on the firewall.
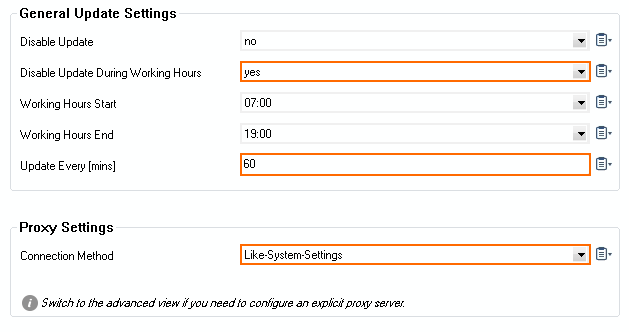
- In the left menu, click Update Handling.
- Set Disable Updates During Working Hours:
- Yes – The firewall will not perform a virus scanner pattern update during the defined working hours because the virus scanning service does not respond to scan queries while it is re-initialized with new patterns.
- No – Virus scanning patterns are installed immediately after they are available.
- (optional) Enter Update Every (mins) to change the update frequency.
- To download the updates via a proxy:
Proxy Settings – If the virus scanner requires an HTTP proxy to reach the update servers, configure the parameters in this section.
- Click Send Changes and Activate.
Next Steps
- Configure the Avira virus scanning settings. For more information, see How to Configure Avira Virus Scanning.