Block storage billing is useful for billing for a block of storage (for example, 20 GB) and then billing at a certain price-per-GB for any usage above that block size. This method is also useful for including a certain amount of storage at no cost, and billing at a certain price-per-GB after that cost-free storage block is used. The following example shows how to set up for a 20 GB plan/block size.
To set up block storage billing, perform the following steps.
- In Autotask, create two contracts for each account to be billed for a 20 GB block of storage.
Note: When creating this contract, add a 20 GB block service to the contract (see Create Services). This service remains on the contract but is not updated by the integration.
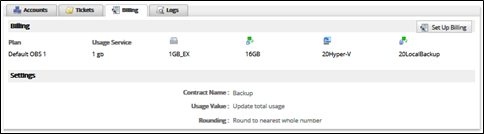
An example of this contract is shown below.
This first contract must remain separate from the contract the integration updates daily. - On the second contract, create a properly named contract with no services as outlined in the Setting up Billing section.
Note: Because this is the contract being updated, it is important that this contract match to the name you set in the billing tab in the ECHOplatform portal. The block plan contract should be named something else. - At the ECHOplatform portal, click Preferences, Configure Billing Plans and then set up a billing plan that with a Base Plan Size set to the size of the block (in this case, 20 GB).
Note : This setting ensures the usage value for overages that is sent to the service does not start until the account reaches 20 GB.
An example of this plan’s relevant fields is displayed below.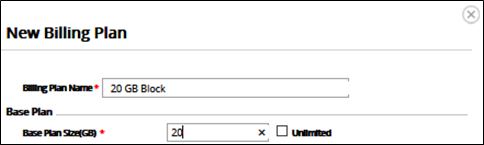
Note : Only the Base Plan Size value has an impact on this billing strategy, the other values are ignored. - At the Autotask Integration page, select the Billing tab, as shown below.

The Autotask Billing page is displayed.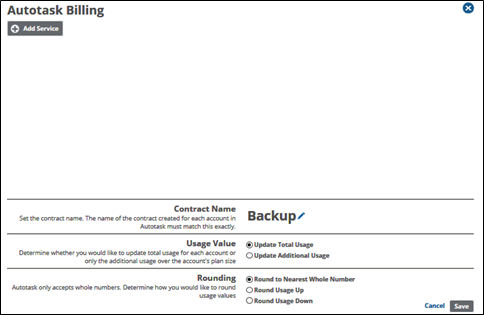
- Click the Add Services button.
The plan fields are displayed.
- Set up your billing integration as shown below.
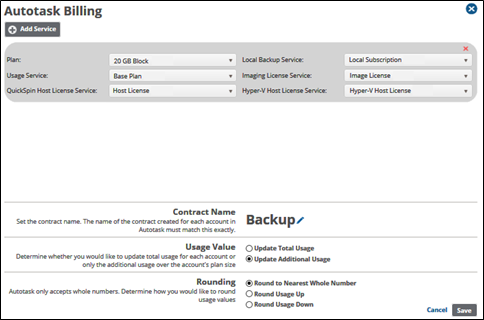
- At the Plan drop-down menu, select a plan.
Note : The accounts associated with this plan have their usage and local backup information set to the services specified on this line. - Select a usage service for this particular plan.
Note : The usage for all accounts associated with the specified plan updates this service on the correct contract. - At the Contract Name section, to type a new name for the contract, click the currently displayed name.
Requirement : The name of the contract created for each account in Autotask must match this name exactly.
The name field is activated, and the edit icons are displayed.
- Click the delete icon
 to erase the current name.
The name is erased. - Type the new name, and then click the confirm icon
 .
.
Note : To cancel the name change and restore the current name, click the delete icon.
The name is displayed. - Select the Update Additional Usage radio button.
Note : This option ensures that every account is billed per-GB for any usage that exceeds the Base Plan Size value on the specified plan. - At the Rounding section, select the Round to Nearest Whole Number radio button.
- Click the Save button.
Your new billing plan is displayed.