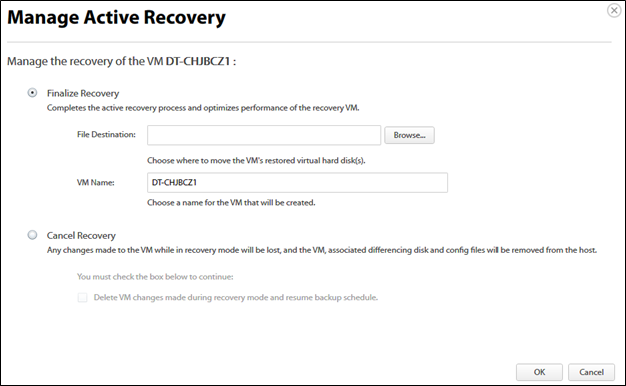
To manage an active recovery for production, perform the following steps.
- At the Computer page, click the Active Recoveries tab, and then click the Manage Recovery button, as shown in the example below.
Note: If you do not see an active recovery virtual machine, you may not have one.

The Manage Active Recovery page is displayed.

To finalize recovery, click the Finalize Recovery radio button.
The Finalize Recovery option completes the active recovery process and optimizes the performance of the recovery VM. This promotes the virtual machine to a completely independent virtual machine. The virtual machine no longer runs off of any backup data as new virtual hard drives are created at the destination you choose. In addition, you can give the virtual machine a different name. After choosing this option, you have to wait for the backup software to copy the virtual machine files to the new destination before you can perform another backup.
- Optionally, click the Browse button, and then select the file destination for the VM’s restored virtual hard disk.
- Optionally, type a name for the VM in the VM Name.
To cancel recovery, click the Cancel Recovery radio button.
Cancel Recovery deletes the recovery virtual machine and returns the backup data to its last good state.
- Ensure the differencing disks are not mounted or in use by any powered-on VM, or the delete operation fails.
Select the Delete VM changes made during recovery mode and resume backup schedule check box.
If enabled, the following occurs:
- Any changes made to this VM or its disks while in recovery mode are lost.
- The differencing disks created during recovery are deleted.
- The recovery VM is powered off and deleted.
- All files created as a part of the test restore are removed from the user-defined location.
- The recovery VM is deleted from the selected host’s inventory.


