

Restoring from a Hyper-V Standard backup will give you the virtual hard disk file(s) for the virtual machines you want to recover. These files are restored to a specific point in time and will be ready to be imported into Hyper-V. This article will show you how to perform a Hyper-V Standard restore.
Hyper-V Standard Restore
This chapter includes the following topics:
Overview
This section includes the following topics:
- About Restoring to a Folder
- Hyper-V Manager Virtual Machines Import Options
- Backup States of Imported VMs
- Hyper-V Replication
- Managing an Active Recovery
About Restoring to a Folder
Each VM has its own folder created within the specified restore directory.
Within that folder, the VM files are created with the same folder structure as when they were backed up.
All VHD/VHDX files (associated with VM disks) and the XML configuration file are restored with a VM restore. If the VM was backed up in offline mode and the memory state needed to be saved, the VM restores the associated BIN and VSV files.
Hyper-V Manager Virtual Machines Import Options
Hyper-V lets you restore virtual machines to any system for import into Hyper-V or mount them as virtual disks.
After you have restored your selected virtual machines, you must Import them into Hyper-V to power on and access the VMs.
To access Hyper-V import options, launch Hyper-V Manager, select Import Virtual Machine, and then select the VM directory you have restored.
There are three virtual machines import options in Hyper-V Manager:
- Register
- Restore
- Copy
Register
Choose this option if the destination you selected for the recovered virtual machines are the destination you intend to run it from.
The original ID of the VM is used when registering the VM with hypervisor.
Restore
Choose this option if the destination you selected for the recovered virtual machines are a temporary location (for example, on a share or removable drive) and you want Hyper-V to move the restored files to the appropriate location and register the virtual machines for you.
The original ID of the VM is used when registering the VM with the hypervisor.
Copy
Choose this option if you intend to import the recovered virtual machines multiple times (for example, you are using the virtual machines as a template for a new virtual machine). Hyper-V copies the restored files to the appropriate location for you.
A new ID is generated and used to register the VM with the hypervisor.
Refer to the third-party Hyper-V Manager documentation for more information.
Backup States of Imported VMs
A VM is imported in a certain state depending on the state it was in when backed up. The following table provides the various backup states.
| State at Time of Backup | Type of Backup | State after Restore |
|---|---|---|
| Running | Online | Off |
| Running | Offline | Saved |
| Saved | Offline | Saved |
| Paused | Offline | Saved |
| Off | Offline | Off |
Hyper-V Replication
Hyper-V Replication is a feature of Hyper-V 2012 and greater versions that allows users to replicate their production VMs to a secondary host on a near-continuous schedule.
If you are using Hyper-V replication, it is recommended that the agent be installed on the recovery host and backs up the recovery VMs. This method puts less load on the production server. This method also provides more data protection.
Refer to the third-party Hyper-V Replication documentation for more information.
Managing an Active Recovery
To manage an active recovery, perform the following steps.
- On the Computer page, click the Active Recoveries tab, and then click the Manage Recovery button, as shown in the example below.
.jpg)
The End test recovery and delete changes page is displayed.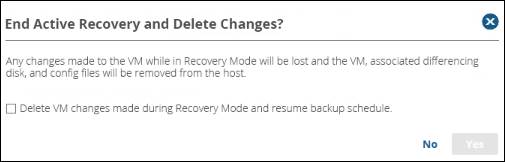
- Ensure the differencing disks are not mounted or in use by any powered-on VM, or the delete operation fails.
If you end the active recovery, the following occurs: - Select the Delete VM changes made during recovery mode and resume backup schedule check box.
If enabled, the following occurs:- Any changes made to this VM or its disks while in recovery mode are lost.
- The differencing disks created during recovery are deleted.
- The recovery VM is powered off and deleted.
- All files created as a part of the test restore are removed from the user-defined location.
- The recovery VM is deleted from the selected host’s inventory.
Restoring Hyper-V Standard Backups
To restore a Hyper-V Standard backup, perform the following steps.
- Navigate to the Computer page.
The Computer page is displayed.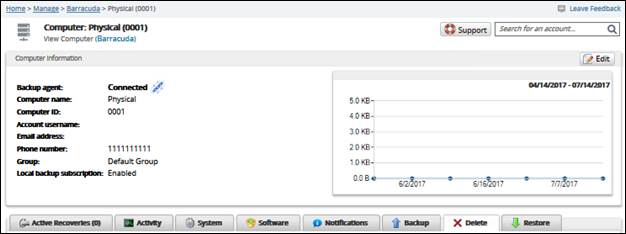
- Click the Restore tab.
The Restore Selections page is displayed.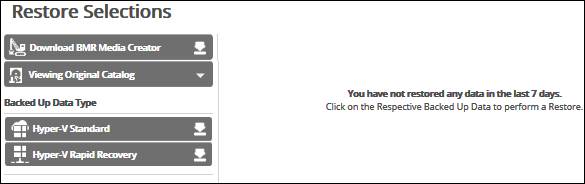
- Click the backup type you want to restore.
The Select page is displayed.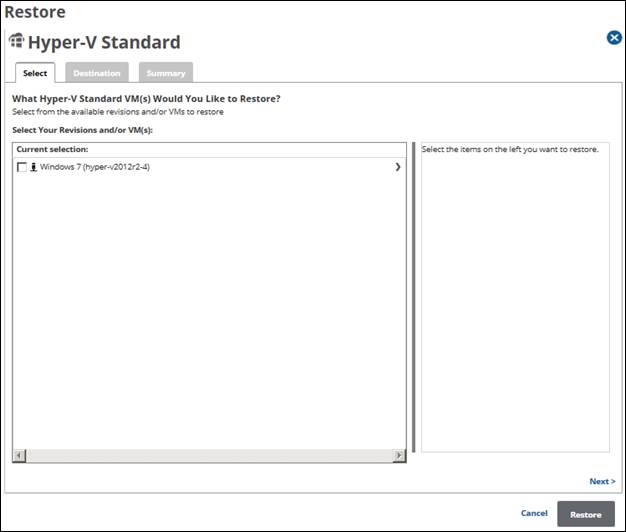
In the Current Selection pane, select the VMs and revisions you would like to restore.
- Clicking the arrow
 at the right of the items displays more revisions.
 - The selection is displayed in the far-right pane. Click the remove icon
 to remove any selections or clear the item check box.
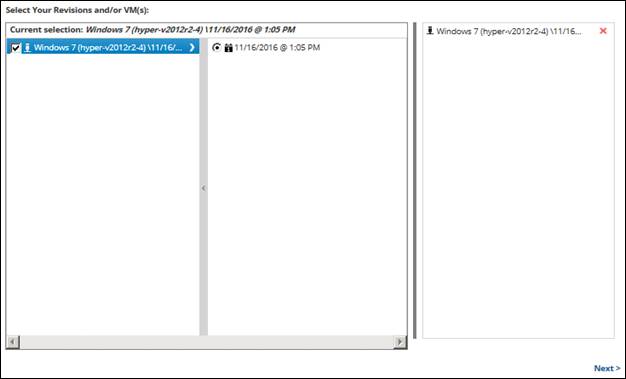
Click Next.
The Destination page is displayed.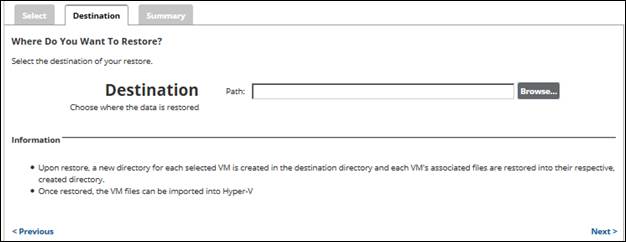
- At the Path field, type a path, or click the Browse button to select the storage location of the restore.
After selecting the storage location of the restore, click Next.
The Summary page is displayed.
Optionally, for more information about restoring Hyper-V data within various environments, click the click here link.
- Verify your selections, and then click the Restore button.
The confirmation pop-up is displayed.
- Click Yes.
The Restore Selections page is displayed showing the status of the restore.