

You can specify Email Gateway Defense as an inbound mail gateway through which all incoming mail for your domain is filtered before reaching your Google account. Email Gateway Defense filters out spam and viruses, then passes the mail on to the Google mail servers. Use the Configure Inbound Mail Flow instructions below to configure.
You can also specify Email Gateway Defense as the outbound mail gateway through which all mail is sent from your domain via your Google account to the recipient. As the outbound gateway, Email Gateway Defense processes the mail by filtering out spam and viruses before final delivery. By configuring Google as described in Configure Outbound Mail Flow below, you instruct the Google mail servers to pass all outgoing mail from your domain to Email Gateway Defense (the gateway server).
Step 1. Launch the Email Gateway Defense Setup Wizard
Log into Barracuda Cloud Control. If this is your first time launching the Email Gateway Defense setup wizard, you will be redirected to the Barracuda Trials Hub page. Click Open under Email Security.

Alternatively, if you have started the setup wizard but did not complete it, after logging into Barracuda Cloud Control, select Email Gateway Defense on the left side. In the top yellow banner, click Set Up Now to launch the setup wizard.
The Email Gateway Defense wizard launches.
Click Next in the upper right corner to get started.
Click Skip on the Connect to Microsoft screen. Select Okay to continue without Microsoft.
Select the Region for your data center. Then click Next.
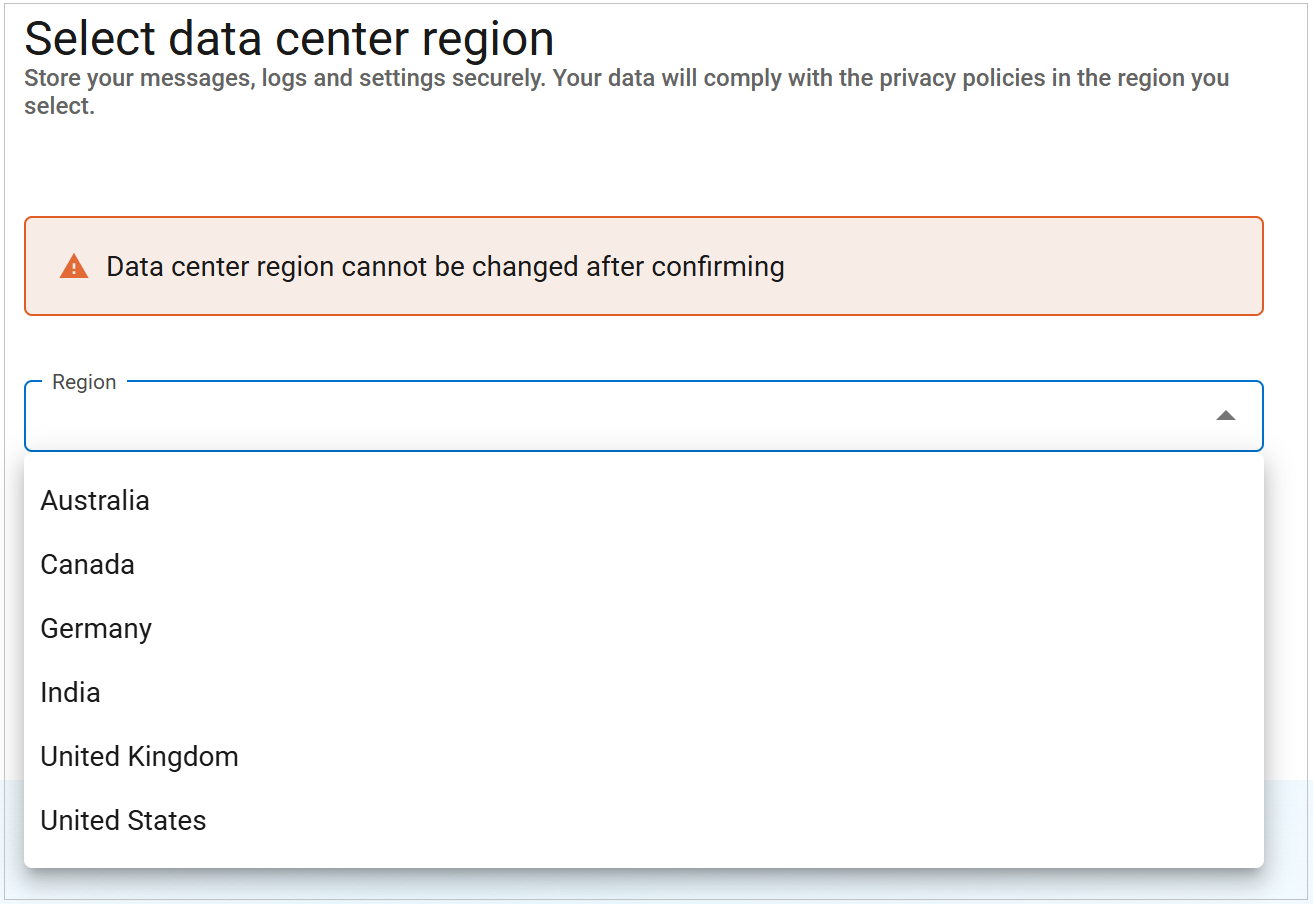
After you select your region, you cannot change it.
Enter a valid email address from the email server domain you want to protect with Email Gateway Defense. Click Detect email server.
The system automatically auto-fills your destination mail server. If this is not the correct server, click Edit, enter the correct details, and then click Update.
After you have determined that the settings are correct, click Verify server.
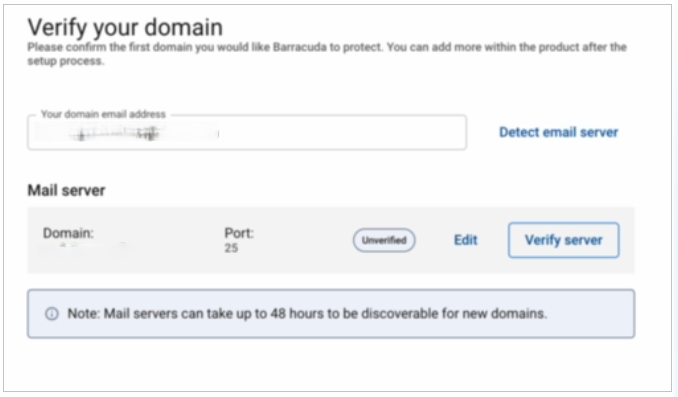
Note that mail servers can take up to 48 hours to be discoverable for new domains.
Once your email server is verified, a green verified check mark
 will appear next to your domain. Click Next.
To set up your email flow, you will need to add the new MX records and remove the old MX records.
To add the new MX records:
Log into your DNS hosting account.
Add the primary and backup MX records shown in the Add new MX records section. Instructions for your DNS hosting provider will vary; you can use search terms such as add, edit, manage, or MX records.
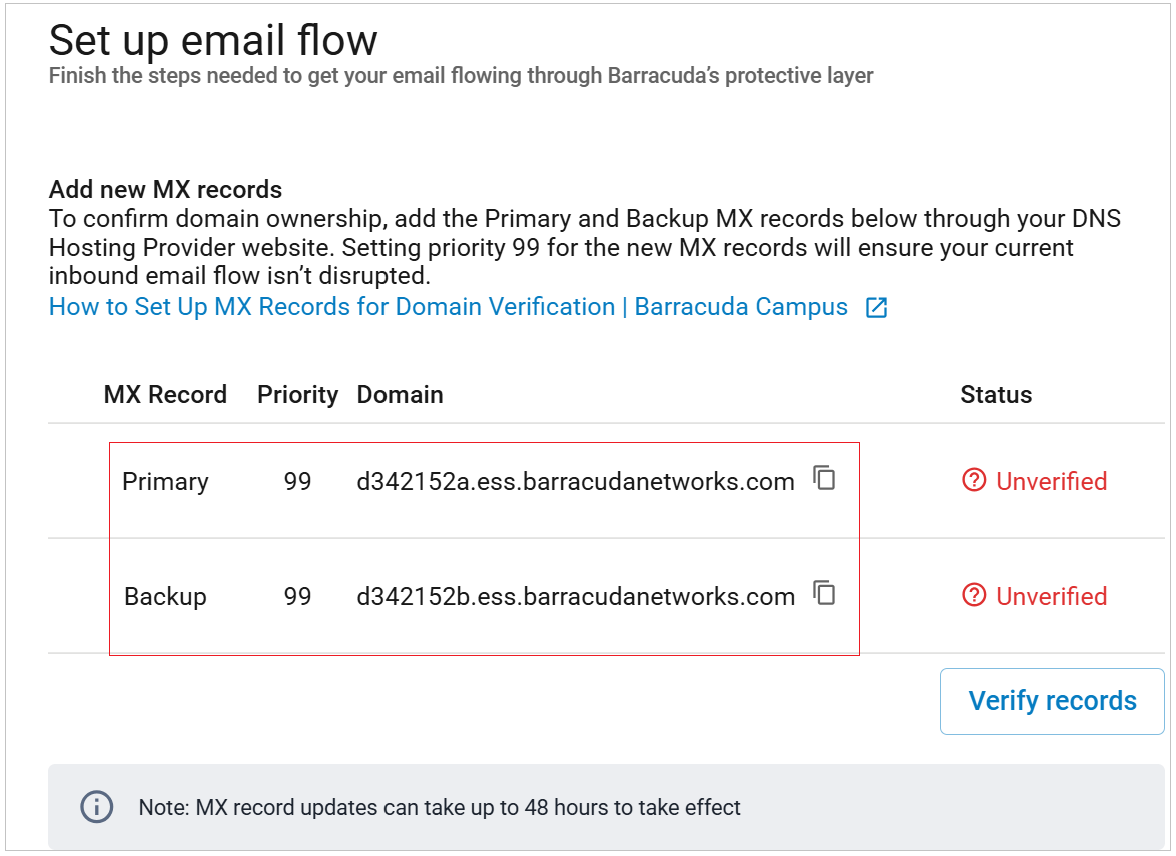
Add the MX records with a low priority, for example, 99. Adding the new MX records to your existing list should look similar to this:

After updating your MX records, allow at least 24-48 hours before completing the next step to allow time for your changes to propagate.
Verify that the new Email Gateway Defense MX records have been added by clicking on the Verify records button.
Once your MX records are added, a green verified check mark
will appear next to the MX record.
To remove the old MX Records:
Log into your DNS hosting account.
Remove the existing MX records shown in the Remove old MX records section. Instructions for your DNS hosting provider will vary; you can use search terms such as add, edit, manage, or MX records.

Update the priority of your primary and backup Barracuda MX records to 1 and 10.
In the Email Gateway Defense wizard, verify that your non-Barracuda Networks MX records have been removed by clicking on the Verify update button.
Once your MX records are removed, a green verified check mark
will appear.
After you have successfully completed all the steps in the Email Gateway Defense setup wizard, click the Complete setup button at the upper right corner. To exit the wizard and come back at a later time, click Exit.


Step 2. Add Additional Email Domains (Optional)
You configured your primary email domain in Step 3 of the wizard, above.
Use the steps in the following section if you want to protect additional domains with Email Gateway Defense. If you are only protecting one domain, continue below with Step 3. Configure Inbound Mail Flow.
- Log into the Barracuda Cloud Control as administrator. In the left panel, click Email Gateway Defense. Select the Domains tab, then click Add Domain.
- Enter the domain name and the Primary MX record for Google: (see Table 1 below).
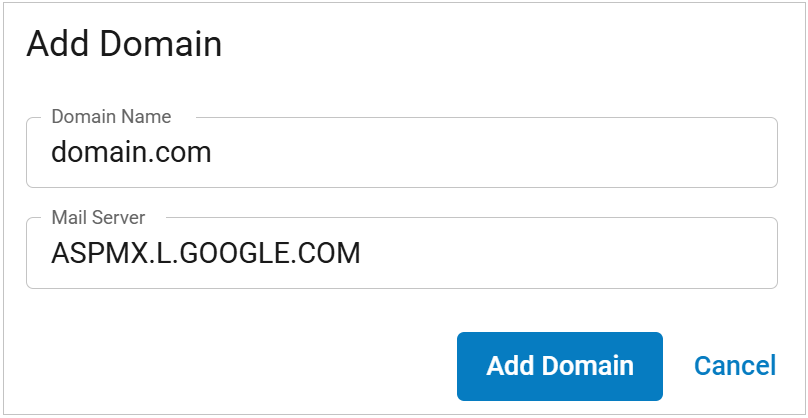
- Click Add Domain; the Domain Settings page displays, listing the new domain.
Click Edit next to the domain you just added. Then add the remaining four mail servers from Table 1 below.
- Click Save Changes and then select Domains in the left-hand navigation menu.
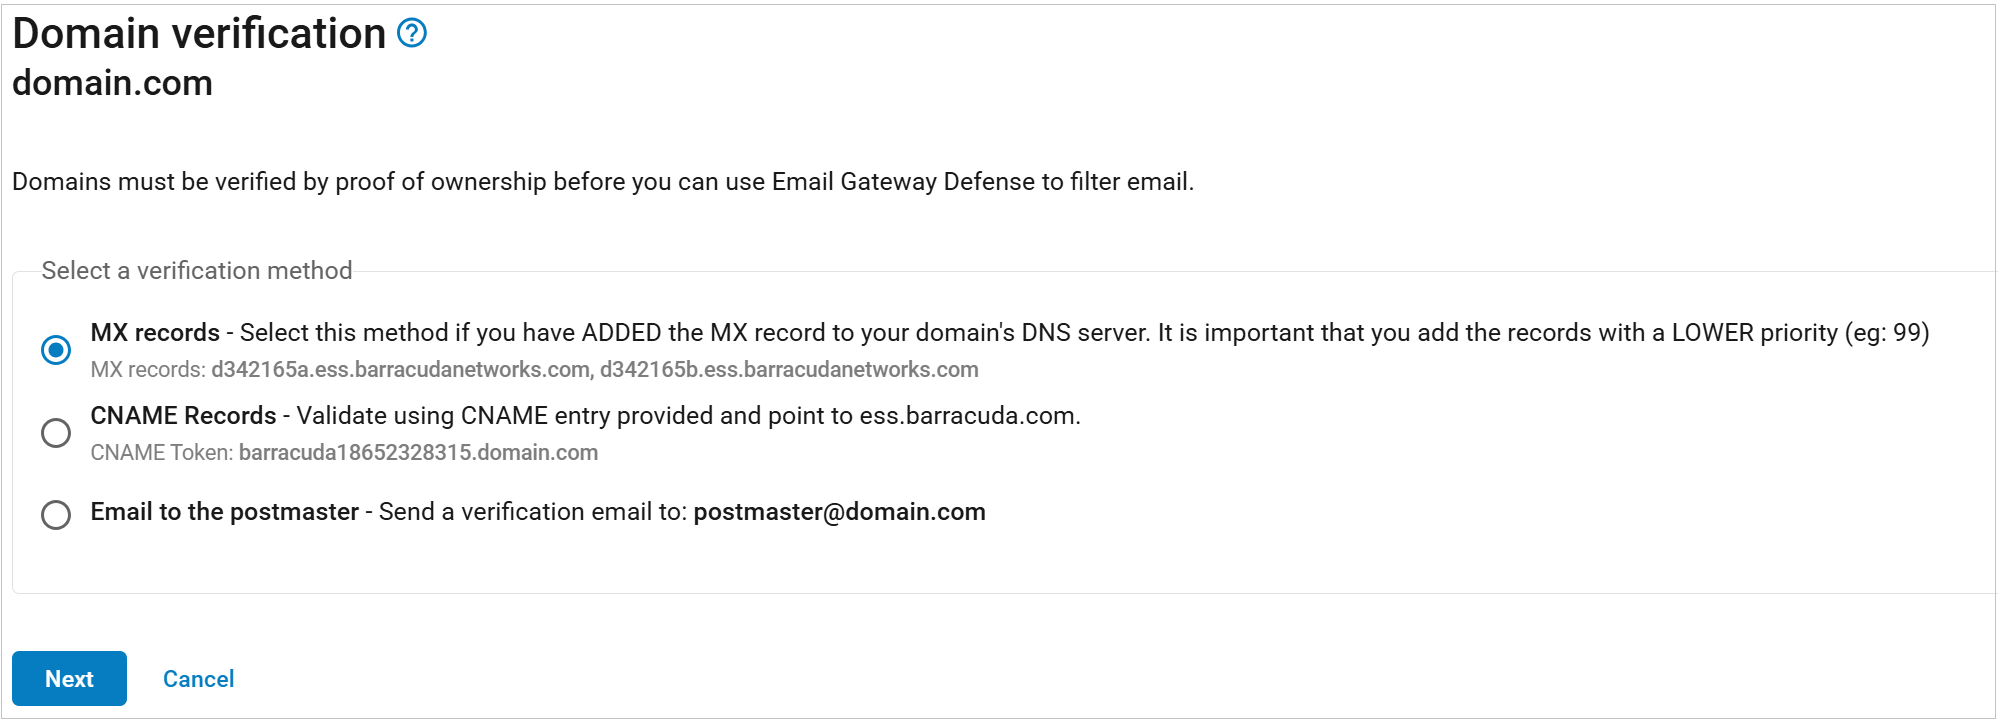
- Click Verify Ownership and select one of the 3 methods to verify your domain.

- Repeat these steps, as needed, for additional domains before continuing with Step 3 below.
- After the mail server is verified, the Verified
 icon displays in the Status column and a confirmation message displays at the top of the page.
Table 1. Google Workspace Destination Mail Servers
| Priority | Google Workspace Destination Mail Server |
|---|---|
| 10 | aspmx.l.google.com |
| 20 | alt1.aspmx.l.google.com |
| 20 | alt2.aspmx.l.google.com |
| 30 | alt3.aspmx.l.google.com |
| 30 | alt4.aspmx.l.google.com |
Step 3. Configure Inbound Mail Flow
- Log into the Google Workspace admin console at https://admin.google.com.
- From the Home page, go to Apps > Google Workspace > Gmail.
- Select Spam, Phishing and Malware from the list.
Click Inbound gateway, and select the Enable check box.
- Click Add under Gateway IPs.
- Enter the IP address/range for your Barracuda Networks region.
For example, if you are in the US region, type209.222.82.0/24, click Save. For other regions, refer to the IP addresses listed in Email Gateway Defense IP Ranges Used for Configuration.
To add another IP address/range, click Add and type in the IP address/range. Click Save again. - Select the following options:
- Automatically detect external IP (recommended)
Require TLS for connections from the email gateways listed above
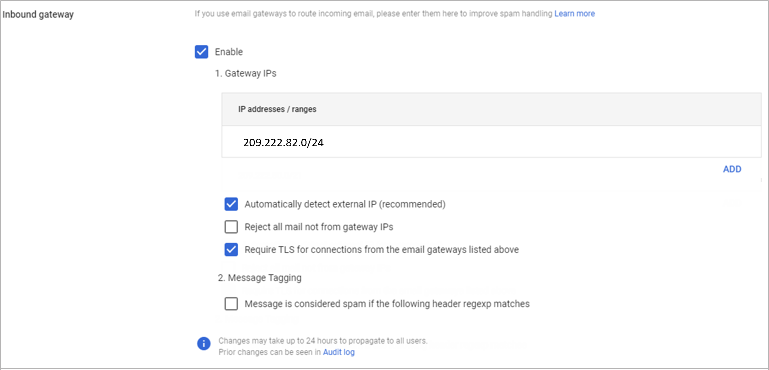
- Click Save.
Step 4. Internal Mail
To configure a routing rule, follow the instructions below:
Step 1. Create Local Host
- Log into the Google Workspace admin console at https://admin.google.com.
- From the Home page, go to Apps > Google Workspace > Gmail.
- Click Hosts.
- Click Add Route. Enter a route name. For example, "Internal Mail".
- Select Multiple hosts.
- Enter the following Primary host details, and then click Add Primary.
- Hostname – aspmx.l.google.com
- Port – 25
- Load– 100%
- Enter the following Secondary host details, and then click Add Secondary.
- Hostname – alt1.aspmx.l.google.com
- Port – 25
- Load– 100%
- Under Options, select Require secure transport(TLS) and Require CA signed certificate.
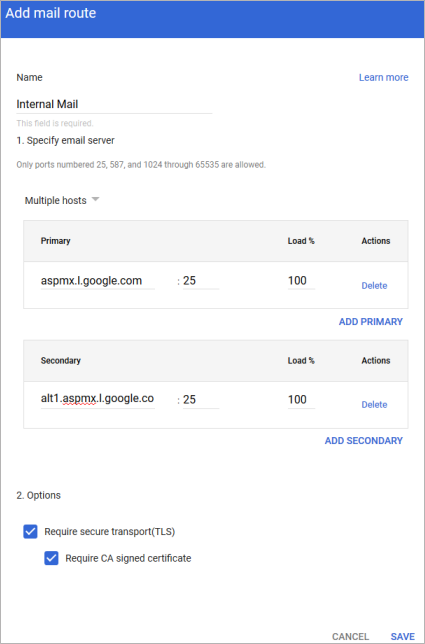
- Click Save.
Step 2. Create Routing Rule
- Navigate to Apps > Google Workspace > Gmail.
- Click Routing at the bottom of the page.
- Under the Routing section, click Configure.
- Enter a name for the rule. For example, "Internal Mail".
- Under Email messages to affect, select Internal - Sending.
- Under For the above types of messages, do the following, click the Down arrow and then select Modify message.
- Select Change route.
- From the list of options, select the host you created above in Step 1. Create a Local Host.
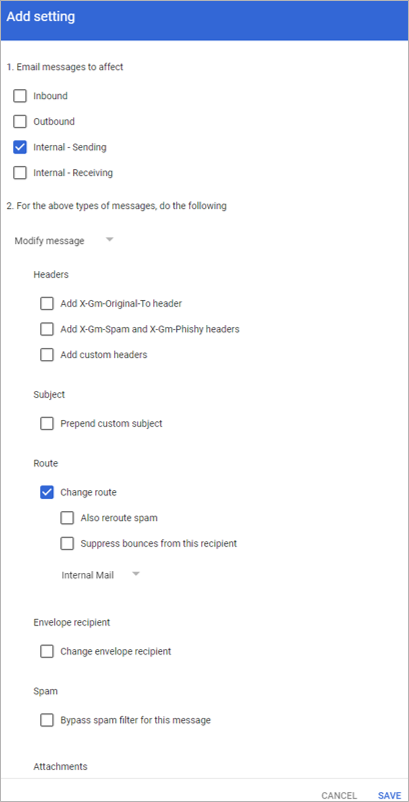
- Toward the bottom, click Show options. Under Account types to affect, select Users and Groups.
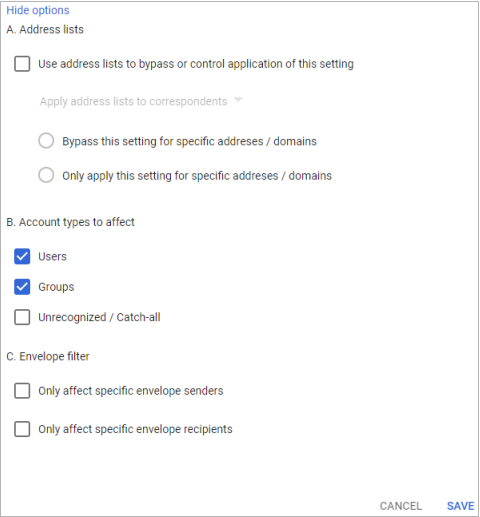
- Click Save.
The new rule displays in the Routing section.
Step 5. Configure Sender Policy Framework for Outbound Mail
To ensure Barracuda Networks is the authorized sending mail service of outbound mail from Email Gateway Defense, add the Sender Policy Framework (SPF) record INCLUDE line of the SPF record for your sending mail server for each domain sending outbound mail. See Sender Policy Framework for Outbound Mail for INCLUDE entries based on your Barracuda Networks instance.
For example, your record will look similar to: v=spf1 include:_spf.google.com include:spf.ess.barracudanetworks.com -all
- If you have an SPF record set up for your domain, edit the existing record, and add the following to the INCLUDE line for each domain sending outbound mail based on your Barracuda Networks instance. For example:
include:spf.ess.barracudanetworks.com -all - If you do not have an SPF record set up for your domain, use the following value to create a TXT record that creates a HARD Fail SPF for your domain based on your Barracuda Networks instance. For example:
v=spf1 include:spf.ess.barracudanetworks.com -all
For more information, see Sender Authentication.
Step 6. Configure Outbound Mail Flow (Optional)
Navigate to Apps > Google Workspace > Gmail.
Click Routing toward the bottom of the page.
Click Outbound gateway.
Enter the Outbound smart hostname provided to you in the settings for your domain within the Email Gateway Defense interface:
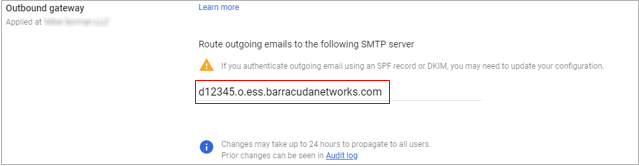
Click Save in the bottom right corner.