

You can configure Microsoft 365 with Email Gateway Defense as your inbound and/or outbound mail gateway.
If you make changes to the settings, allow a few minutes for the changes to take effect.
You can specify Email Gateway Defense as an inbound mail gateway through which all incoming mail for your domain is filtered before reaching your Microsoft 365 account. Email Gateway Defense filters out spam and viruses, then passes the mail on to the Microsoft 365 mail servers.
You can also specify Email Gateway Defense as the outbound mail gateway through which all mail is sent from your domain via your Microsoft 365 account to the recipient. As the outbound gateway, Email Gateway Defense processes the mail by filtering out spam and viruses before final delivery. By configuring Microsoft 365, you instruct the Microsoft 365 mail servers to pass all outgoing mail from your domain to Email Gateway Defense (the gateway server).
Step 1. Launch the Email Gateway Defense Setup Wizard
The setup wizard includes steps to identify your email server, add MX records, and remove MX records. Each of the domains where you want to filter email must be verified by Email Gateway Defense for proof of ownership; Email Gateway Defense does not process email for a domain until the verification process is complete.
Log into Barracuda Cloud Control. If this is your first time launching the Email Gateway Defense setup wizard, you will be redirected to the Barracuda Trials Hub page. Click Open under Email Security.

Alternatively, if you have started the setup wizard but did not complete it, after logging into Barracuda Cloud Control, select Email Gateway Defense on the left side. In the top banner, click Set Up Now to launch the setup wizard.
The Email Gateway Defense wizard launches.
Click Next in the upper right corner to get started.
Click Connect to connect to Microsoft.
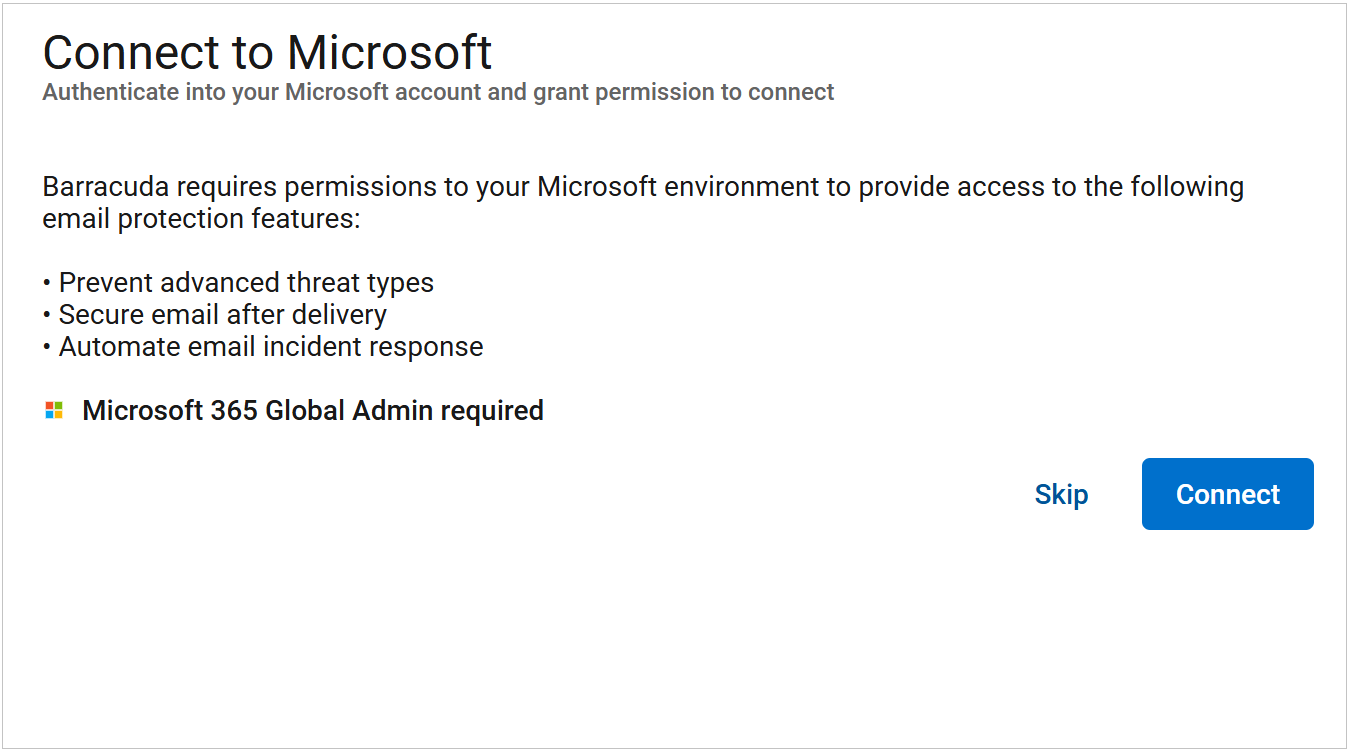
You will be prompted to log in with a global admin account to give permissions to the application to access your Microsoft data. Click Accept to authorize Barracuda Networks to access your details.
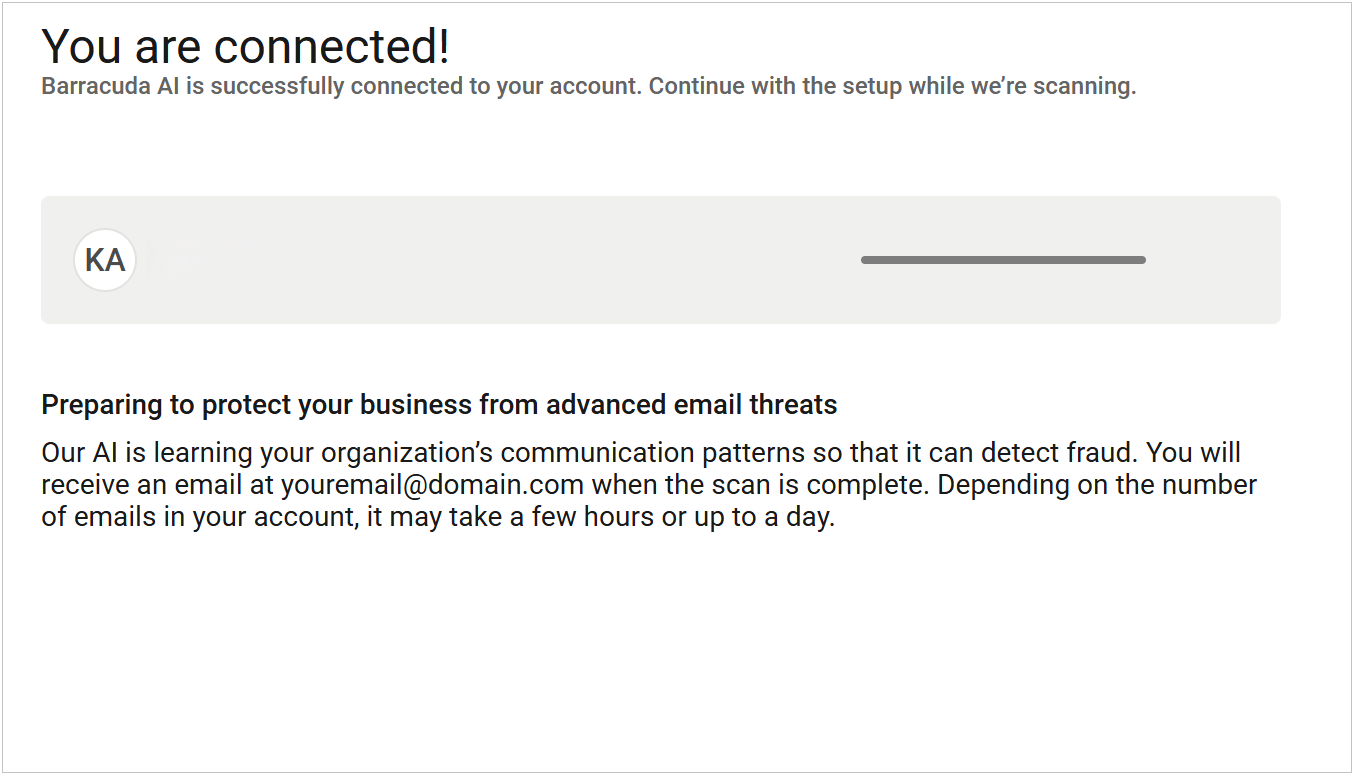
Once you are connected, Barracuda Networks will initiate a scan to identify any email threats. During this process, click Next in the upper right corner to continue.
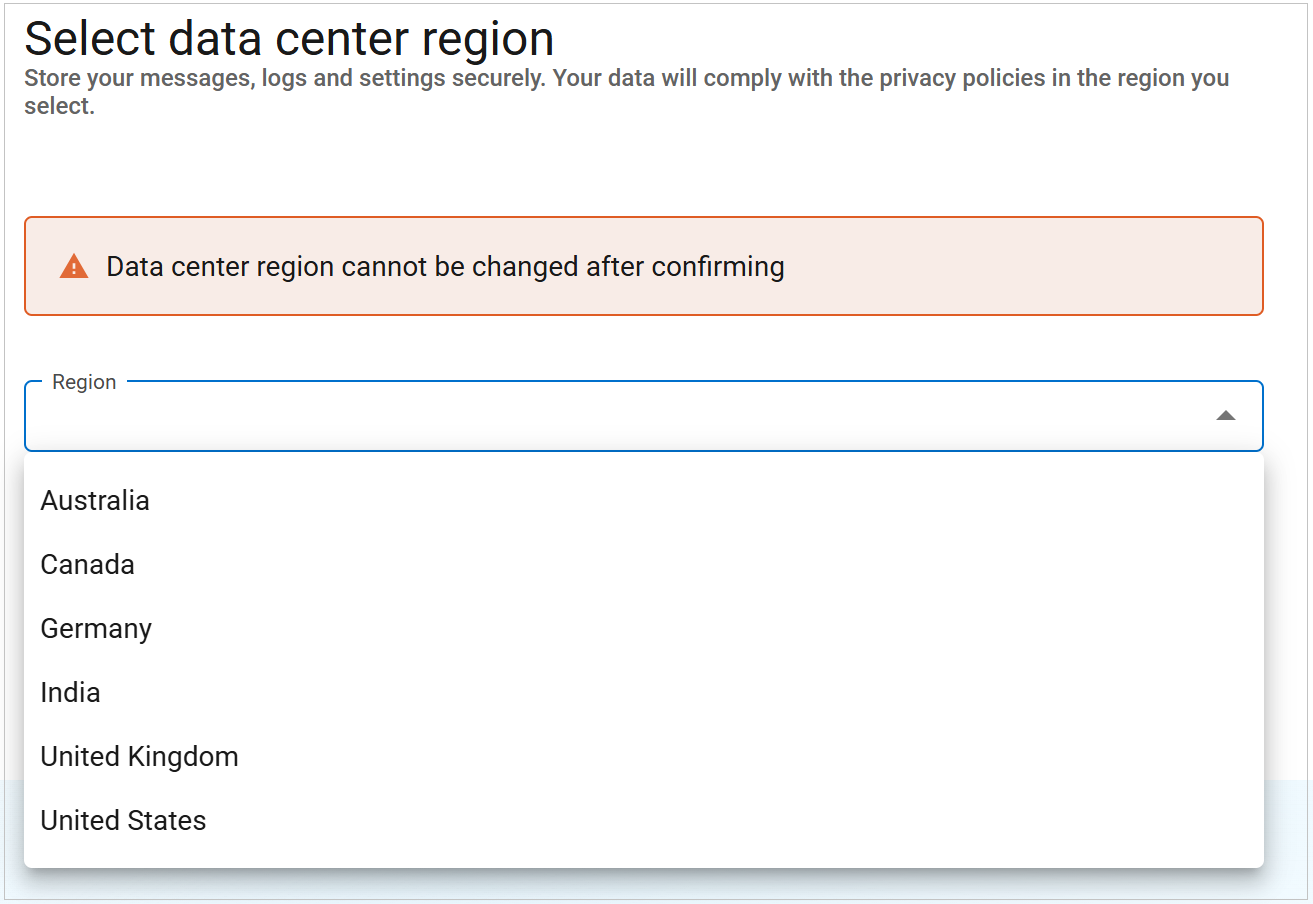
Select the Region for your data center. Then click Next.
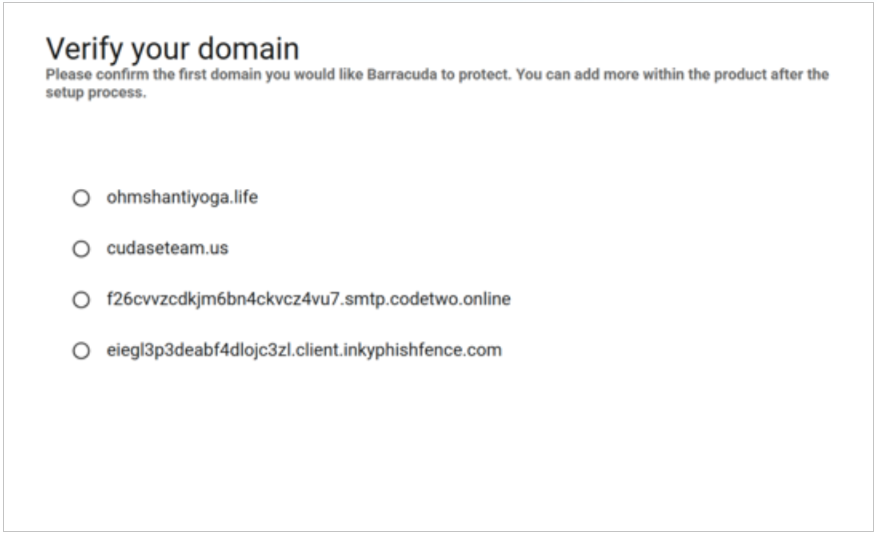
Confirm the domain you would like to protect. Then click Next.
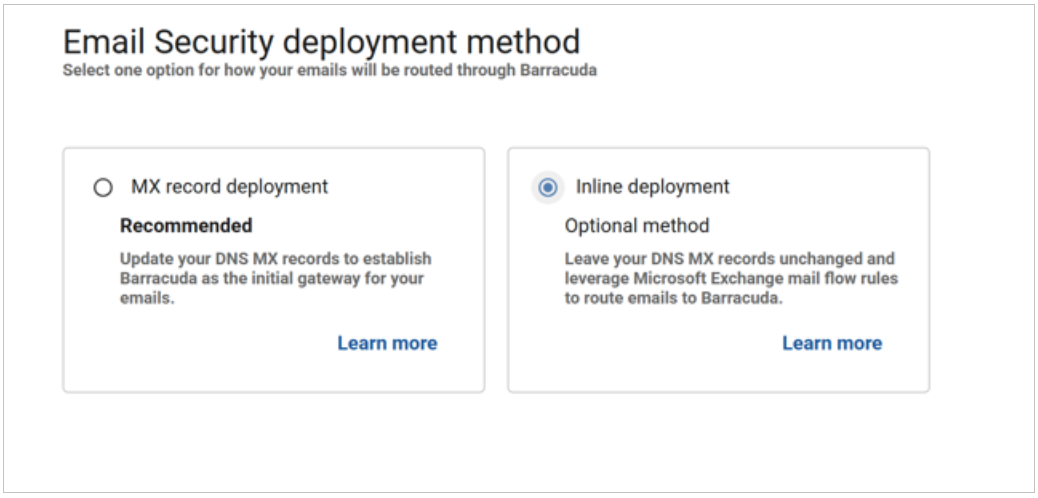
Choose your deployment method.
To set up your email flow, you will need to add the new MX records and remove the old MX records.
To add the new MX records:
Log into your DNS hosting account.
Add the primary and backup MX records shown in the Add new MX records section. Instructions for your DNS hosting provider will vary; you can use search terms such as add, edit, manage, or MX records.

Add the MX records with a low priority, for example, 99. Adding the new MX records to your existing list should look similar to this:

After updating your MX records, allow at least 24-48 hours before completing the next step to allow time for your changes to propagate.
Verify that the new Email Gateway Defense MX records have been added by clicking on the Verify records button.
Once your MX records are added, a green verified check mark
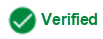 will appear next to the MX record.
To remove the old MX Records:
Log into your DNS hosting account.
Remove the existing MX records shown in the Remove old MX records section. Instructions for your DNS hosting provider will vary; you can use search terms such as add, edit, manage, or MX records.
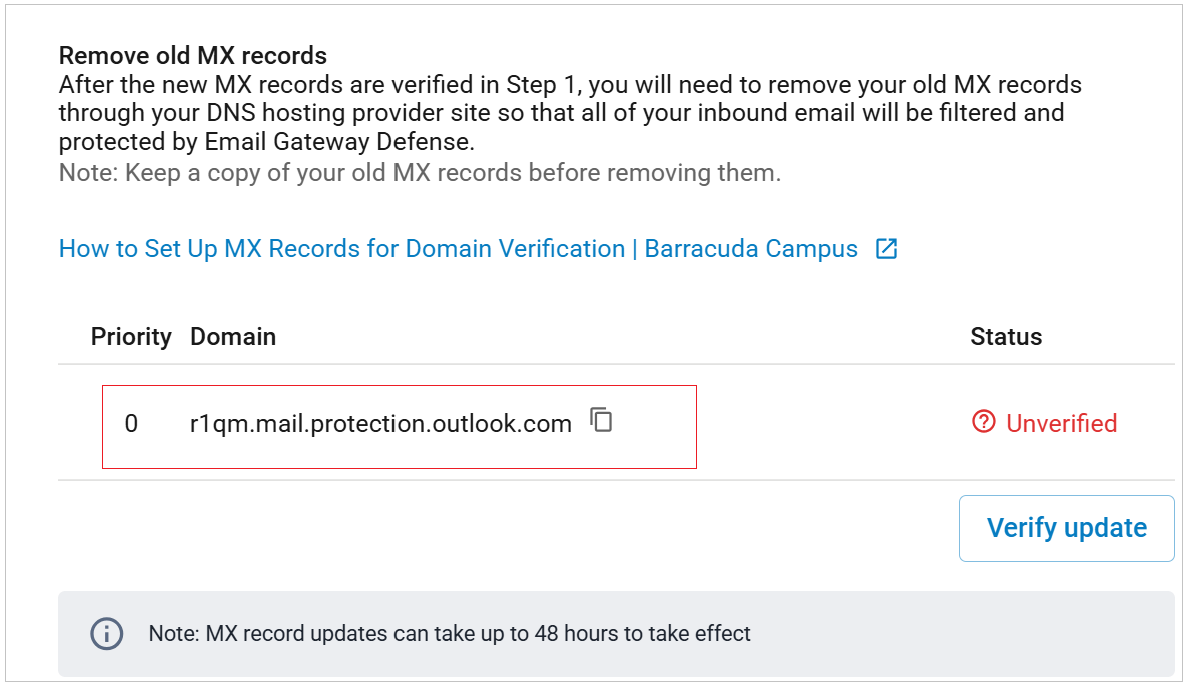
Update the priority of your primary and backup Barracuda MX records to 1 and 10.
In the Email Gateway Defense wizard, verify that your non-Barracuda Networks MX records have been removed by clicking on the Verify update button.
Once your MX records are removed, a green verified check mark
will appear. After you have successfully completed all the steps in the Email Gateway Defense setup wizard, click the Complete setup button at the upper right corner. To exit the wizard and come back at a later time, click Exit.
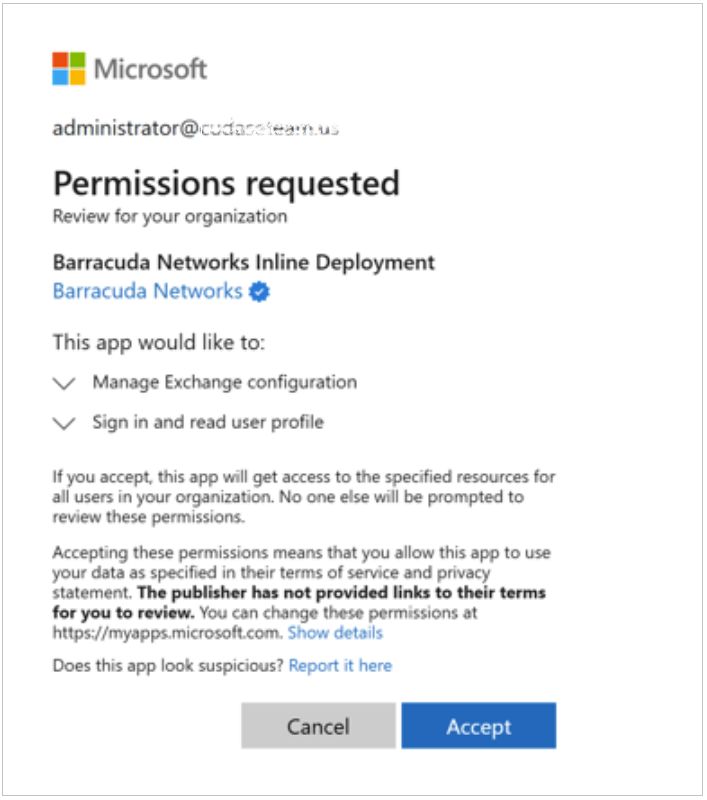
After clicking Next, you will be prompted to sign into Microsoft to accept an additional application. This application will be used to create the necessary rules and connectors required for inline deployment.
After accepting permissions, you will be returned to the setup wizard. Click Next to begin the deployment.
During deployment, the setup wizard will automatically create the following:
Three mail flow rules – Two rules for processing inbound mail and one rule for outbound mail. Note: The outbound mail flow rule will be disabled by default.
Three connectors – Two connectors for processing inbound mail and one connector for processing outbound mail.
Anti-Spam connection filtering policy – An entry in the Anti-Spam connection filtering policy to bypass spam filtering for emails originating from Barracuda Networks.
Policy to allow spoofing – An “Allow spoofing” policy for emails sent from Barracuda Networks.
Once the deployment is complete, click the Complete setup button at the upper right corner. You will be redirected to your Message Log.
You have now successfully set up Email Gateway Defense using the inline deployment method.
Step 2. Deploy Partner Connector
The steps in this section enhance the security of the connection between Email Gateway Defense and Microsoft 365.
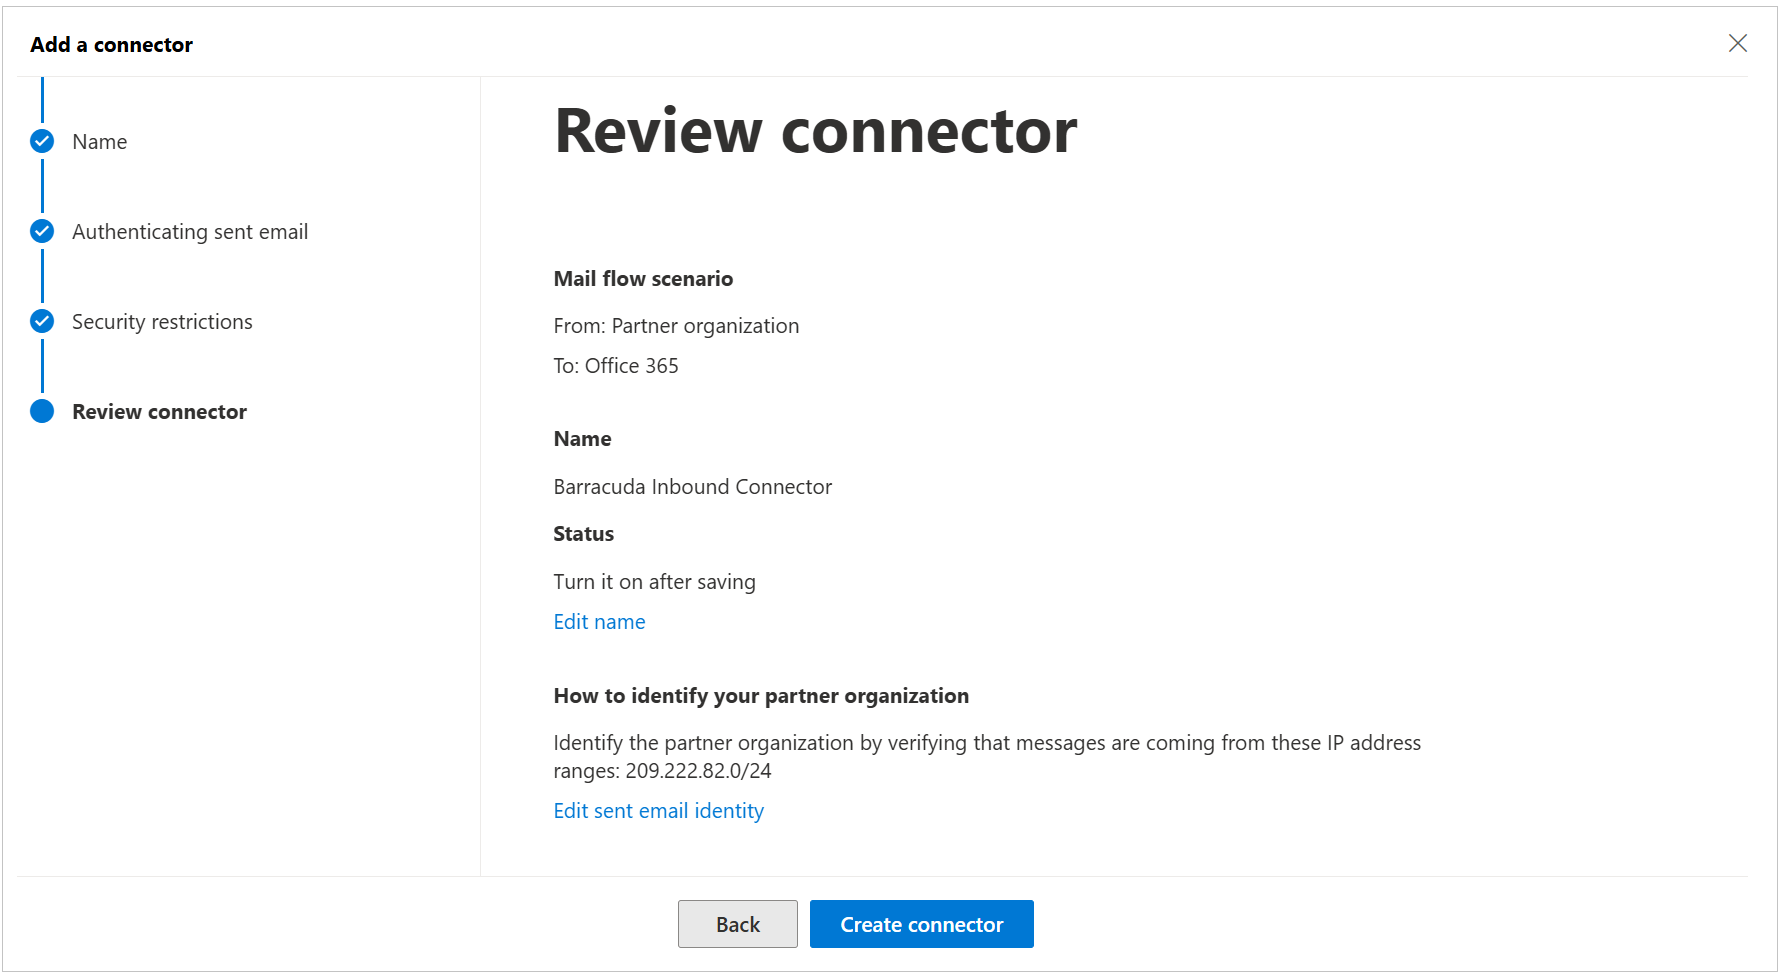
Create a Partner Connector
Creating a partner connector will allow you to use enhance filtering along with tenant access restrictions, ensuring a safe and secure environment.
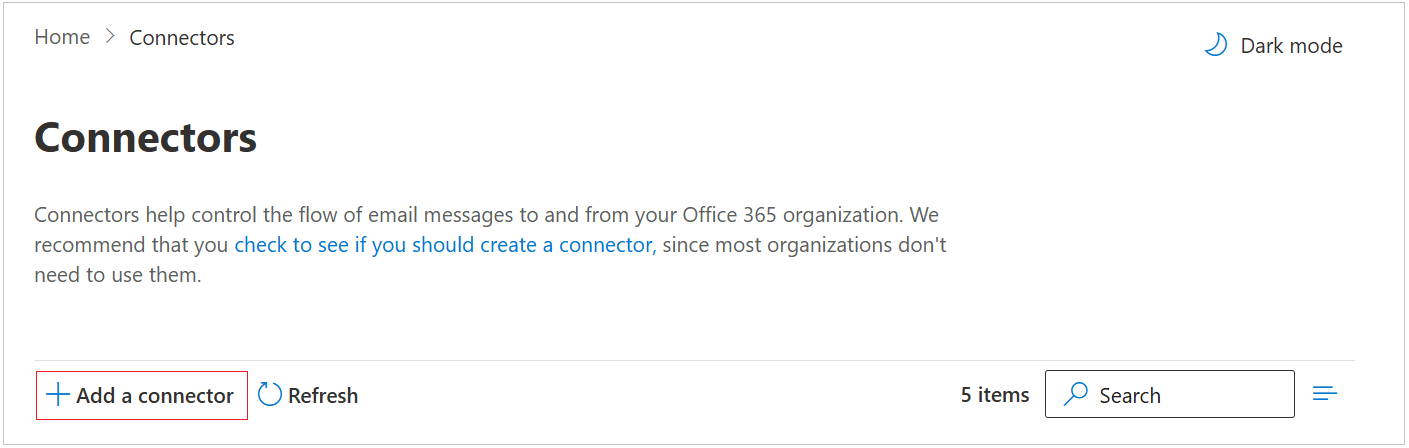
Click the Add a connector button, and use the wizard to create a new connector.
For Connection from, select Partner organization. Then, click Next.
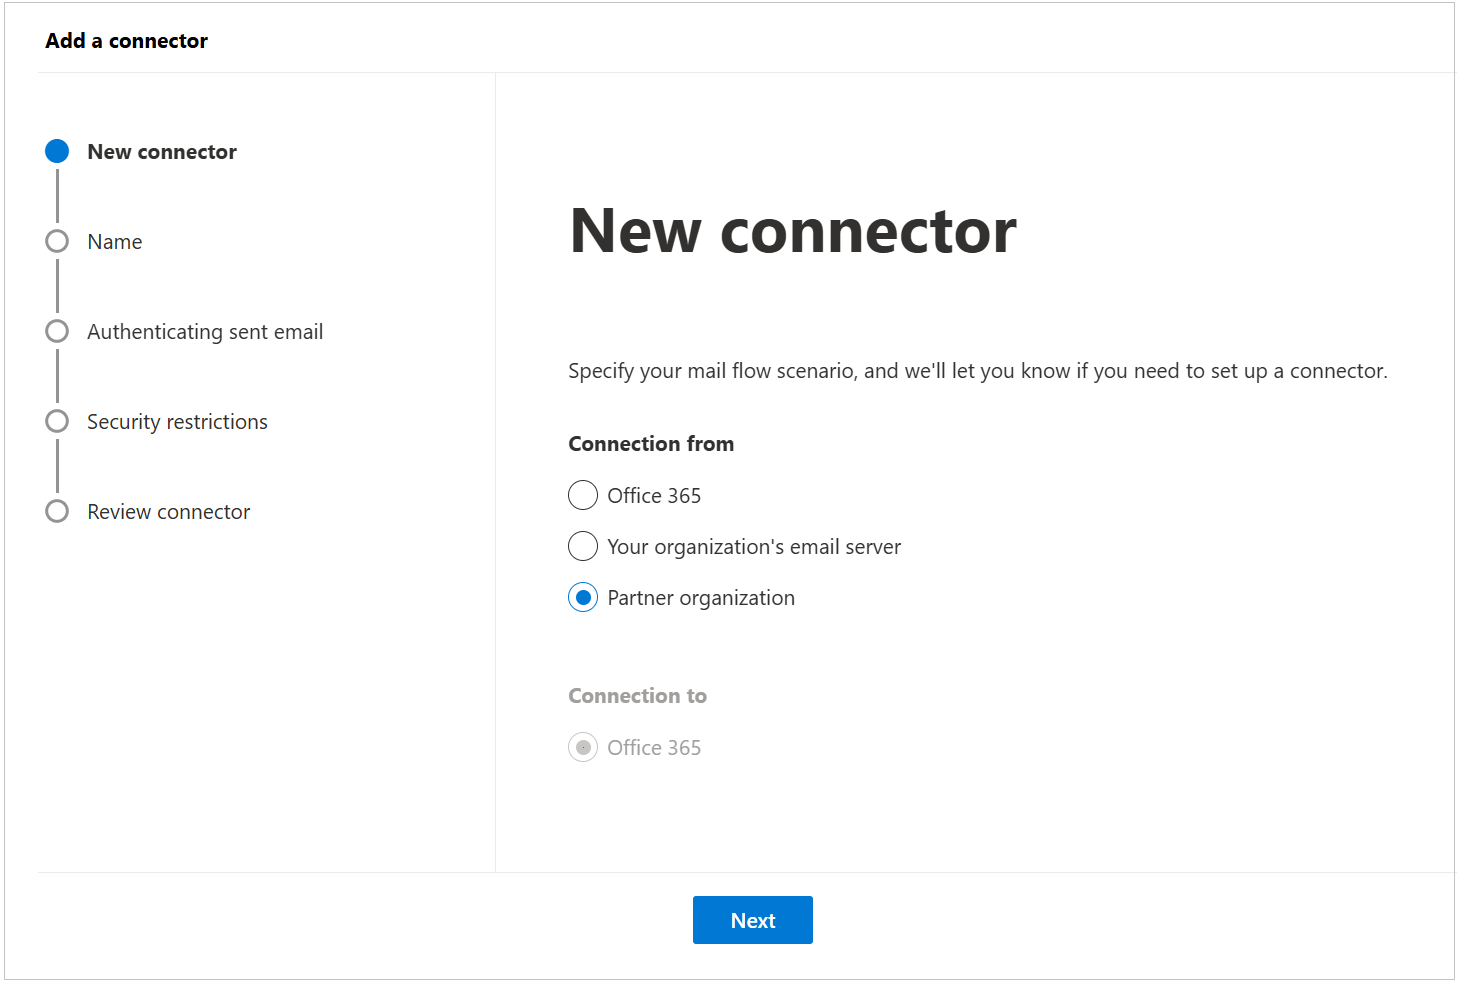
Enter a Name “Barracuda Inbound Connector” and (optional) Description to identify the connector. Then, click Next.

Select By verifying that the IP address of the sending server matches one of the following IP addresses, which belong to your partner organization.
Click the + to enter the correct IP range for your region. Then, click Next.
This is the region selected when setting up your Barracuda Networks instance. Refer to the Email Gateway Defense IP Ranges Used for Configuration for the IP ranges corresponding to your region.
For example, for the US region, enter 209.222.82.0/24.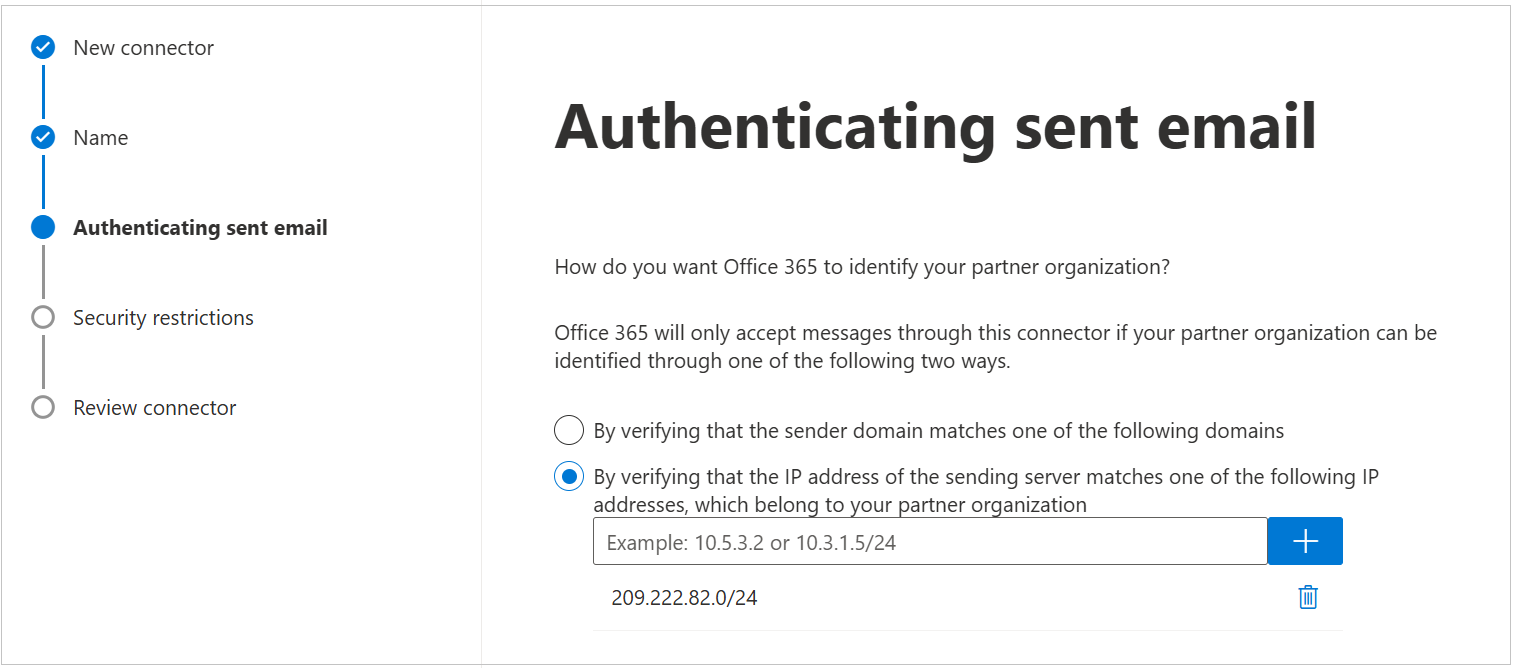
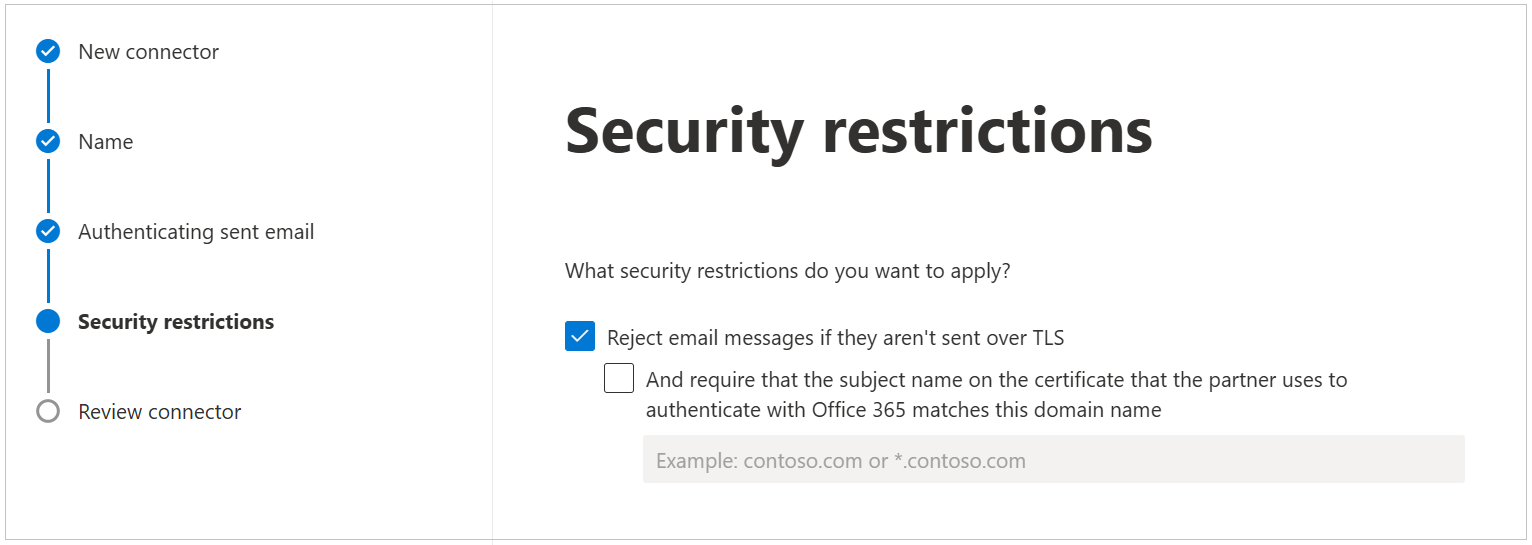
Use the default settings for the Security restrictions: Reject email messages if they aren’t sent over TLS. Then, click Next.
Review your settings and then click Create connector.
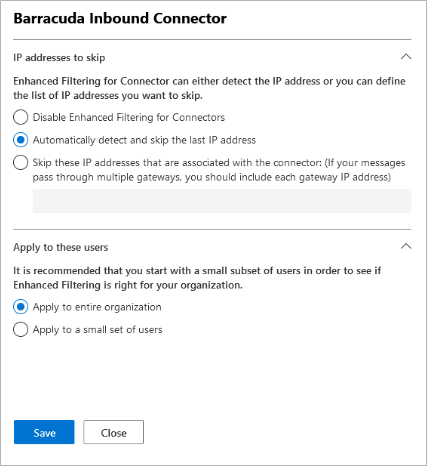
Enable Enhanced Filtering for Connectors
To enable Enhanced Filtering for Connectors, use the following instructions:
Select Barracuda Inbound Connector, the partner connector you previously created.
Select Automatically detect and skip the last IP address and Apply to entire organization.
Click Save .
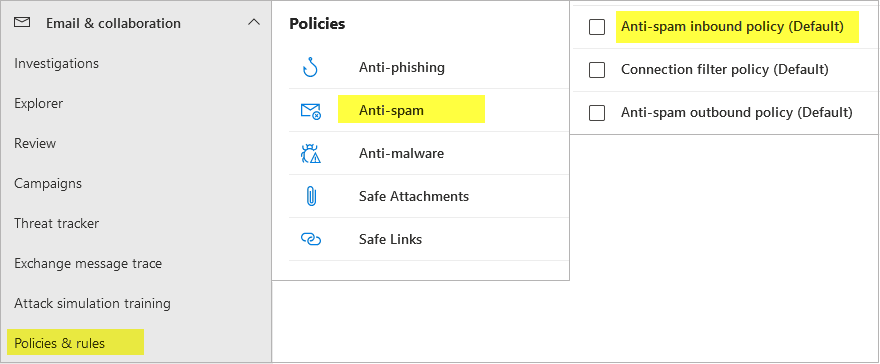
Review Microsoft Anti-Spam Settings
Enhanced Filtering for Connectors allows customers to continue to leverage anti-spam capabilities provided in Exchange Online. Review your Microsoft anti-spam policy to ensure it is configured to follow recommended best practices.
Log into the Microsoft Defender portal https://security.microsoft.com/.
On the left, navigate to Email & collaboration > Policies & rules.
Select Threat policies > Anti-spam.
Select Anti-spam inbound policy (Default).
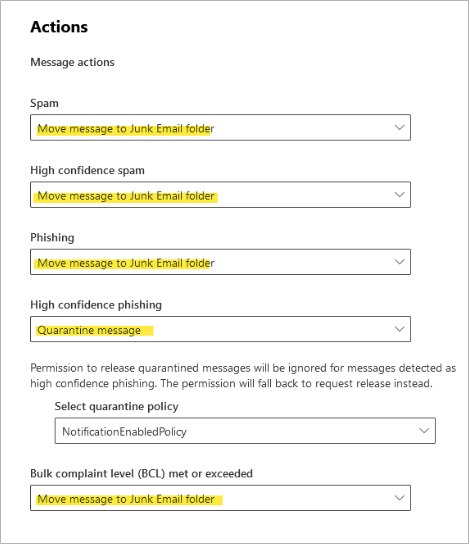
Scroll down and click Edit actions.

Review your settings and click Save.
Note: The settings shown here are the default Microsoft anti-spam settings. Organizations may opt for a different level of filtering based on the needs of the organization. To learn more about Microsoft anti-spam policies, see https://learn.microsoft.com/en-us/defender-office-365/anti-spam-protection-about.
Step 3. Add Additional Email Domains (Optional)
You configured your primary email domain in Step 1 of the wizard, above. Barracuda Networks recommends adding all Microsoft 365 accepted domains into Email Gateway Defense.
Repeat these steps, as needed, for additional Microsoft 365 domains before continuing with the next step.
Obtain the hostname:
Log into the Microsoft 365 admin center.
In the left pane, click Settings > Domains.
In the Domains table, click on your domain.
Take note of the hostname. This is the address of your destination mail server, for example, cudaware-com.mail.protection.outlook.com
Enter the hostname:
Log into the Barracuda Cloud Control as administrator. In the left panel, click Email Gateway Defense. Select the Domains tab, then click Add Domain.
Enter the domain name and destination mail server hostname obtained from your Microsoft 365 account:
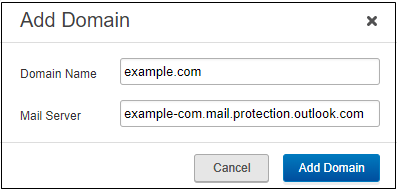
Click Add Domain; the Domain Settings page displays, listing the new domain.
Verify that the domain is yours. Follow the instructions in How to Set Up MX Records for Domain Verification. Make sure that you see that the domain is successfully verified, then return to this page.
Step 4. Configure Tenant Restrictions
Validate Mail Flow
The new inbound partner connector that was created will be used to enforce restrictions on your Microsoft tenant to prevent emails from bypassing your Barracuda Networks gateway defenses. Prior to enforcing those restrictions, it is important to validate your inbound mail flow to ensure there are no external senders that are sending emails directly to your Microsoft tenant.
For instructions on how to validate mail flow, see Validating Mail Flow Before Restricting Access.
Restrict Access
To update your Barracuda partner connector to require inbound mail to flow through Email Gateway Defense, connect to Exchange Online and run the PowerShell command.
Install Exchange Online module.
If you have already installed Exchange Online module, proceed to the next step.
To install Exchange Online module, open Windows PowerShell as an administrator and enter the following command:
Install-Module -Name ExchangeOnlineManagement
Connect to Exchange Online Powershell and log in with your Microsoft 365 administrator account using the following command:
Connect-ExchangeOnline
Run the following PowerShell command:
Set-InboundConnector -Identity "Barracuda Inbound Connector" -RestrictDomainstoIPAddresses $true
This completes the steps required to set up inbound mail filtering. To set up outbound mail filtering, continue below with the next steps.
Step 5. Configure Sender Policy Framework for Outbound Mail
To ensure Barracuda Networks is the authorized sending mail service of outbound mail from Email Gateway Defense, add the following to the Sender Policy Framework (SPF) record INCLUDE line of the SPF record for your sending mail server for each domain sending outbound mail. Select the relevant SPF INCLUDE based on the region you selected for your Barracuda Networks instance.
For more information, see Email Gateway Defense Outbound IP Ranges.
AU (Australia)
include:spf.ess.au.barracudanetworks.com -all
CA (Canada)
include:spf.ess.ca.barracudanetworks.com -all
DE (Germany)
include:spf.ess.de.barracudanetworks.com -all
IN (India)
include:spf.ess.in.barracudanetworks.com -all
UK (United Kingdom)
include:spf.ess.uk.barracudanetworks.com -all
US (United States)
include:spf.ess.barracudanetworks.com -all
For more information, see Sender Authentication.
If you have an SPF record set up for your domain, edit the existing record, and add the following to the INCLUDE line for each domain sending outbound mail based on your Barracuda Networks instance. For example:
include:spf.ess.barracudanetworks.com -allIf you do not have an SPF record set up for your domain, use the following value to create a TXT record that creates a HARD Fail SPF for your domain based on your Barracuda Networks instance. For example:
v=spf1 include:spf.ess.barracudanetworks.com -all
Step 6. Configure User Accounts and User Lists
Follow the steps in the appropriate links, based on your organization's setup.
How to Configure User Authentication Using LDAP
How to Configure User Authentication with Microsoft Entra ID
Step 7. Configure Outbound Mail
Log into the Microsoft 365 admin center https://admin.exchange.microsoft.com/.
In the left pane, click Mail flow, and click Connectors.
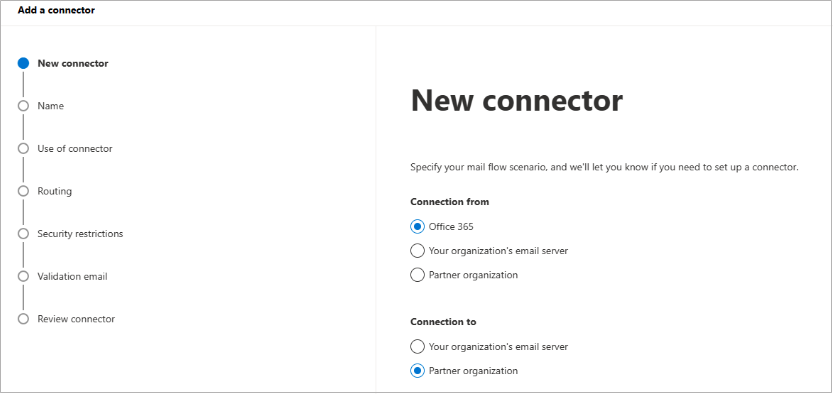
Click the Add a connector button, and use the wizard to create a new connector.
For Connection from, select Office 365. For Connection to, select Partner organization.
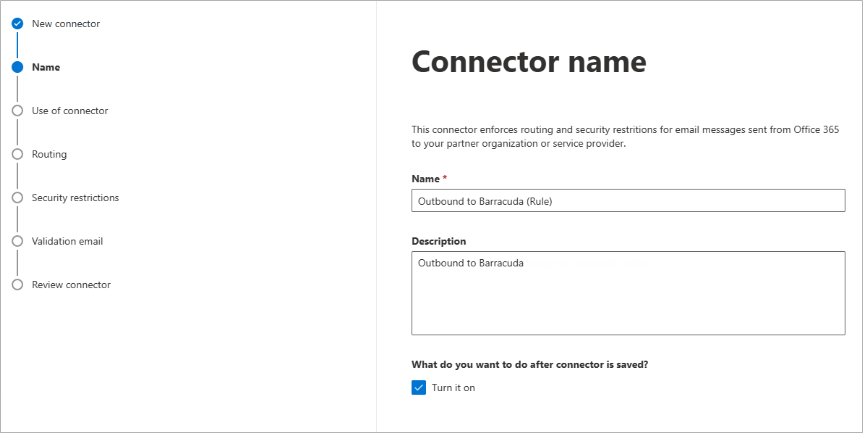
Click Next. Enter a Name and (optional) Description to identify the connector:
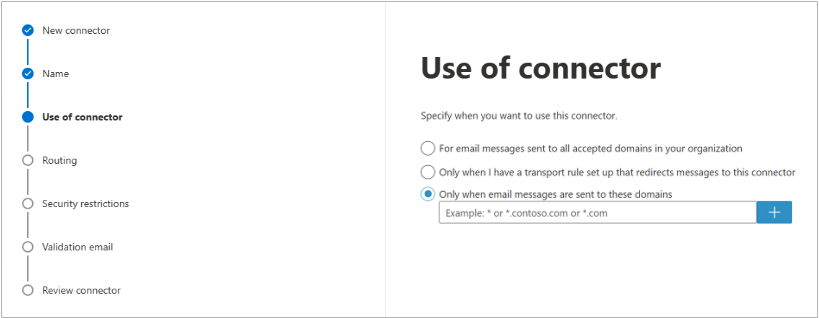
Click Next. Select Only when email messages are sent to these domains. Enter an asterisk ( * ) in text box field and click the blue + .
Click Next. Select Route email through these smart host, and click the + symbol.
Go to Email Gateway Defense, and click the Domains tab. Copy your outbound hostname from the Outbound Smarthost Configuration field, and enter it in the add smart host page. For example, d12345.o.ess.barracudanetworks.com .
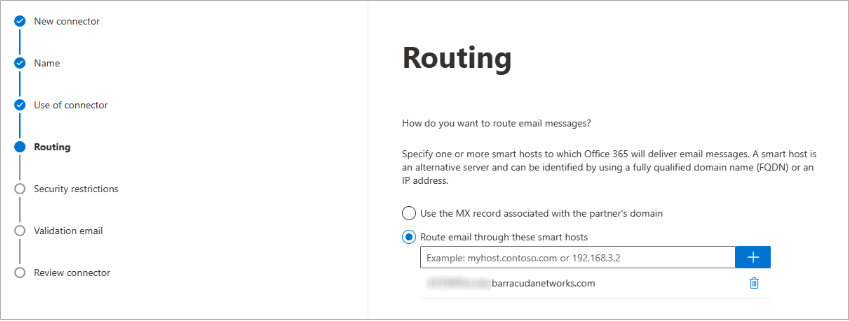
Click Next. Use the default settings for the Security restrictions: Always use Transport Layer Security (TLS) to secure the connection (recommended) > Issues by Trusted certificate authority (CA):

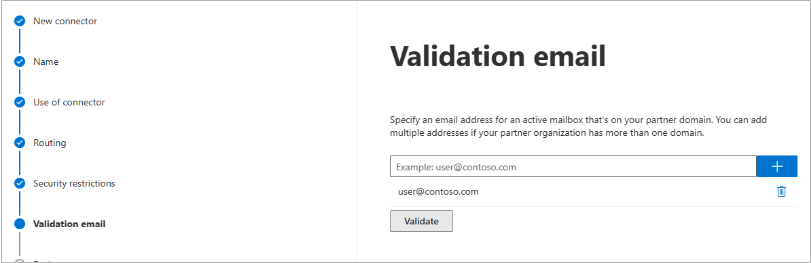
Enter an external email address to validate the connector. For this test, it is important to use an email address from outside your organization, like a gmail or yahoo email address. Click Validate.
There are two parts of the validation:Test Connectivity – If this test fails, Outbound Groups is not enabled. Contact Barracuda Networks Technical Support and request that Outbound Groups be enabled on your Email Gateway Defense account.
Send Test Email – If the test fails, there is no cause for concern. The test email comes from a Microsoft domain, not from your domain, so it is rejected. If you changed your domain away from
onmicrosoft.com, the test should work. Note that you might still receive the email even if the test failed.
Once the validation process is complete, click Next. Review your settings and then click Create connector.
Email Gateway Defense now accepts outbound traffic from Outlook 365.
Step 8. Disable RTF (Rich Text Format) (Optional)
Customers sending outbound mail through Email Gateway Defense can consider disabling Rich Text Format (RTF) on their outbound external mail. When a message is formatted as Rich Text, the attachments will be formatted with TNEF, a Microsoft proprietary encoding that can be configured at the client or organization level. RTF refers to the message format and TNEF refers to the attachment format. RTF encoding can cause issues with attachments converting to winmail.dat files which can only be read by other Outlook clients. This can cause problems for outbound content/DLP policies that examine attachments. For example, if an end user sends an email with a PDF attachment that contains a SSN and the email is sent with RTF encoding, Email Gateway Defense would not be able to scan the PDF and identify the SSN to apply a DLP policy. By disabling RTF at the account level, it will force all outbound external mail to be HTML encoded instead.
To disable RTF on Exchange Online and Exchange 2013 and newer, use one of the following methods.
Powershell Command
Set-RemoteDomain -Identity Default -TNEFEnabled $false
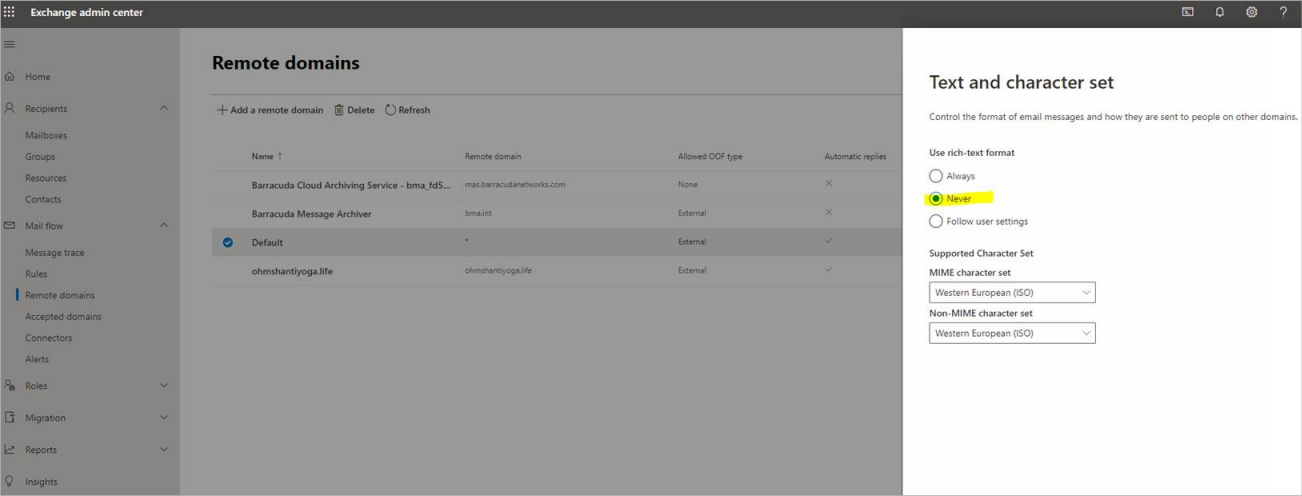
Exchange Admin Center
Log into the Microsoft 365 Exchange Admin Center.
In the left pane, click Mail flow > Remote domains.
Edit the Default remote domain.
Under Text and character set, select Never for Use rich-text format.
Click save.
Your deployment is now complete! Learn more about Email Gateway Defense.