

Customers can designate an individual to manage quarantine emails sent to shared mailboxes by using mail flow rules within Exchange.
With the temporary passcode feature and a mail flow rule, customers can reroute emails from certain shared mailboxes or distribution groups to designated individual(s). The designated individual(s) are responsible for logging in and releasing any quarantined emails. These emails are then delivered to the shared mailbox or distribution group where users can then access it.
Step 1. Enable Temporary Passcode Feature
To get started, enable the temporary passcode feature in Email Gateway Defense.
Step 2. Create a Mail Flow Rule
- Log into the Microsoft 365 admin center https://admin.exchange.microsoft.com/.
- In the left pane, click Mail flow > rules.
- Click Add a rule.
- Select Create a new rule.
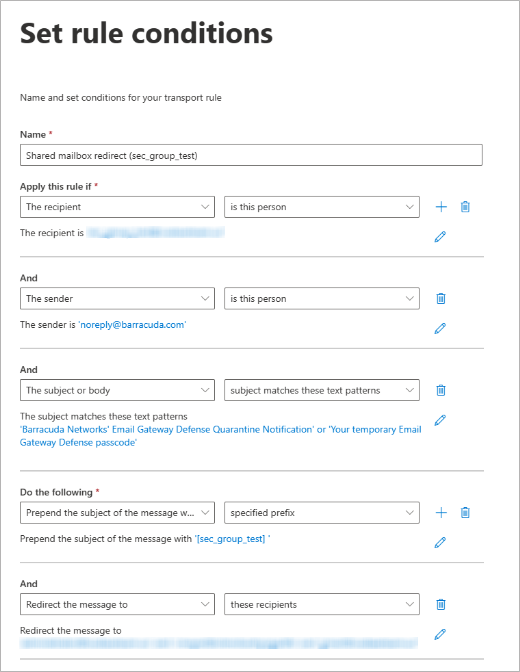
- In the new rule page, enter a Name to represent the rule. For example, Shared mailbox redirect (sales@contoso.com).
Under Apply this if, select The recipient > is this person and then select the specific shared mailbox or distribution group.
- Click the + to add a new condition.
- From the drop-down menu, select The sender > is this person and then enter noreply@barracuda.com.
- Click Save.
- Click the + to add a new condition.
- From the drop-down menu, select The subject or body > subject matches these text patterns. Depending on your specific use case, enter one or both of these subject lines:
- Your temporary Email Gateway Defense passcode
- Barracuda Networks' Email Gateway Defense Quarantine Notification
(Optional) Under Do the following, click the + to add a new condition. Select Prepend the subject of the message with > specified prefix and then enter the name of the shared mailbox or distribution group in square brackets ([ ]), followed by a space. This will help identify the email with the correct shared mailbox or distribution group.
- Under Do the following, click the + to add a new condition. Select Redirect the message to > these recipients and then select the designated individual(s).
- Click Next, and click Next again.
- Review the settings, and then click Finish.
- Note that the rule is disabled by default. Enable the rule and ensure that the newly created mail flow will not be impacted by any existing rules. To ensure that the rule is always checked, move it to the top of the priority list if necessary.