

Configure IP Address and Network Settings
The Barracuda Email Security Gateway is given a default IP address of 192.168.200.200. You can change this address by doing either of the following:
- Connect directly to the Barracuda Email Security Gateway with a keyboard and monitor and specify a new IP address through the console interface.
- Log into the Barracuda Email Security Gateway web interface as admin and change the IP address on the BASIC > IP Configuration page. See Configure the Barracuda Email Security Gateway From the Web Interface below for details.
To connect directly to the Barracuda Email Security Gateway to set a new IP address:
- At the barracuda login prompt, enter admin for the login and, for the password:
If your appliance serial number is higher then 1311431 , then the default administrator password is the numeric portion of the serial number. If your serial number is 1311431 or lower, then the default administrator password is admin. For help finding the serial number of your appliance, see Serial Number for Hardware and Virtual Appliances.
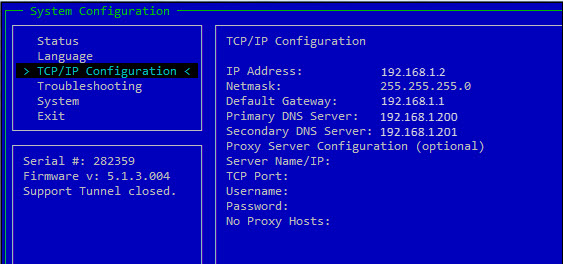
The User Confirmation Requested window will display the current IP configuration of the system.
- Using the Tab key, select Yes to change the IP configuration.
- Enter the new IP address, netmask, and default gateway for your Barracuda Email Security Gateway, and select OK when finished.
- Select No when prompted if you want to change the IP configuration. Upon exiting the screen, the new IP address and network settings will be applied to the Barracuda Email Security Gateway.
Configure Your Corporate Firewall
If your Barracuda Email Security Gateway is located behind a corporate firewall, you need to open specific ports to allow communication between the Barracuda Email Security Gateway and remote servers. See also Required Outbound Connections for Barracuda Networks Appliances.
To configure your corporate firewall:
Using the following table as a reference, open the specified ports on your corporate firewall:
Port Direction Protocol Used for 22 Out TCP Remote diagnostics and technical support services (recommended). If you don't want to leave this port open, you can just open for technical support sessions if needed, and then close the port again after the session. 25 In/Out TCP SMTP 53 Out TCP/UDP Domain Name Server (DNS) 80(1) Out TCP Virus, firmware, security and spam rule definitions 123 Out UDP NTP (Network Time Protocol) 8000(2) (default) Out TCP Virus, firmware, security and spam rule definitions 443 Out TCP Optional : Allow access to HTTPS links in emails. Notes:
(1) If your firewall allows unrestricted outbound traffic on port 80, then no further action is necessary. If there are restrictions on outbound traffic on this port, you must configure your firewall as described in Required Outbound Connections for Barracuda Networks Appliances to allow the Barracuda Email Security Gateway access to firmware and definition updates.
(2) If your firewall allows unrestricted outbound traffic on port 8000, then no further action is necessary.- If appropriate, change the NAT routing of your corporate firewall to route incoming email to the Barracuda Email Security Gateway. Consult your firewall documentation or your corporate firewall administrator to make the necessary changes.
After specifying the IP address of the system and opening the necessary ports on your firewall, you need to configure the Barracuda Email Security Gateway from the web interface. Make sure the computer from which you configure the Barracuda Email Security Gateway is connected to the same network, and the appropriate routing is in place to allow connection to the Barracuda Email Security Gateway’s IP address from a web browser.
Configure the Barracuda Email Security Gateway From the Web Interface
- From a web browser, enter the IP address of the Barracuda Email Security Gateway followed by port 8000.
Example: http://192.168.200.200:8000 - Log in to the web interface using admin for the username and, for the password:
- If your appliance serial number is higher then 1311431, then the default administrator password is the numeric portion of the serial number. For help finding the serial number of your appliance, see Serial Number for Hardware and Virtual Appliances.
- If your serial number is 1311431 or lower, then the default administrator password is admin.
For maximum security, version 9.2 and higher requires changing the administrator password before proceeding. On the BASIC > IP Configuration page, enter the required information in the fields as described in the following table:
Fields Description TCP/IP Configuration The IP address, subnet mask, and default gateway of your Barracuda Email Security Gateway. The TCP port is the port on which the Barracuda Email Security Gateway receives incoming email. This is usually port 25. Destination Mail Server TCP/IP Configuration The hostname or IP address of your destination mail server; for example mail.yourdomain.com. This is the mail server that receives email after it has been checked for spam and viruses.
You should specify your mail server’s hostname rather than its IP address so that the destination mail server can be moved and DNS updated at any time without any changes needed to the Barracuda Email Security Gateway.
TCP port is the port on which the destination mail server receives all SMTP traffic such as inbound email. This is usually port 25.
If you need to set up more than one domain or mail server, refer to Creating and Managing Domains.
DNS Configuration The primary and secondary DNS servers you use on your network.
It is strongly recommended that you specify a primary and secondary DNS server. Certain features of the Barracuda Email Security Gateway rely on DNS availability.
Domain Configuration Default Host Name is the host name to be used in the reply address for email messages (non-delivery receipts, virus alert notifications, etc.) sent from the Barracuda Email Security Gateway. The Default Host Name is appended to the default domain.
Default Domain is a required field and indicates the domain name to be used in the reply address for email messages (non-delivery receipts, virus alert notifications, etc.) sent from the Barracuda Email Security Gateway.
Accepted Email Recipients Domains The domains managed by the Barracuda Email Security Gateway. Make sure this list is complete. The Barracuda Email Security Gateway rejects all incoming messages addressed to domains not in this list. See Creating and Managing Domains.
Note: One Barracuda Email Security Gateway can support multiple domains and mail servers. If you have multiple mail servers, go to the DOMAINS tab and enter the mail server associated with each domain
- Click Save.
If you changed the IP address of your Barracuda Email Security Gateway, you are disconnected from the web interface and will need to log in again using the new IP address.
Continue with Step 4 - Product Activation and Firmware Update