

Follow the steps below to create an Amazon Virtual Private Cloud (VPC), an Internet Gateway and a Subnet on Amazon Web Services (AWS).
Step 1 – Create the Amazon VPC Cloud
A Virtual Private Cloud (VPC) is an isolated virtual network on Amazon Web Services (AWS) Cloud where you can launch AWS resources, such as Amazon EC2 instances. When creating a VPC, the IP address(es) should be in the form of Classless Inter-Domain Routing (CIDR) block (for example, 10.0.0.0/16). In a VPC, you can select your own IP address range, create subnets, configure routing tables and network gateways.
For more information about CIDR notation, refer to Classless Inter-Domain Routing on Wikipedia. For information about the number of VPCs that you can create, refer to Amazon VPC Limits.
Perform the steps below to create a VPC:
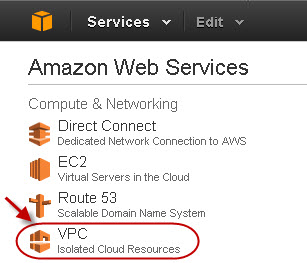
- Go to the AWS Management Console.
- In the Compute & Networking section, click VPC.
- From the VPC Dashboard, select Your VPCs under VIRTUAL PRIVATE CLOUDS.
- Click Create VPC.
- In the Create VPC dialog box, do the following:
- Enter the IP address in the CIDR Block field.
- Select Default from the Tenancy drop-down list.
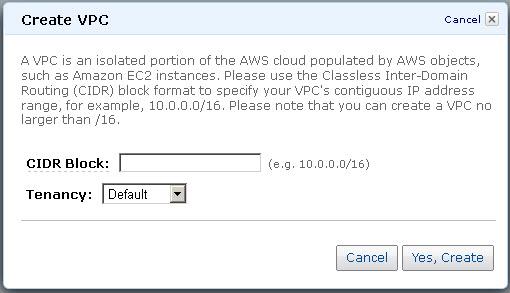
- Click Yes, Create.
Step 2 - Add an Internet Gateway to the VPC
By default, the instances launched on the Virtual Private Cloud (VPC) cannot communicate with the internet until an Internet Gateway is created and attached to the VPC.
Perform the following steps to add an internet gateway to your VPC:
- From the VPC Dashboard, select Internet Gateways under VIRTUAL PRIVATE CLOUDS.
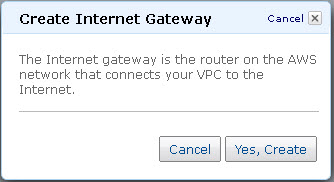
- Click Create Internet Gateway.
- In the Create Internet Gateway dialog box, click Yes, Create.
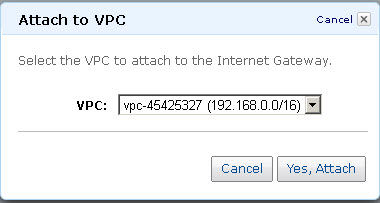
- Select the internet gateway created in the above step, and then click Attach to VPC.
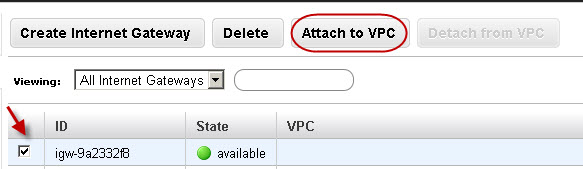
- Select the VPC that you created in Step 1, and then click Yes, Attach.
Step 3 - Add a Subnet to the VPC
Perform the following steps to add a subnet to your VPC:
- From the VPC Dashboard, select Subnets under VIRTUAL PRIVATE CLOUDS.
- Click Create Subnet.
- In the Create Subnet dialog box, do the following:
- Select the created VPC from the VPC drop-down list.
- Select the availability zone that your VPC resides from the Availability Zone drop-down list.
- Specify the IP address(es) in the CIDR Block field.
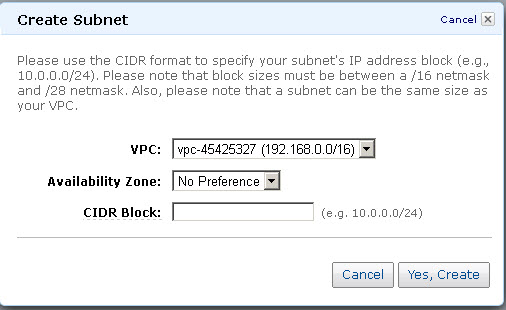
- Click Yes, Create.
Continue with the licensing process on Amazon Web Services.