

When an instance of your Barracuda Email Security Gateway virtual appliance is created, a public IP address is associated with the instance. That public IP address changes if the instance is stopped or terminated. However, you can assign a persistent public IP address to the instance using Elastic IP addressing, resolving this issue. For more information, see the Amazon Web Services article Elastic IP Addresses.
Allocating an Elastic IP Address to the Barracuda Email Security Gateway Instance
- Log into the Amazon EC2 Management Console.
- From the EC2 dashboard, select Elastic IPs under NETWORK & SECURITY.
- Click Allocate New Address. Click Yes, Allocate to confirm and allocate a new IP address. A random Public IP gets generated and displayed in the Allocate New Address table.
Associating the Elastic IP Address with the Barracuda Email Security Gateway Instance
- In the Allocate New Address table, right click on the new IP address and select Associate.
- In the Associate Address window, do the following:
- Select the Instance and the Private IP Address of the instance from the respective lists.
OR - Select a Network Interface and the Private IP Address from the respective lists.
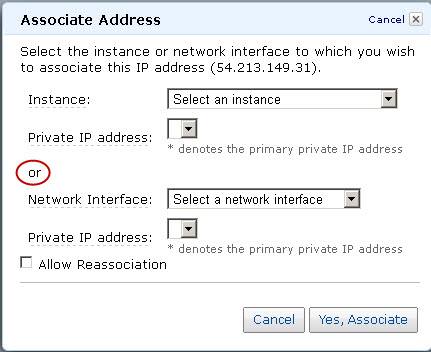
- Select the Allow Reassociation check box.
- Select the Instance and the Private IP Address of the instance from the respective lists.
- Click Yes, Associate.