

Note that clustered systems can be geographically dispersed and do not need to be located on the same network. Important: Every Barracuda Email Security Gateway in a cluster must meet the following requirements:
- Be the same model (400 and above).
- Have the same version of firmware installed.
- Be configured for the same time zone.
- Have a unique external IP address. This means that every Barracuda Email Security Gateway behind a NAT must have a unique external IP address and must be reachable by that external IP address.
See also: Benefits of Clustering the Barracuda Email Security Gateway
Set Up Clustered Systems
To cluster two Barracuda Email Security Gateways together, where one system is designated as "Barracuda1" and the other is designated "Barracuda2", do the following:
- Complete the installation process for each system as described in Step 2 - Install the Barracuda Email Security Gateway. Each Barracuda Email Security Gateway in a cluster must be the same model# and be on exactly the same firmware version.
- From the ADVANCED > Task Manager page on the Barracuda1 system, verify that no processes are running. Complete this step for the Barracuda2 system as well. No processes should be running when you add a system to a cluster.
- Configure the Barracuda2 system as you would like Barracuda1, and any other system you might add to the cluster, to be configured. Make a backup of the configurations of each Barracuda Email Security Gateway.
- From the ADVANCED > Clustering page on the Barracuda1 system, enter a Cluster Shared Secret password for the cluster, and click Save Changes.
- Optional: In the Cluster Hostname field on Barracuda1, enter the DNS/hostname (FQDN) by which other Barracuda Email Security Gateways in the cluster will attempt to communicate with this one. If this field is left blank, the IP address entered below will be used. This field is also useful for limiting user access to a cluster - see Limiting Access to a Cluster below.
- From the ADVANCED > Clustering page on the Barracuda2 system, do the following:
- Enter the same Cluster Shared Secret password, and click Save Changes.
- Optionally enter the DNS/hostname (FQDN) in the Cluster Hostname field for Barracuda2.
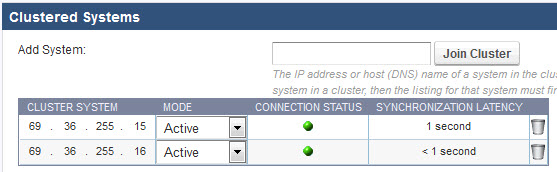
- In the Clustered Systems section, enter the IP address of the Barracuda1 system and click Join Cluster. At this point, the configuration of the Barracuda1 system will automatically propagate to Barracuda2.
- On each Barracuda system, refresh the ADVANCED > Clustering page, and verify that:
- Each system’s IP address appears in the Clustered Systems list
- The Connection Status of each server is green - see Figure 1 below.
- Distribute the incoming mail traffic to each Barracuda Email Security Gateway using a Barracuda Load Balancer (preferred) or another load balancing device, or by using multiple DNS MX records of equal priority.
Figure 1: Two servers in a cluster with a 'green' status.
Add a Barracuda Email Security Gateway to a Cluster
Begin by making a backup of the configuration of any system in the cluster, then perform these steps on the Barracuda Email Security Gateway you want to add to the existing cluster:
- Complete the installation process and ensure that the new Barracuda Email Security Gateway is the same model# and running the same firmware version as all systems in the cluster.
- From the ADVANCED > Task Manager page, verify that no processes are running. Do this on all other systems in the cluster as well.
- From the ADVANCED > Clustering page, enter the Cluster Shared Secret password for the cluster, and click Save Changes.
- Optional: In the Cluster Hostname field, enter the DNS/hostname (FQDN) by which other Barracuda Email Security Gateways in the cluster will attempt to communicate with this one.
- On a Barracuda Email Security Gateway already in the cluster, change any value in the configuration and click Save Changes. This ensures proper synchronization of the configuration.
- On the ADVANCED > Clustering page on the new Barracuda Email Security Gateway to be added to the cluster, enter the IP address of any system in the cluster in the Add System field and click the Join Cluster button. At this point, the configuration of the cluster will automatically propagate to the newly added system.
Limiting End-user Access to the Cluster
You can choose to dedicate a single Barracuda Email Security Gateway as the Quarantine Host to serve up the end-user interface through which users will access their quarantine inboxes, even though their actual quarantine inbox (primary or secondary) may be hosted by another Barracuda Email Security Gateway in the cluster. By not directing email to the Quarantine Host, you can:
- Enhance network security by limiting end-user access (port 8000 by default) and administration to only one Barracuda Email Security Gateway on the Internet
- Insulate the user interface performance from any peaks in email volume
To configure one Barracuda Email Security Gateway as the Quarantine Host, from the BASIC > Quarantine page, enter that system's hostname in the Quarantine Host field.
Removing a Barracuda Email Security Gateway From a Cluster
- Log into the system to be removed and change or clear the Cluster Shared Secret on the ADVANCED > Clustering page. Click Save Changes. Changing the cluster shared secret prevents the systems in the cluster from communicating with one another.
- On the same system, delete all other systems from the Clustered Systems list.
- On any system that remains in the cluster, go to the ADVANCED > Clustering page. In the Clustered Systems list, delete the system to be removed from the cluster. This step is very important when removing a failed Barracuda Email Security Gateway from a cluster.
Centralized Policy Management With a Quarantine Host
You can optionally designate one Barracuda Email Security Gateway as the "host" of the cluster such that all administration of configuration settings and access to per-user quarantine for the cluster can only be accessed and set from that node. This option has two advantages: it provides for additional security by limiting access to administration of the cluster, and it protects the user interface from mail processing load since, with this configuration, you do not direct any email traffic to the host node.
To assign one Barracuda Email Security Gateway as the host of the cluster, enter the hostname of that device in the Quarantine Host field on the BASIC > Quarantine page and do not direct any email to that device.
Redundancy of user quarantine data on the cluster
Each user account has a primary and backup server in the cluster. Regardless of how many Barracuda Email Security Gateways there are in the cluster, there are always two appliances that have the same quarantine information (configuration and quarantine messages).
Data Not Synchronized Across the Cluster
Clustering provides 100% redundant coverage of the propagated data. However, for practical reasons, some data is not propagated to the other clustered systems when a new system joins. Energize updates do not synchronize across systems in a cluster. The following Barracuda Email Security Gateway configurations are considered unique and will not sync to match other Barracuda Email Security Gateways in a cluster:
- IP Address, Subnet Mask, and Default Gateway (on the BASIC > IP Configuration page)
- Primary DNS Server and Secondary DNS Server (on the BASIC > IP Configuration page)
- Serial number (this will never change)
- Hostname (on the BASIC > IP Configuration page)
- Any advanced IP configuration (Barracuda Email Security Gateway 600 and above, on the ADVANCED > Advanced Networking page)
- Administrator password
- Guest password
- Time Zone (on the BASIC > Administration page)
- Cluster hostname (on the ADVANCED > Clustering page)
- Cluster Shared Secret, though this must be the same for the cluster to work properly (on the ADVANCED > Clustering page)
- Local Host Map (on the ADVANCED > Clustering page)
- SMTP Welcome Banner (on the ADVANCED > Email Protocol page)
- SMTP Port (on the BASIC > Outbound page)
- Web Interface HTTP Port (on the BASIC > Administration page)
- Web Interface HTTPS/SSL port (on the ADVANCED > Secure Administration page)
- Any other secure administration configuration, including saved certificates (on the ADVANCED > Secure Administration page)
- Quarantine Host (on the BASIC > Quarantine page)
- All SSL/TLS information, including saved certificates (on the ADVANCED > Secure Administration page)
- Whether to only display local messages in the message log (Only view local messages on the BASIC > Message Log > Preferences page)
- Whether the latest release notes have been read
- All customized branding (Barracuda Email Security Gateway 600 and above, on the ADVANCED > Appearance page)