

Use the BASIC > Administration page to take care of administrative tasks such as changing your password; configuring email notifications, time settings, and interface settings; setting up LDAP authentication; and managing log settings for connected devices. This section also allows you to shut down or reboot your Barracuda Firewall Insights device.
Change Your Password
The default password is intended for initial access only. Use the Password Change section to change the password for the account currently in use.
Passwords should be 5 to 20 characters and can include letters, numbers, and special characters (including periods, hyphens, and underscores).
Configure Email Notifications
In the Email Notification section, specify how and where to deliver system alerts from Barracuda Firewall Insights.
- SMTP Host – Name of your SMTP host to use for sending notifications, not localhost.
- SMTP Port – Network port for your SMTP host.
- Connection Security – Select the type of security for your email system, TLS or None.
- Username – Login username for your email system, if required by your SMTP host.
- Password – Password corresponding to the username for your email system, if required by your SMTP host.
- System Alerts Email Address – Type one or more email addresses that receive automated alerts from Barracuda Firewall Insights, including system messages and notifications about available firmware updates. Separate multiple email addresses with a comma.
- From Email – Specify the address to use as the From address for system alert emails.
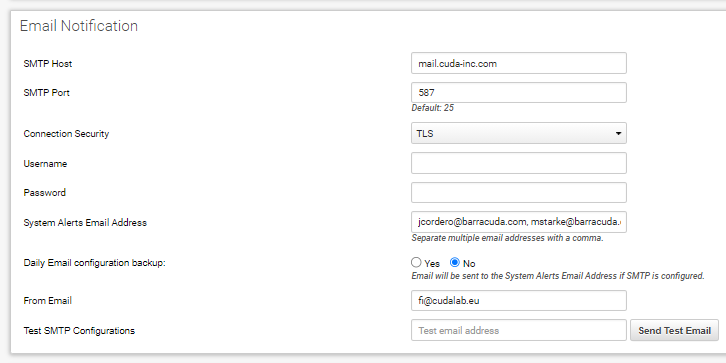
- Test SMTP Configurations – Type an email address to receive a test email. Click Send Test Email to ensure that the email system works.
Set the Time Zone
Use the Time section to change the time zone on your system.
Specify NTP Server Information
Add NTP (Network Time Protocol) information for clock synchronization with your Barracuda Firewall Insights in the NTP Server section.
- Enable NTP Sync – Select whether you want to enable automatic NTP synchronization with one or more servers you specify below.
- NTP Servers – Specify one or more servers to use for NTP synchronization, in order of precedence. Specify one server per line with hostname and/or IP address.
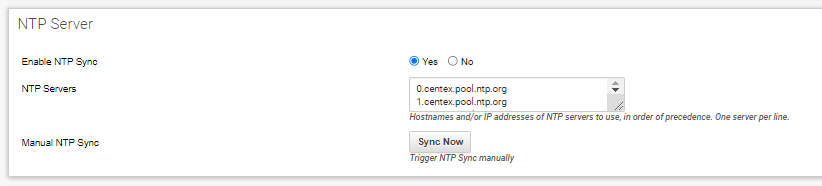
- Manual NTP Sync – Click to perform an immediate NTP synchronization. Servers used depend on your selection in the Enable NTP Sync field:
- If Yes – Synchronization performed using NTP servers you specified, in order of precedence.
If No – Synchronization performed using ntp.barracudacentral.com, regardless of whether you specified other NTP servers.
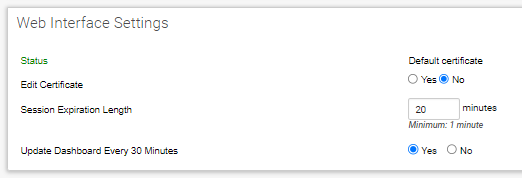
Configure Web Interface Settings
Specify the settings for the web interface of your Barracuda Firewall Insights.
Web Interface Certificate – Select either the Default certificate or a user-defined certificate.
If you select a user-defined certificate, you can choose between:Single Certificate in PEM FILE – Upload the certificate file using the Browse button. Click the Upload button after you select your certificate file.
All other PEM Certificates – Upload the certificate file and the certificate key file using the Browse button. Provide the certificate password and click Upload.
PKCS12 Token – Upload the signed certificate file using the Browse button. Provide the certificate password and click Upload.
- Session Expiration Length – Time of inactivity, in minutes, before users are required to log on again to access the web interface.
Minimum value: 1 minute. Default setting: 20 minutes. Update Dashboard Every 30 Minutes – Select Yes to automatically refresh the dashboard so you can see the most recent information.
If you select Yes, as long as you leave the dashboard up as the active screen, you will not be logged out of the dashboard, and it will continue to display updated information every 30 minutes. When you switch to a different tab, if the Session Expiration Length has passed, you will be logged out.
If you select No, the Session Expiration Length will apply to the Dashboard along with the rest of the tabs.
Viewing Connected Devices
Use the Connected Devices section to specify the shared secret for devices you want to connect, to view devices that are connected to Barracuda Firewall Insights, and to specify their log retention period.
Connected Devices
As part of your configuration process, you set up Barracuda Networks devices to point to Barracuda Firewall Insights. If they connect properly, the device connections will appear in this section. See Getting Started for information on how to connect devices.
Log Retention Period – Specify how long you want to retain logs for all connected devices: 1 month, 2 months, 3 months, 6 months, 9 months, or 12 months. One month is defined as 31 days.
- The Kafka Log Retention period relates to how long the log files received from a firewall are stored on Firewall Insights. For more information, see Understanding Data Retention and Storage Capacity.
Shared Secret – Enter the Shared Secret you will use for each device for which you want to collect reports. On every device you want to connect, enter this same shared secret.
The Connected Devices table provides the following information:
Device – To have a unique name, the device name must consist of hostname + domain name for the connected device.
- Serial – The unique identifier for each device.
IP Address – The address of the connected device.
Click Delete to delete the association of this device from Barracuda Firewall Insights. Clicking Delete here does the following:
- Removes all logs on Barracuda Firewall Insights that are associated with this device.
- Removes this device from lists of devices on Barracuda Firewall Insights.
To preserve the log data for this device, click Cancel, then back up the logs onto an external device.
Configure LDAP Authentication
Add an LDAP server and configure LDAP Settings for administrators to log in and manage Barracuda Firewall Insights. LDAP is also required for role-based user access to firewalls.
- Select Enable LDAP.
- In the LDAP Server field, enter domain name or IP address of the LDAP server.
- Enter the LDAP Server Port (default: port 389).
- Define the LDAP User Name Format (default:
memberof). - Specify the LDAP User Base DN from where the server should search for users.
Add your LDAP Certificate.
In the LDAP Group Attribute in User Data field, enter the name of the attribute field on the LDAP server that contains group information.
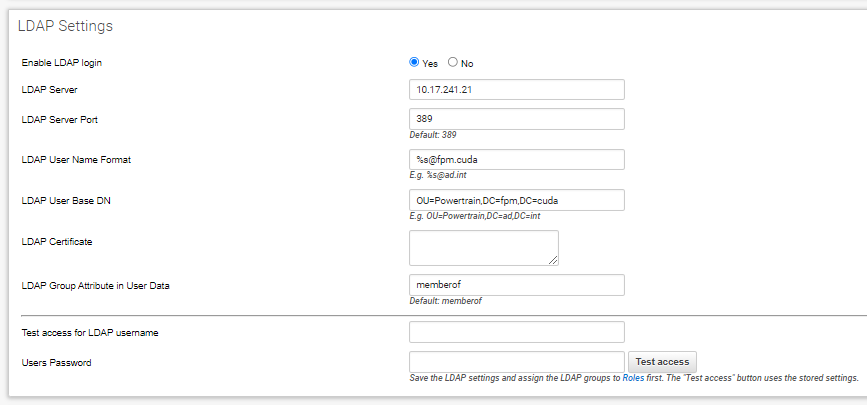
To test configured access for LDAP users, enter username and password in the fields below the configuration, and click Test access.
You can now configure role-based access for users and groups that should have admin- or read-only access to Barracuda Firewall Insights and connected devices. For information on how to configure role-based access, see Roles.
Shutting Down or Restarting the System
- Shutdown – Shuts down and powers off Barracuda Firewall Insights.
- Restart – Reboots Barracuda Firewall Insights.