

In this article:
Step 1 - Downloading the Certificate
Use the following steps to download the certificate from the Barracuda Load Balancer:
- Log into the Barracuda Load Balancer web interface, and go to the BASIC > Certificates page.
- In the Saved Certificates table, locate the certificate, and click Certificate in the Download column.
- In the Save Token page, enter a passphrase in the Encryption Password field, and click Save.
- The certificate is exported as a PKCS12 token which includes the private key.
Step 2 - Extracting the Private Key
This section describes how to extract the private key from the certificate using OpenSSL.
If the private key is encrypted, use the following steps to extract the private key from the PKCS12 token and decrypt the private key on either a Linux system or a Windows system.
- If you are using a Windows system, change the working directory so that you can run OpenSSL from the command line:
C:\OpenSSL-Win32\bin\> - Enter the following command to simultaneously extract and encrypt the private key:
openssl pkcs12 -nocerts -in certificate.pfx -out private_key_encrypted.pem - When prompted, enter the password you assigned when downloading the .pfx file from the Barracuda Load Balancer in point 3 in the section Step 1 - Downloading the Certificate.
- When prompted again, enter a password to encrypt the private key. This is necessary as the private key must be secured at all times, including when it is displayed onscreen.
- Enter the following command to decrypt the encrypted private key:
openssl rsa -in private_key_encrypted.pem -out private_key_decrypted.pem - When prompted, enter the password you created in point 4 of this section.
Step 3 - Getting the Intermediate and Root Certificates
You can download the intermediate and root certificates of most certificate authorities (CAs) using Microsoft® Internet Explorer®. However, you may need to follow the support link on the CA site to obtain the correct intermediate and root certificates.
- On the system where you downloaded the certificate, double-click the downloaded certificate, for example, mycertificate.cer, and click the Certificate Path tab.
- Double-click each CA in the issuer hierarchy, and note the details including the name of the issuer and the certificate expiry date. These details are helpful in identifying the intermediate and root certificates in the steps that follow.
- Open Internet Explorer, and go to Tools > Internet Options > Content > Certificates.
- Click the Intermediate Certification Authorities tab, and select the relevant certificate.
- Click Export. Follow the instructions in the Wizard, exporting the certificate as Base-64 encoded X.509 (.CER), and saving the export with the appropriate name.
- In the Certificates page, click the Trusted Root Certification Authorities tab, and select the root certificate.
- Click Export. Follow the instructions in the Wizard, exporting the certificate as a Base-64 encoded X.509 (.CER), and saving the export with an appropriate name.
- Because Internet Explorer adds trailing line breaks to files, open each exported file in a basic editing program such as WordPad or Notepad++ (do not use Notepad), and remove any trailing line breaks.
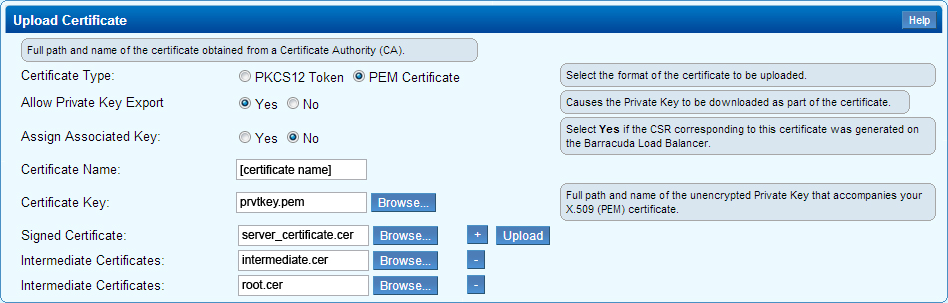
Step 4 - Uploading the Certificate
Use the following steps to upload the certificate chain in the correct order, using the screenshot for reference:
- In the Barracuda Load Balancer web interface, go to the BASIC > Certificates page.
- In the Upload Certificate section, select the Certificate Type as PEM Certificate.
Select Yes for Allow Private Key Export, and set Assign Associated Key to No.
- In the Certificate Name field, enter a recognizable name for the certificate.
- In the Certificate Key field, click Browse, and navigate to and select the Private Key.
- In the Signed Certificate field, click Browse, and navigate to and select the Server Certificate.
- In the intermediate Certificates field, click Browse, and navigate to and select the Intermediate Certificate.
- Click the plus ( + ) symbol following the Intermediate Certificates field.
- In the new intermediate Certificates field, click Browse, and navigate to and select the Root Certificate.
The uploaded certificate displays in the Upload Certificates section of the Saved Certificates table.