

This article applies to Barracuda Load Balancer running firmware version 4.2.2 or higher, and VMware® View™ version 5.1 or higher. VMware View was formerly known as VMware Virtual Desktop Infrastructure (VDI).
This article assumes you have installed the Barracuda Load Balancer, have an activated subscription, and that your virtual systems are installed and configured.
By the time you are ready to deploy in production, you will need to update your DNS server with an entry that links the fully qualified domain name (FQDN) of the VMware service with the corresponding VIP address on the Barracuda Load Balancer.
If you have both internal and external clients accessing the VMware service through the Barracuda Load Balancer, you may configure two different VIP addresses and two services, one to direct the traffic to VMware View Security Servers, and the other that directs traffic to the VMware View Connection Servers.
This article describes how to deploy the Barracuda Load Balancer in a VMware View environment.
Follow the steps in this article to configure your Barracuda Load Balancer to direct traffic to your VMware View servers. Session-based persistence of View client connections is facilitated by inspecting the JSESSIONID cookie.
You can configure SSL offloading to reduce the load on your VMware servers. Follow the steps according to whether you want the Barracuda Load Balancer to perform SSL offloading or not.
In this article:
References
VMware View 5.1 Documentation http://pubs.vmware.com/view-51/index.jsp
If you do not want the Barracuda Load Balancer to perform SSL offloading, follow these steps:
Step 1. Import the Certificate to the View Connection Server
If you have not already installed the signed certificate on your View Connection Servers, follow these steps to install the signed certificate on every server:
- Install the certificate on the View Connection Server.
- Set the Friendly Name to vdm for the installed certificate.
- On the View Connection Server, right-click My Computer, and go to Manage > Service and Applications > Services
- Select View Connection Server Service, and click Start to restart the Service. Wait for a few minutes for the View Connection Server to start listening.
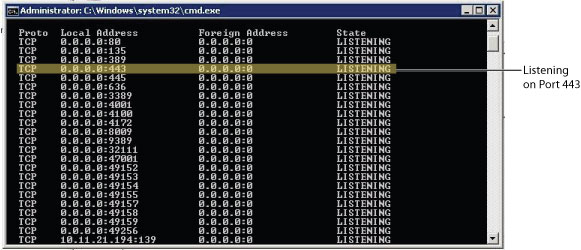
- On the View Connection Server, in the command window, type netstat -anp TCP and check the output to see if the View Connection Server is listening on port 443 for the View Connection Service.
Reference: http://pubs.vmware.com/view-51/topic/com.vmware.view.installation.doc/GUID-80CC770D-327E-4A21-B382-786621B23C44.html in the VMware View 5.1 Documentation Center.
Step 2. Install the Certificate on the Barracuda Load Balancer
Make a copy of the signed certificate and install it on the Barracuda Load Balancer:
- Log in to the Barracuda Load Balancer web interface, and go to the BASIC > Certificates page.
- Upload the certificate.
Step 3. Set Up the View Service on the Barracuda Load Balancer
Use the following steps to create the View Service over SSL/HTTPS:
- Go to the BASIC > Services page.
- Click Add New Service, and create a Layer 7 - HTTPS Service:
- The VIP address must be the address configured for the FQDN in the DNS record.
From the SSL Certificate menu, select the certificate that you just installed for this Service. Click Add Service.
- In the Services Configuration table, click the Edit (
 ) icon in the Actions column to edit the new Service.
- In the Persistence section, select HTTP Cookie as the Persistence Type, and specify the Cookie Name as JSESSIONID.
- In the Advanced Options section, set the Session Timeout to 0, and click Save Changes at the top of the page.
- Add each View Connection Server that provides the Service:
- In the Services Configuration table, click the Server link in the Add column. The Add Real Server page displays.
- Enter the View Connection Server details, and click Add . The server displays below the Service in the Services Configuration table.
- Click the Edit ( ) icon in the Actions column for the View Connection Server.
- In the Real Server Detail page, in the SSL section, set Enable HTTPS/SSL to Yes.
- If the Certificate for the Service is not a CA signed certificate, set Validate Certificate to No, otherwise set this value to Yes.
- In the Services Configuration table, click the Server link in the Add column. The Add Real Server page displays.
Step 4. Set Up the View Connection Server (Not for SSL offloading)
Configure the View Connection Server for HTTPS/SSL:
- Log into the View Administrator Console, expand View Configuration, and click Servers.
- In the right pane, click the Connection Servers tab; all configured View Connection Servers display in the table below.
- Edit each server that is going to be part of the pool:
- Select the VDI Connection Server, and click Edit.... The Edit View Connection Server Settings dialog box displays.
- In the HTTP(S) Secure Tunnel section, select the Use Secure Tunnel connection to desktop check box
- In the External URL field, edit the URL to specify the FQDN of the VDI Service in the form https://<FQDN>:443
- In the PCoIP Secure Gateway section, clear the Use PCoIP Secure Gateway for PCoIP connections to desktop check box:
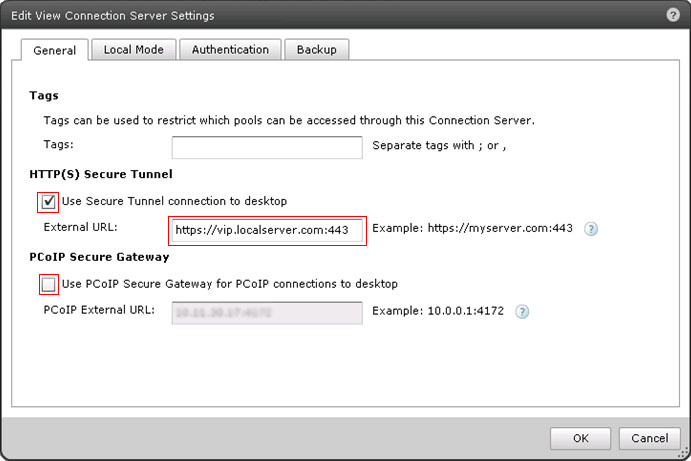
- Click OK to save your changes.
You should be able to access the VMware View Connection service through the VIP address. If not, refer to Troubleshooting.
To configure the View Service with SSL offloading on the Barracuda Load Balancer, follow these steps:
Step 1. Install the Signed Certificate on the Barracuda Load Balancer
Make a copy of the signed certificate and install it on the Barracuda Load Balancer:
- Log in to the Barracuda Load Balancer web interface, and go to the BASIC > Certificates page.
- Upload the certificate.
Step 2. Create the Service on the Barracuda Load Balancer
Use the following steps to create the View Service over SSL/HTTPS:
- Go to the BASIC > Services page.
- Click Add New Service, and create a Layer 7 - HTTPS Service:
- The VIP address must be the address configured for the FQDN in the DNS record.
From the SSL Certificate menu, select the certificate that you just installed for this Service. Click Add Service.
- In the Services Configuration table, click the Edit () icon in the Actions column to edit the new Service.
- In the Persistence section, select HTTP Cookie as the Persistence Type, and specify the Cookie Name as JSESSIONID.
- In the Advanced Options section, set the Session Timeout to 0, and click Save Changes at the top of the page.
- Add each View Connection Server that provides the Service:
- In the Services Configuration table, click the Server link in the Add column.
The Add Real Server page displays. - Enter the View Connection Server details. Set the Port to 80, or whatever the HTTP listening port is on the VMware View Connection Server and click Add .
The server displays below the Service in the Services Configuration table. - Click the Edit ( ) icon in the Actions column for the View Connection Server.
- In the Real Server Detail page, in the SSL section, set Enable HTTPS/SSL to No .
- Click Save Changes to save your settings and close the window.
- In the Services Configuration table, click the Server link in the Add column.
Step 3. Configure Each View Connection Server for HTTP Traffic
Configure each VMware View Connection Server to receive HTTP traffic instead of HTTPS:
- Log into the View Connection Server, and locate or create the locked.properties file, located in the SSL gateway configuration folder on the View Connection Server or Security Server host. For example, install_directory\VMware\VMware View\Server\sslgateway\conf\locked.properties
- To configure the View Server's protocol, add the serverProtocol property to the file and set the property to http (you must enter http in lowercase).
- Optional. You can add properties to configure a non-default HTTP listening port and a network interface on the View Server. To do so,
- To change the HTTP listening port from 80, set serverPortNonSSL to another port number to which the intermediate device is configured to connect.
- If the View Server has more than one network interface and you want it to listen for HTTP connections on only one interface, set serverHost to the IP address of that network interface.
- On the Barracuda Load Balancer, make sure the Service you created in the last step has this port value.
- Save the locked.properties file.
- Restart the View Connection Server Service or Security Server Service. Your changes take effect once the Service is restarted.
Step 4. Log into View Administrator Console
Update the VMware View Connection Server settings:
- Log into the View Administrator Console, expand View Configuration, and click Servers.
- In the right pane, click the Connection Servers tab; all configured View Connection Servers display.
- Edit each VMware View Connection Server :
- Select the server and click Edit. The Edit View Connection Server Settings dialog box displays.
- In the HTTP(S) Secure Tunnel section, turn Off Use Secure Tunnel connection to desktop.
- In the PCoIP Secure Gateway section, turn Off Use PCoIP Secure Gateway for PCoIP connections to desktop .
- Click OK to save your changes.
Reference: Allow HTTP Connections to Intermediate Servers http://pubs.vmware.com/view-51/index.jsp?topic=%2Fcom.vmware.view.administration.doc%2FGUID-690C7F60-FA7F-4C35-B9A6-22F271AF1DD2.html
You should be able to access the VMware View Connection service through the VIP address. If not, refer to Troubleshooting.
Troubleshooting
Why am I getting a Server Certificate warning?
The installed certificate is not from a Certification Authority. You can ignore the warning.
Why am I getting a warning/error for server authentication and unable to launch the snapshot?
The certificate on the Barracuda Load Balancer and the View Connection Server do not match. You should have installed a copy of the certificate from the View Connection Server onto the Barracuda Load Balancer.
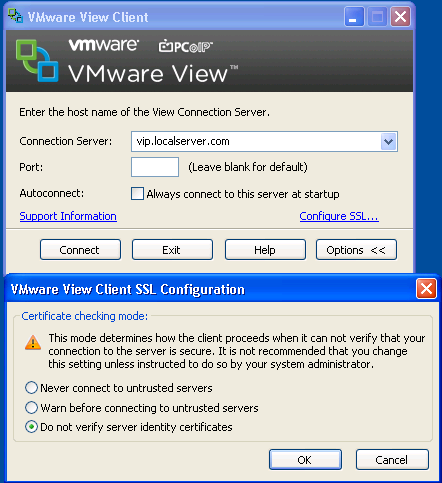
As a workaround, on the VMware View Client:
- Go to Options -> Configure SSL.
- Select Do not verify server identity certificates and click OK.
Why am I getting a Server Authentication failed error, even though the same certificate is installed on the Barracuda Load Balancer and the View Connection Servers?
The CN parameter of the installed certificate should match the FQDN of the service.
Why am I getting an error as Invalid Certificate received from server?
The issuing authority for the certificate installed for the service is not present under Trusted Root Certification Authorities on the client device. Install the same certificate under LOCAL Computer > Trusted Root Certification Authorities for the client device.
Why I am getting a user not authenticated failure even though the username and password provided are correct?
You did not enable persistence for the VMware View service on the Barracuda Load Balancer.
How do I restart a View Connection Server Service?
- On the View Connection Server, right-click My Computer, and go to Manage > Service and Applications > Services.
- Select View Connection Server Service, and click Start to restart the Service. Wait for a few minutes for the View Connection Server to start listening.
How to Create a Self-Signed Certificate
Optional. If you do not have a signed certificate, you can use the following steps to create a self-signed certificate.
- Log into the Barracuda Load Balancer web interface, go to the BASIC > Certificates page, and in the Certificate Generation section, click Create Certificate
- Enter the Certificate Name, for example, VMware View
- Enter the Organization Info details:
In the Common Name field, enter the fully qualified domain name (FQDN) which resolves to the VIP address for the VMware View Service. For example, viewvip.localserver.com
- Enter the Country Code, State or Province, Locality, Organization (Company) Name, Organization (Departmental) Unit for your organization.
- From the Key Size menu, select 2048
- Set Expires In to the number of days the generated certificate is to be valid.
- Set Allow Private Key Export to Yes.
- Click Generate Certificate at the top of the section. The certificate is added to the Saved Certificates table in the Created Certificates section.
In the Download column, click Certificate; the Save Token page displays. Enter a password in the Encryption Password field.
- Click Save. The certificate, including the private key, is exported as a PKCS12 token in a file named <certificate name>.pfx.
- Click Close Window to return to the Certificates page.