

Before completing a one-armed configuration, verify you have completed all of the steps in Microsoft Exchange Server 2010 Deployment.
If you plan to use a two-armed configuration, refer to How to Deploy Exchange 2010 in a Two-Armed Configuration.
In a one-armed configuration, the ports to be used by internal Outlook® clients when communicating with the Exchange 2010 server using RPC must be pre-configured on both Exchange 2010 and the Barracuda Load Balancer.
If your organization wishes to use a single VIP address and single FQDN for your Exchange deployment, you must use a one-armed configuration.
Step 1. Configure Exchange 2010 to use a Static Port
By default, the Exchange 2010 RPC client dynamically selects a port between 1024 and 65535. To allow for a one-armed deployment, configure Exchange to use a static port instead.
On each CAS server, complete the following:
1a. Configure the static port in the registry. Open the Registry Editor by typing regedit in the Start menu. Add a DWORD (32-bit) value named TCP/IP Port under HKEY_LOCL_MACHINE\SYSTEM\CurrentControlSet\Services\MSExchangeRpc\ParametersSystem
You may need to create the ParametersSystem key prior to adding the DWORD registry value. In this case, when prompted, change the Base to Decimal and set the value data to 65500 (or a port of your choice between 1024 and 65535):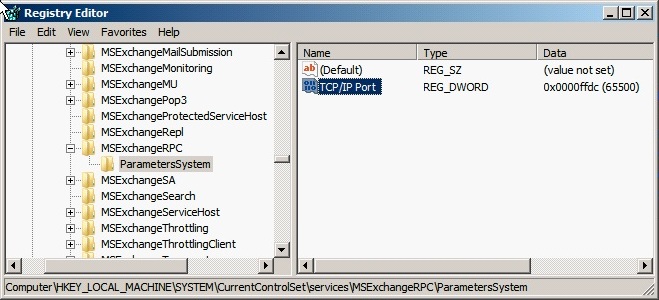
If you have Public Folders in your deployment, you must also repeat this step on each server with the mailbox role installed that hosts a Public Folder.
1b. Change the port that clients use to connect for directory access. On each CAS server, complete the following:
- If you are running Microsoft Exchange 2010 RTM (including RTM Rollup 1 - 4), follow these instructions:
- In Windows Explorer, navigate to the Microsoft.exchange.addressbook.service.exe.config file. This file is located in the \Bin folder in the root directory of your Exchange 2010 install.
- Open this file using Notepad.
- Change the default value of 0 on line 13 to 65501 (or a port of your choice within the prior specified range) so it appears as follows, including the quotations:
<add key="RpcTcpPort" value="65501" />
- If you are running Microsoft Exchange 2010 SP1, follow these instructions:
- Configure the static port in the registry. To do this, open the Registry Editor by typing regedit in the Start menu.
- Add a String value (REG_SZ) with Value name RpcTcpPort under
HKEY_LOCL_MACHINE\SYSTEM\CurrentControlSet\services\MSExchangeAB\Parameters
You may need to create the Parameters key prior to adding the REG_SZ registry value. In this case, change the value data to 65501 (or a port of your choice between 1024 and 65535):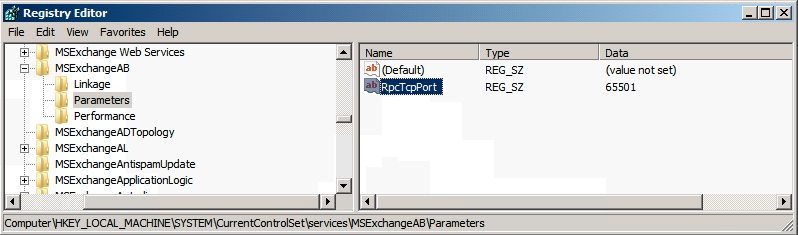
1c. Restart the Microsoft Exchange Address Book and the Microsoft Exchange RPC Client Access services on all CAS and Mailbox servers that you modified.
1d. To test that your Client Access servers are using ports 65500 and 65501, open a Windows command prompt and run netstat –na
1e. In the output, look for TCP entries marked as LISTENING with the ports 65500 and 65501. You will see an entry marked as LISTENING for 0.0.0.0:65500 and 0.0.0.0:65501.
Step 2. Configure CAS Services on the Barracuda Load Balancer
On each active Barracuda Load Balancer that handles traffic for CAS Services, complete the following steps to configure CAS Services for Exchange 2010:
2a. Log into the Barracuda Load Balancer, and go to the BASIC > Services page.
2b. Add each Service listed in Table 1 and Table 2 by following these steps. Use the Basic View. In the Add New Service pane, if you are in the Advanced View, select Switch to Basic View.
- Enter the Service Name.
- Enter the Virtual IP Address specified in the table.
- Select the protocol, and enter the Port for the Service from the table.
- Enter the Real Servers IP addresses for each server in the CAS array.
Table 1. Required Services.
| Service Name | Virtual IP Address | Protocol | Service Type | Service Port | Real Server Port | Monitor Port |
|---|---|---|---|---|---|---|
| MAPI / DCOM | VIP address for FQDN that resolves to CAS array | TCP | TCP Proxy | 135 | 135 | 65500 |
| MAPI / RPC Client Access | VIP address for FQDN that resolves to CAS array | TCP | TCP Proxy | 65500 | 65500 | 65500 |
MAPI / Global Address Book | VIP address for FQDN that resolves to CAS array | TCP | TCP Proxy | 65501 | 65501 | 65501 |
| Exchange Services HTTPS | VIP address for FQDN that clients use to access CAS array | TCP | Layer 7 - HTTPS | 443 | 80* | 80* |
| Exchange Web Services HTTP Redirect | VIP address for FQDN that clients use to access CAS array e.g. exchange.domain.local | TCP | Layer 7 - HTTP | 80 | N/A* | N/A |
| *Note: If your deployment requires end-to-end encryption of Exchange traffic, the Real Server and Monitor Port for the Exchange Services HTTPS service is 443, not 80. | ||||||
Table 2. Optional Services.
| Service Name | Virtual IP Address | Protocol | Service Type | Service Port | Real Server Port | Monitor Port |
|---|---|---|---|---|---|---|
| IMAP4 (optional) | VIP address for FQDN that resolves to CAS array | TCP | TCP Proxy | 143 | 143 | 143 |
| IMAP4 SSL (optional) | VIP address for FQDN that resolves to CAS array | TCP | TCP Proxy | 993 | 993 | 993 |
| POP3 (optional) | VIP address for FQDN that resolves to CAS array | TCP | TCP Proxy | 110 | 110 | 110 |
| POP3 SSL (optional) | VIP address for FQDN that resolves to CAS array | TCP | TCP Proxy | 996 | 996 | 996 |
2c. Once all of the Services are created, edit each Service as specified:
- On the BASIC > Services page, click the Edit icon for the Service you wish to edit.
- In the Service Detail page, for each service in the following table, edit the settings and save your changes:
| Service Name | Service Detail Page Settings |
|---|---|
| Exchange Web Services (Port 443) |
|
| Exchange Web Services HTTP Redirect | In the General section, set Service Type to Layer 7 - HTTP. Set Enable HTTP Redirect to Yes. |
IMAP4 (Port 143) IMAP4 / SSL (Port 993) POP3 (Port 110) POP3 SSL (Port 996) | In the General section, set Service Type to TCP Proxy. Persistence is not required for these Services as they are transactional based. |
MAPI / RPC Client Access (Port 65500) MAPI / DCOM (Port 135) MAPI / Global Address Book (Port 65501) |
|
2d. Use the following steps to change the port and Server Testing Method for every Real Server associated with the Exchange Web Services Service:
- On the BASIC > Services page, for each Real Server associated with the Exchange Web Services Service, click the Edit icon; the Real Server Detail page displays.
- In the Real Server Detail section, set Port to 80.
- In the Server Monitor section:
- Set the Testing Method to Simple HTTP
- Set the Port to 80
- Change the Test Target to
/owa/auth/logon.aspx
If you have modified the path of logon.aspx from the Exchange 2010 default, use the modified path in the Test Target. - Change Test Match to
2006 Microsoft Corporation - Change Additional Headers to
User-Agent: Barracuda Load Balancer Server Monitor - Set the Status Code to 200 and set the Test Delay to 30
2e. Create two content rules for the Exchange Web Services Service to maintain persistence for Outlook Web Access and the Exchange Control Panel.
On the BASIC > Services page, click Rule in the Add column of the Exchange Web Services Service. On the Add Rule page, configure the rule.
- Use the following table to add the rule for Outlook Web Access:
| Rule Parameter Name | Rule Setting |
|---|---|
| Rule Name | OWA |
| Host Match | * |
| URL Match | /owa/* |
| Persistence Type | HTTP Cookie |
| Cookie Name | sessionid |
| Persistence Time (Seconds) | 1200 |
- Click Save Changes.
Use the following table to add the rule for the Exchange Control Panel. On the BASIC > Services page, click Rule in the Add column of the Exchange Web Services Service. On the Add Rule page, configure the rule.
| Rule Parameter Name | Rule Setting |
|---|---|
| Rule Name | ECP |
| Host Match | * |
| URL Match | /ecp/* |
| Persistence Type | HTTP Cookie |
| Cookie Name | sessionid |
| Persistence Time (Seconds) | 1200 |
- Click Save Changes.
For Outlook Anywhere, use the following table to add the rule for the Offline Address Book:
| Rule Parameter Name | Rule Setting |
|---|---|
| Rule Name | OAB |
| Host Match | * |
| URL Match | /oab/* |
| Persistence Type | HTTP Cookie |
| Cookie Name | sessionid |
| Persistence Time (Seconds) | 1200 |

2f. If Real Servers are segregated and secure in your network, we recommend not enabling back-end SSL for each Real Server thereby avoiding additional processing load. But if you require end-to-end encryption of Exchange Web Services data, direct the Barracuda Load Balancer to re-encrypt traffic before sending it to the Real Server:
- On the BASIC > Services page, for each Real Server associated with the Exchange Web Services Service, click the Real Server Edit icon; the Real Server Detail page displays.
- In the Real Server Detail section, set Port to 443.
In the SSL section, set Enable HTTPS/SSL to Yes.
Traffic is now encrypted using the same key uploaded and created from your Exchange CAS array. If this setting is enabled, Exchange Web Services will no longer need to accept unencrypted sessions on port 80. This increases processing load on both the Barracuda Load Balancer and all CAS Array members.
Step 3. Configure Hub Transport Services on the Barracuda Load Balancer
On each active Barracuda Load Balancer that handles traffic for Hub Transport Services, complete the following steps to configure Hub Transport Services for Exchange 2010.
3a. Log into the Barracuda Load Balancer, and go to the BASIC > Services page.
3b. Using the following table, add the SMTP Service and, optionally, the SMTP / SSL Service. To add a Service (use the Basic View. These instructions assume you do not Switch to Advanced View):
- In the Service Name box, enter the name for the Service.
- Enter the Virtual IP Address specified in the table.
- Select the protocol and enter the Port for the Service in the table.
In the Real Servers box, if your Real Servers are consolidated with both the CAS and HUB roles installed, enter the IP address for each Service you create. If the Hub Transport role is installed on separate servers from the CAS role, enter the IP addresses of only the servers with the Hub role installed. The created Services load balance the SMTP traffic to the Hub transport servers for incoming client SMTP connections.
| Service Name | Virtual IP Address | Protocol | Service Type | Service Port | Real Server Port | Monitor Port |
|---|---|---|---|---|---|---|
| SMTP | VIP address for FQDN that resolves to CAS array | TCP | TCP Proxy | 25 | 25 | 25 |
| SMTP / SSL (optional) | VIP address for FQDN that resolves to CAS array | TCP | TCP Proxy | 587 | 587 | 587 |
3c. To change the Service type for the SMTP and SMTP / SSL Services to TCP Proxy:
- On the BASIC > Services page, click the Edit icon for the Service.
- In the Service Detail page, in the General section, set the value of Service Type to TCP Proxy.
- Save your changes.
Step 4. Configure a Rewrite Rule
Use the following steps to configure a rewrite rule to add '/OWA' to the end of the URL:
4a. Log into the Barracuda Load Balancer, and go to the WEBSITES > URL Rewrites page.
4b. In the Layer 7 - HTTP Services section, select the newly created service.
4c. In the HTTP Request Rewrite section, create a new rule, for example OWA:
- In the Rule Order field, enter 3
- For the Action, select Redirect URL.
- Leave the Header Name field blank
- In the Old Value field, enter /
- In the Rewrite Value field, enter a slash (/) and the rule name, for example /OWA
- In the Rewrite Condition field, enter *
4d. Click Add.
Your installation is complete. Continue to How to Test the Microsoft Exchange Server 2010 Deployment Configuration.